Sophia AI - Administrator Guide
CloudOverview
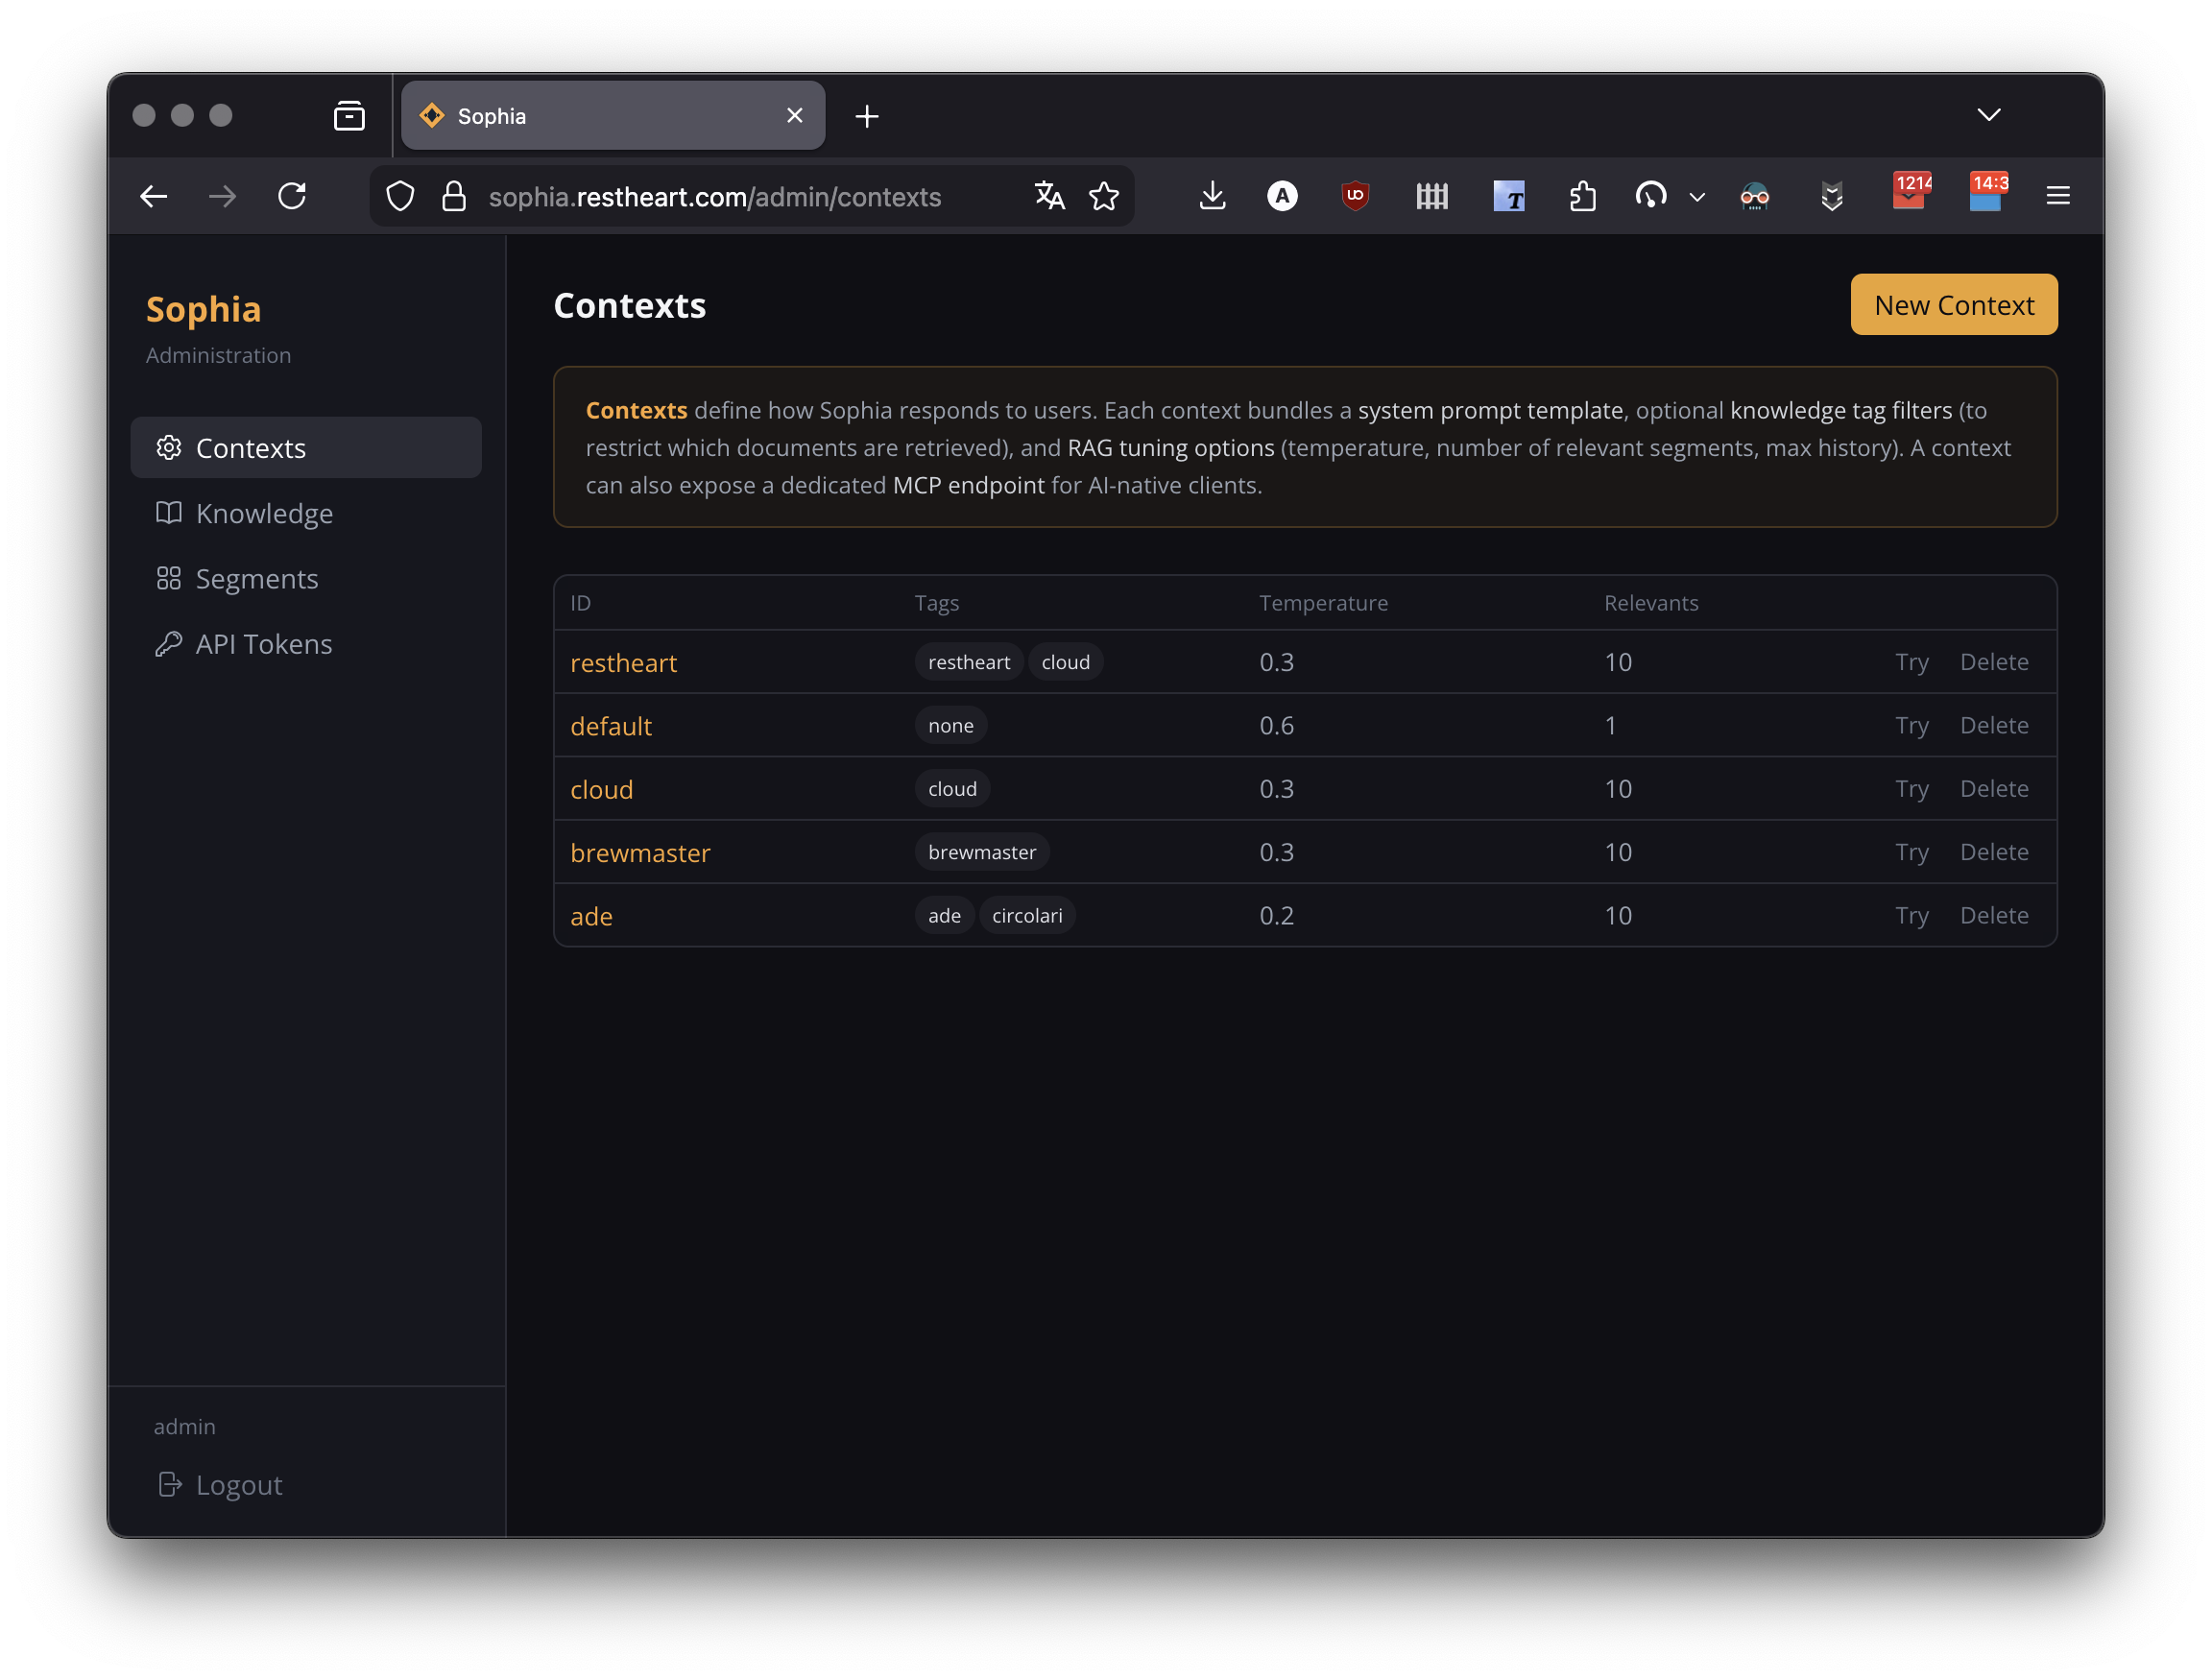
This guide covers the Sophia Admin Panel — the web-based interface where you manage agents, knowledge bases, text segments, users, API tokens, chat sessions, costs, errors, and models. Access the admin panel at /admin after logging in with an administrator account.
Logging In
Navigate to /login and enter your credentials. Sophia uses cookie-based authentication: a successful login sets an HttpOnly rh_auth cookie and redirects you to the admin panel.
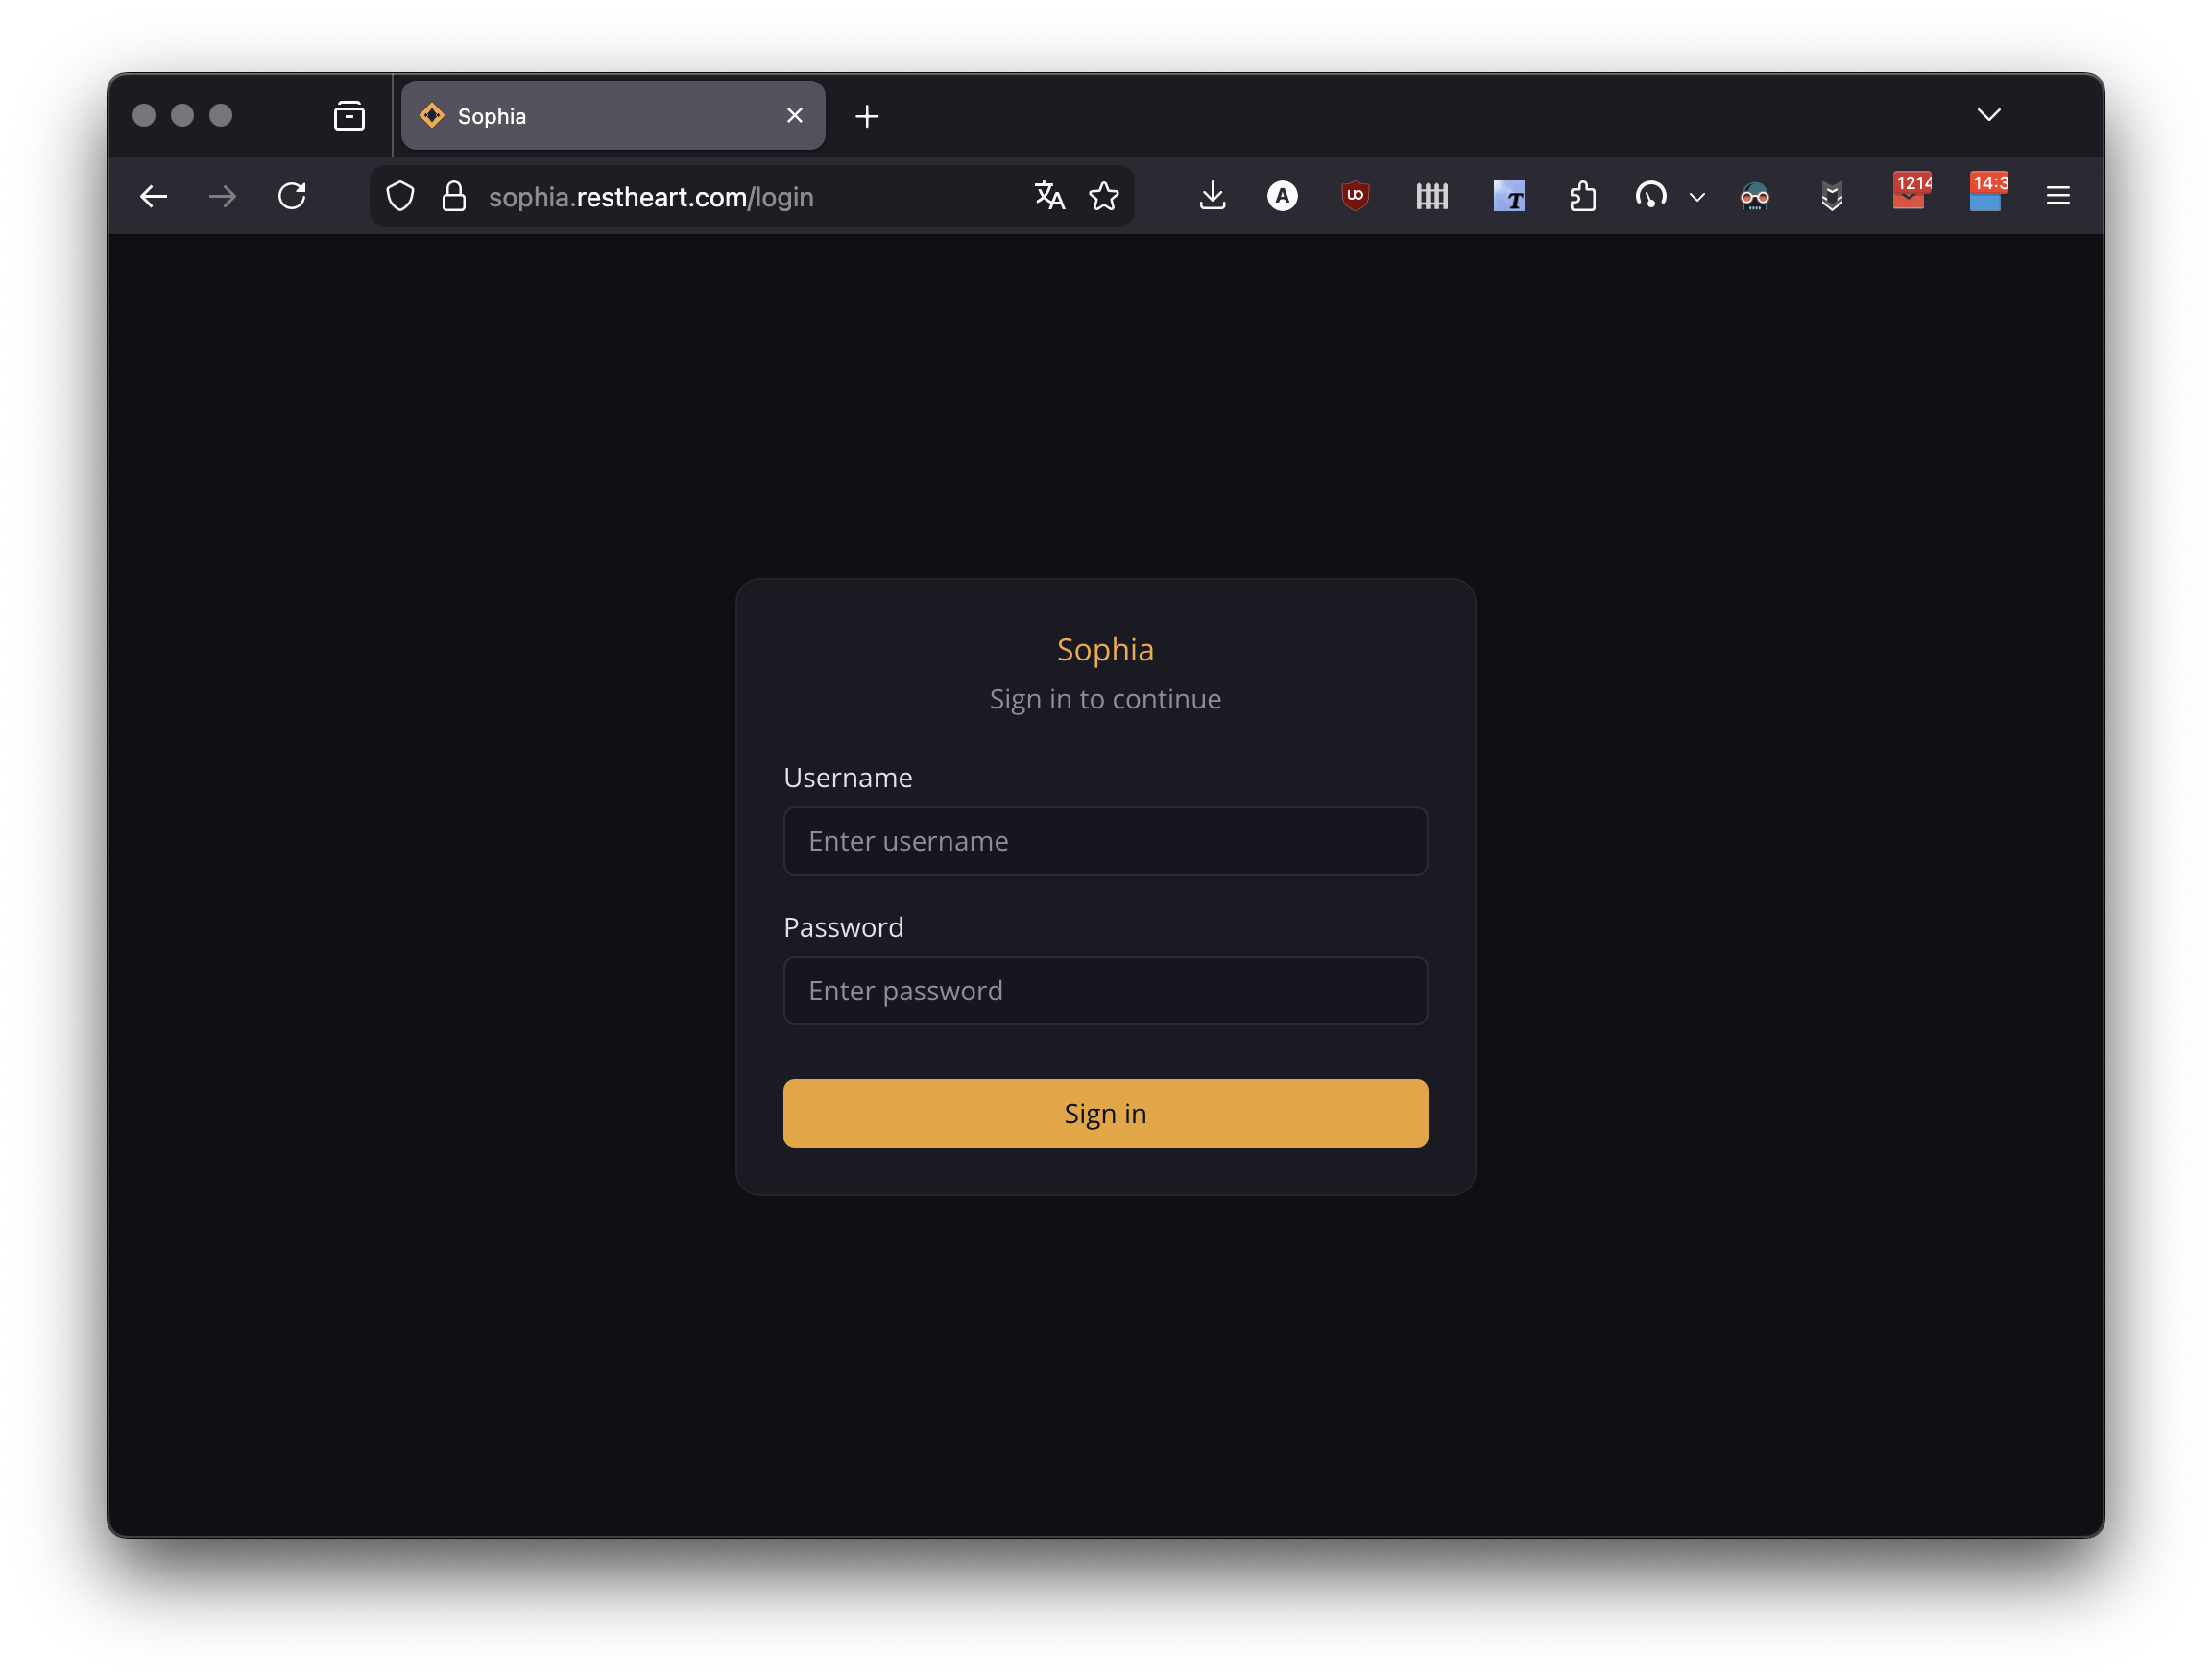
Non-admin users are redirected to the chat interface; administrators are redirected to the admin panel.
Legal Acceptance Modal
On the first login (and after any major-version bump of the Terms of Service or Privacy Policy) Sophia displays a blocking modal asking the user to accept three things:
-
The current Terms of Service (link to the external document on restheart.com)
-
The current Privacy Policy (link to the external document on restheart.com)
-
The clauses listed in §13.5 of the Terms that, under Italian law (art. 1341 c.c.), require separate written approval
The modal cannot be dismissed without accepting or logging out — any Mongo request issued before acceptance is intercepted server-side and returns 403 AcceptanceRequired. The acceptance record (version, URL, timestamp, IP address) is persisted on the user document under consents; see Legal Documents and Consents below.
Agent Management
A Agent defines the full behaviour of Sophia for a given knowledge domain: the system prompt template, tag filters, RAG and LLM options, agentic mode settings, collaborative artifacts, hint questions, deck view, and the MCP server description shown to AI clients.
Navigate to Admin > Agents to manage agents.

Creating an Agent
Click New Agent and provide a unique ID (e.g. support, product-docs). The ID is used in the web URL path (/{agentId}) and in the MCP endpoint URL (/mcp/{agentId}/).
Agent Fields
| Field | Required | Description |
|---|---|---|
|
Yes |
Agent name. Used in URLs and MCP paths. |
|
Yes |
System prompt. Must contain |
|
No |
Custom welcome message shown when a user opens the chat. |
|
No |
List of suggested questions shown as clickable chips at session start. |
|
No |
Tags ANDed into every vector search — restricts the knowledge base to matching documents. |
|
No |
If |
|
No |
LLM, RAG, agentic and rendering parameters (see below). |
|
No |
Description shown to AI clients in the MCP |
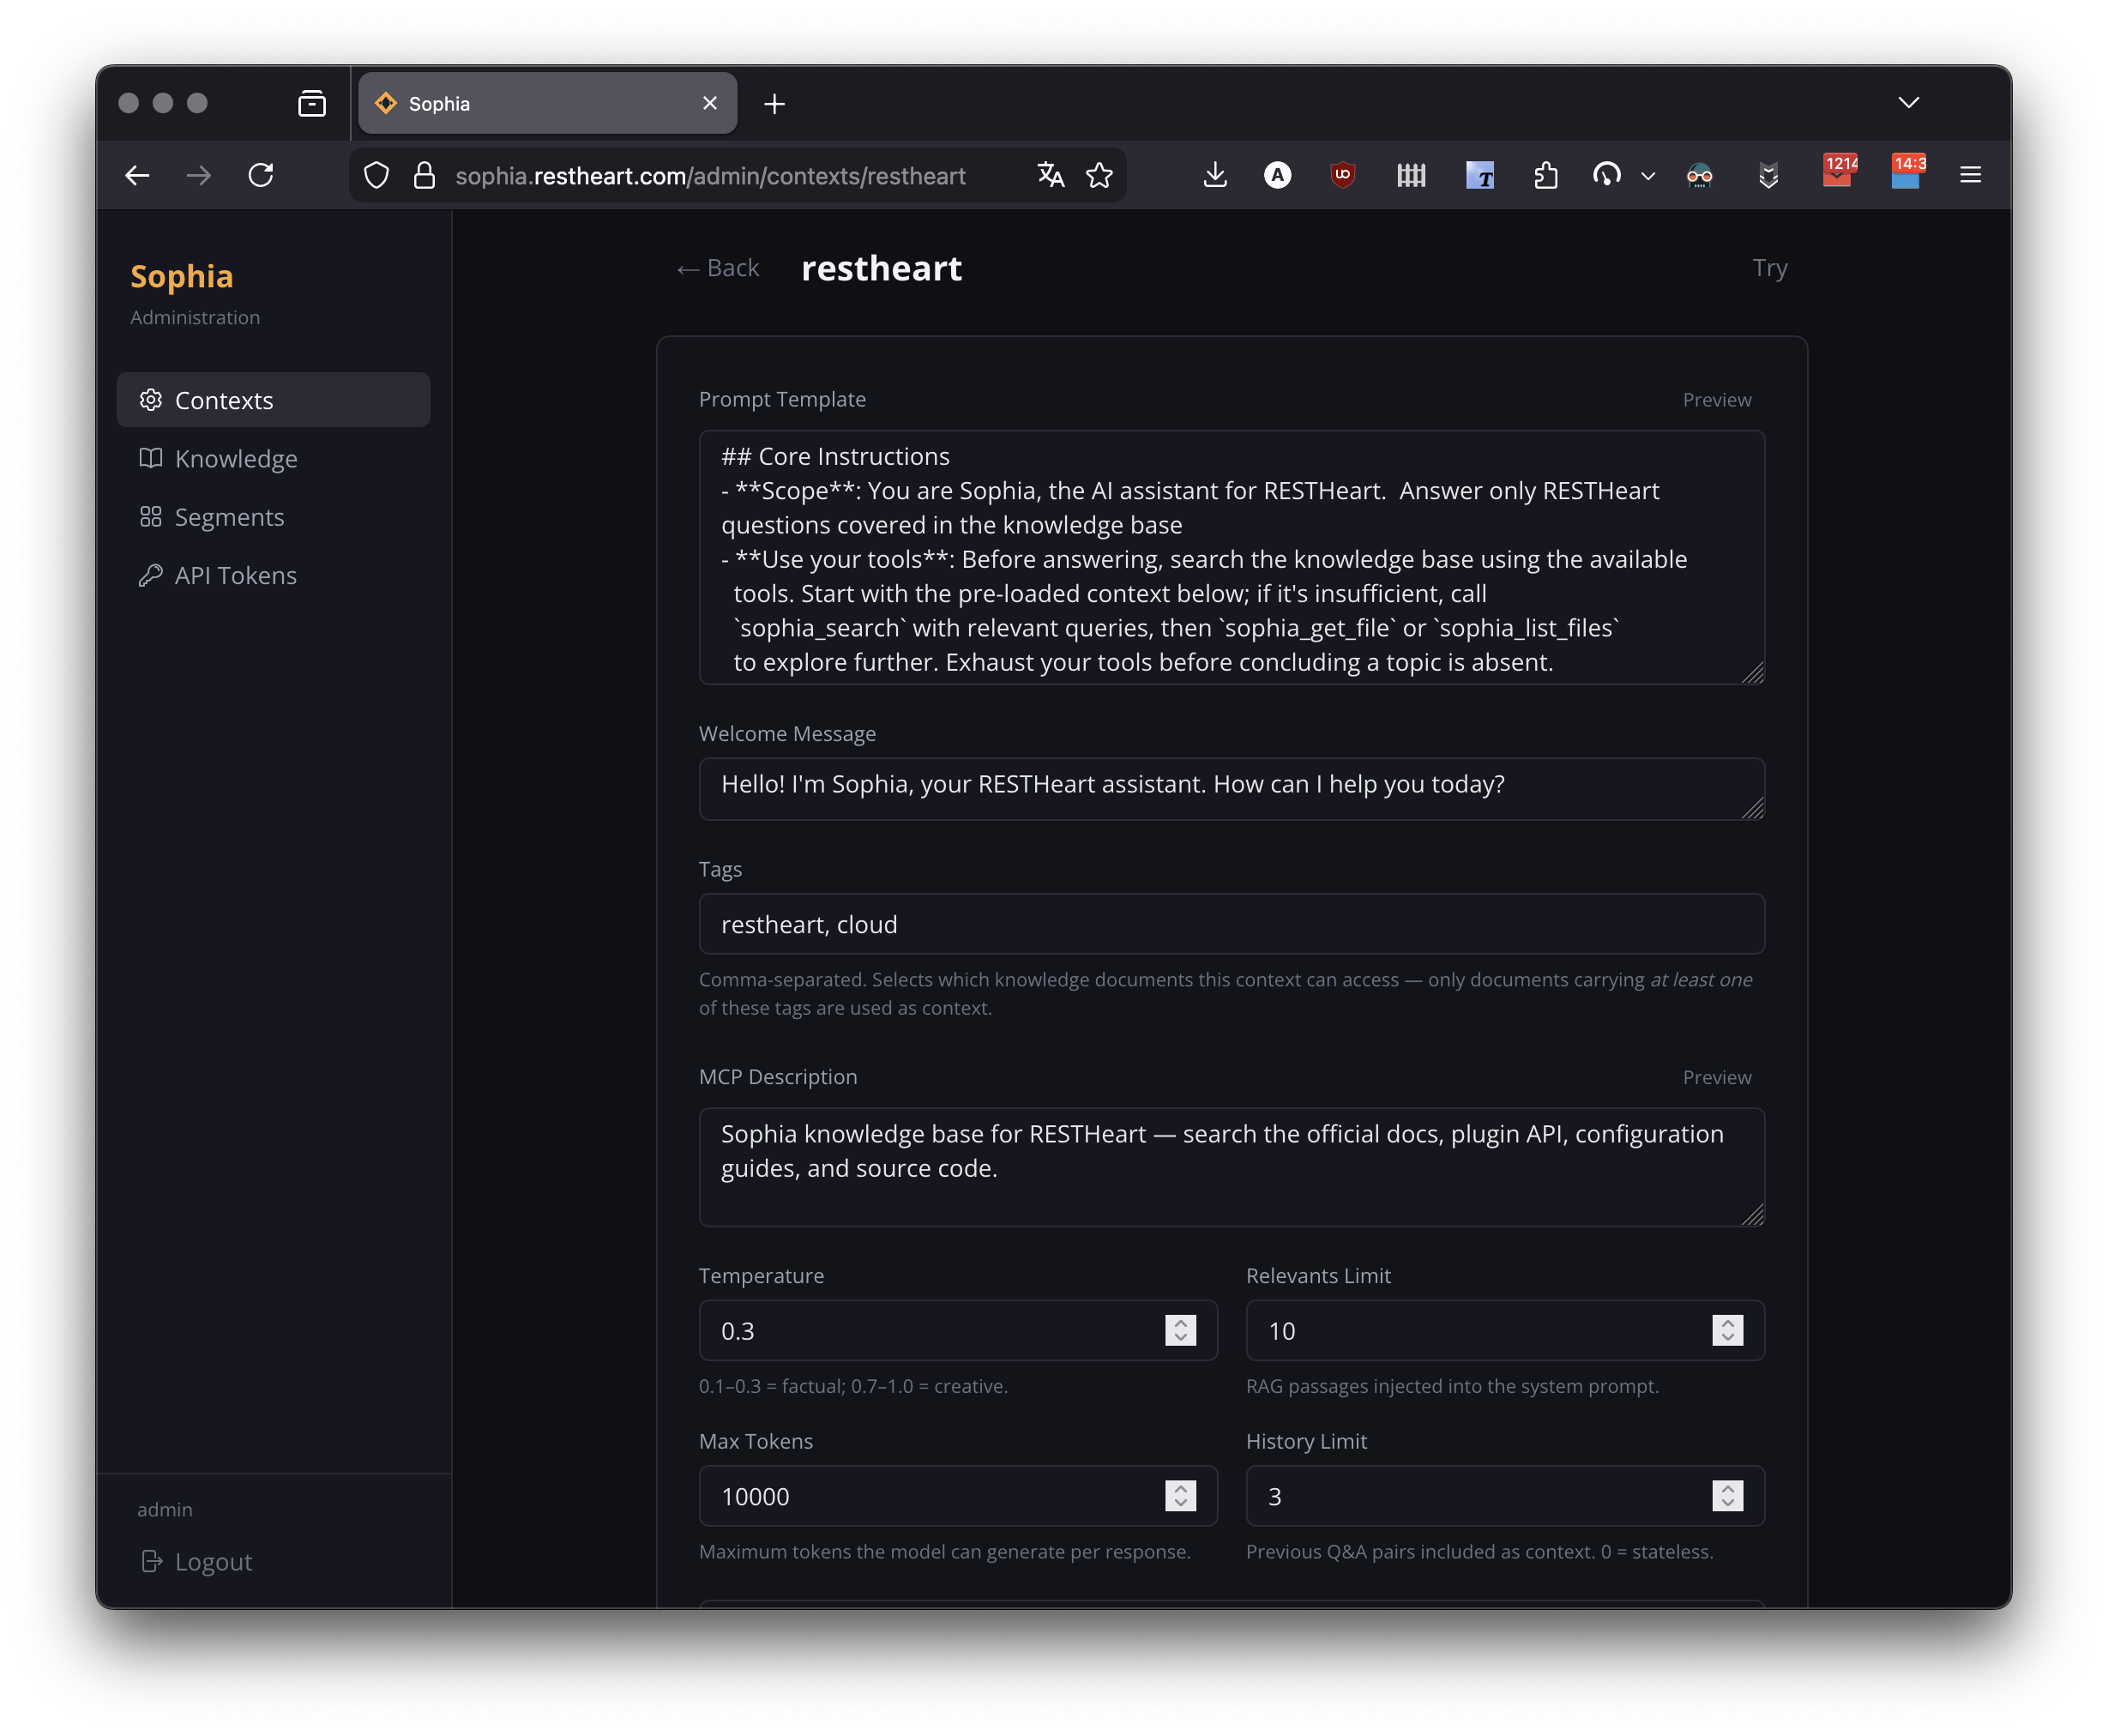
Template Placeholders
The system prompt template is interpolated at query time. Use the placeholder that matches your operating mode:
-
<documents-placeholder>— replaced with RAG segments relevant to the user’s question (linear and agentic modes) -
<history-placeholder>— replaced with recent conversation turns. Ignored when Agentic Context Management is enabled. -
<userprompt>— replaced with the user’s current question
The template editor provides a live markdown preview. The editor also displays a cached prefix size and a cost-per-interaction estimate based on the chosen model.
Hint Questions
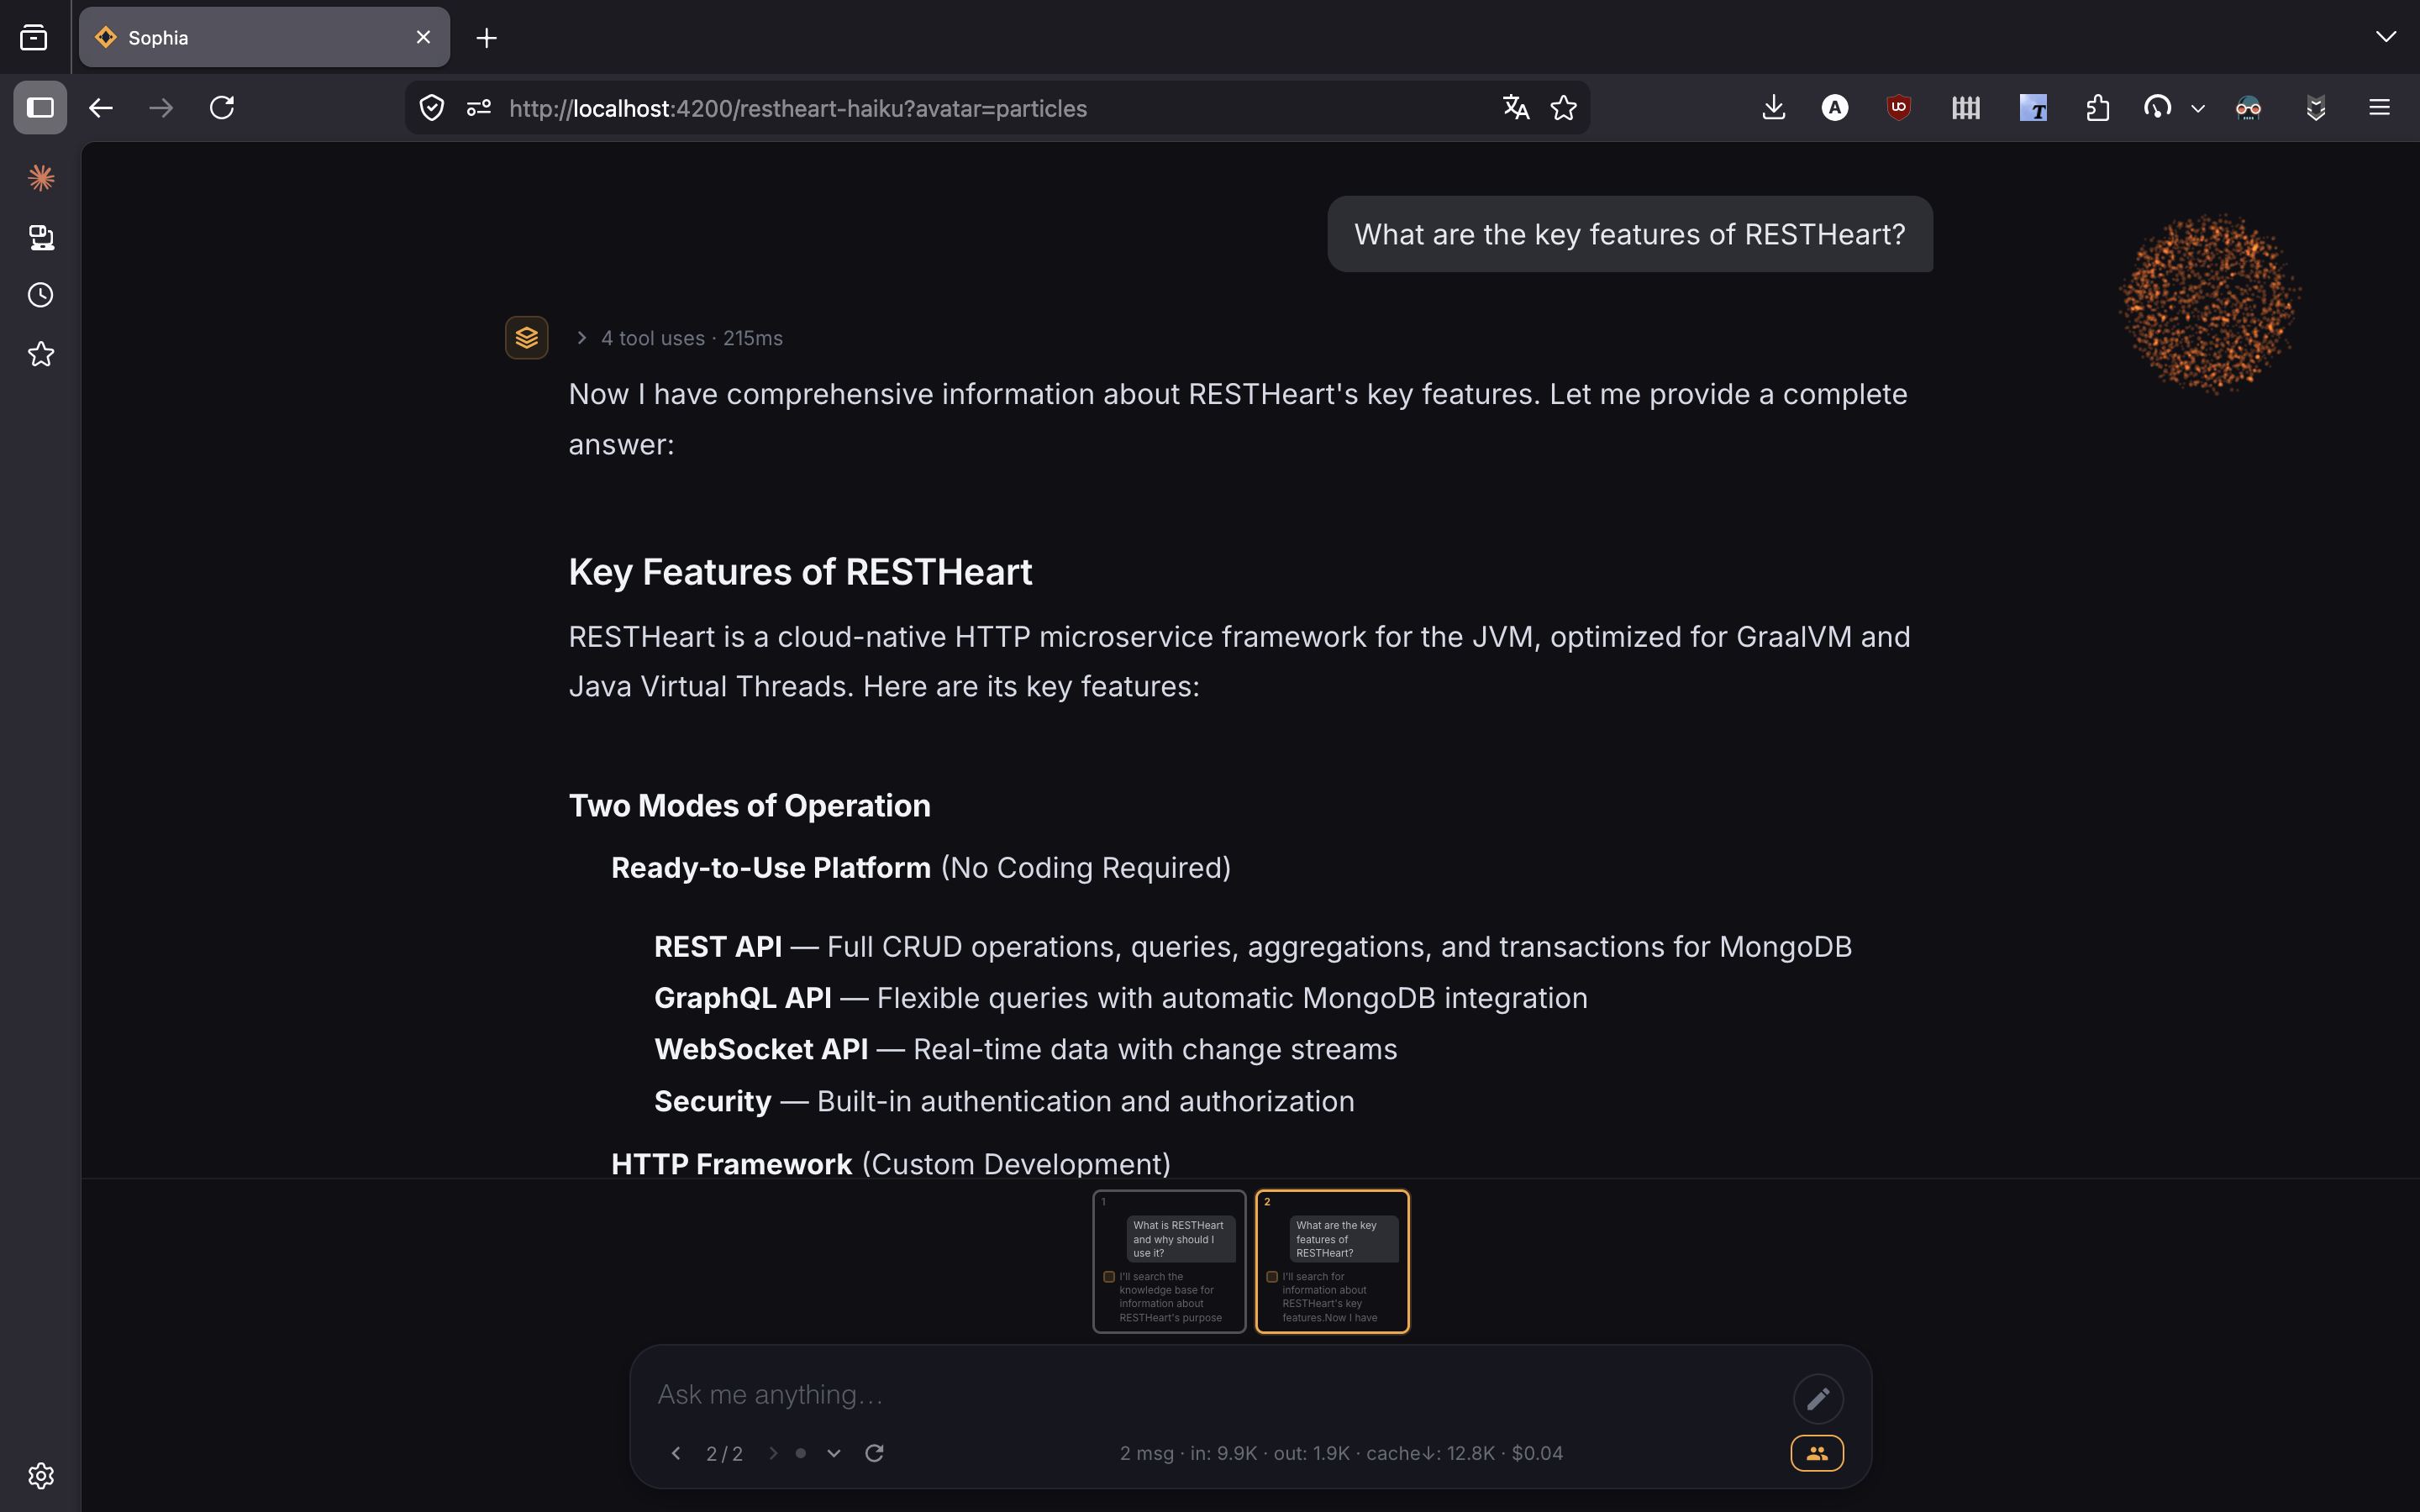
Provide a newline-separated list of suggested questions. They appear as clickable chips at the start of a new chat session — clicking one sends it as the first prompt. Useful for guiding new users to common entry points.
Tag Filters
Tags are the primary mechanism for knowledge segregation. The agent’s tags are ANDed with every vector search: only documents carrying all of the agent’s tags are retrieved.
-
An agent with
tags: ["restheart"]can only access documents taggedrestheart -
An agent with
tags: ["internal", "hr"]can only access documents tagged with both -
This is a mandatory filter — users cannot bypass it
LLM & RAG Options
| Option | Type | Default | Description |
|---|---|---|---|
|
number |
|
LLM sampling temperature (0–1). Lower values produce more deterministic responses. |
|
number |
|
Maximum tokens in the LLM response. |
|
number |
|
Top-k sampling parameter. |
|
number |
|
Top-p (nucleus) sampling parameter. |
|
number |
|
Vector search candidates considered before ranking. |
|
number |
|
Number of relevant text segments injected into the prompt. |
|
number |
|
Recent conversation turns included as context. Ignored when Agentic Context Management is on. |
|
number |
|
Maximum length of user input. |
|
string |
server default |
Bedrock inference profile id. Pick from the Models table — leave blank to use the server default. |
The agent editor exposes these fields directly. The right-hand side shows a model picker with origin (EU/US), pricing per million input/output tokens, and a tool-use score that highlights models suited for agentic workflows.
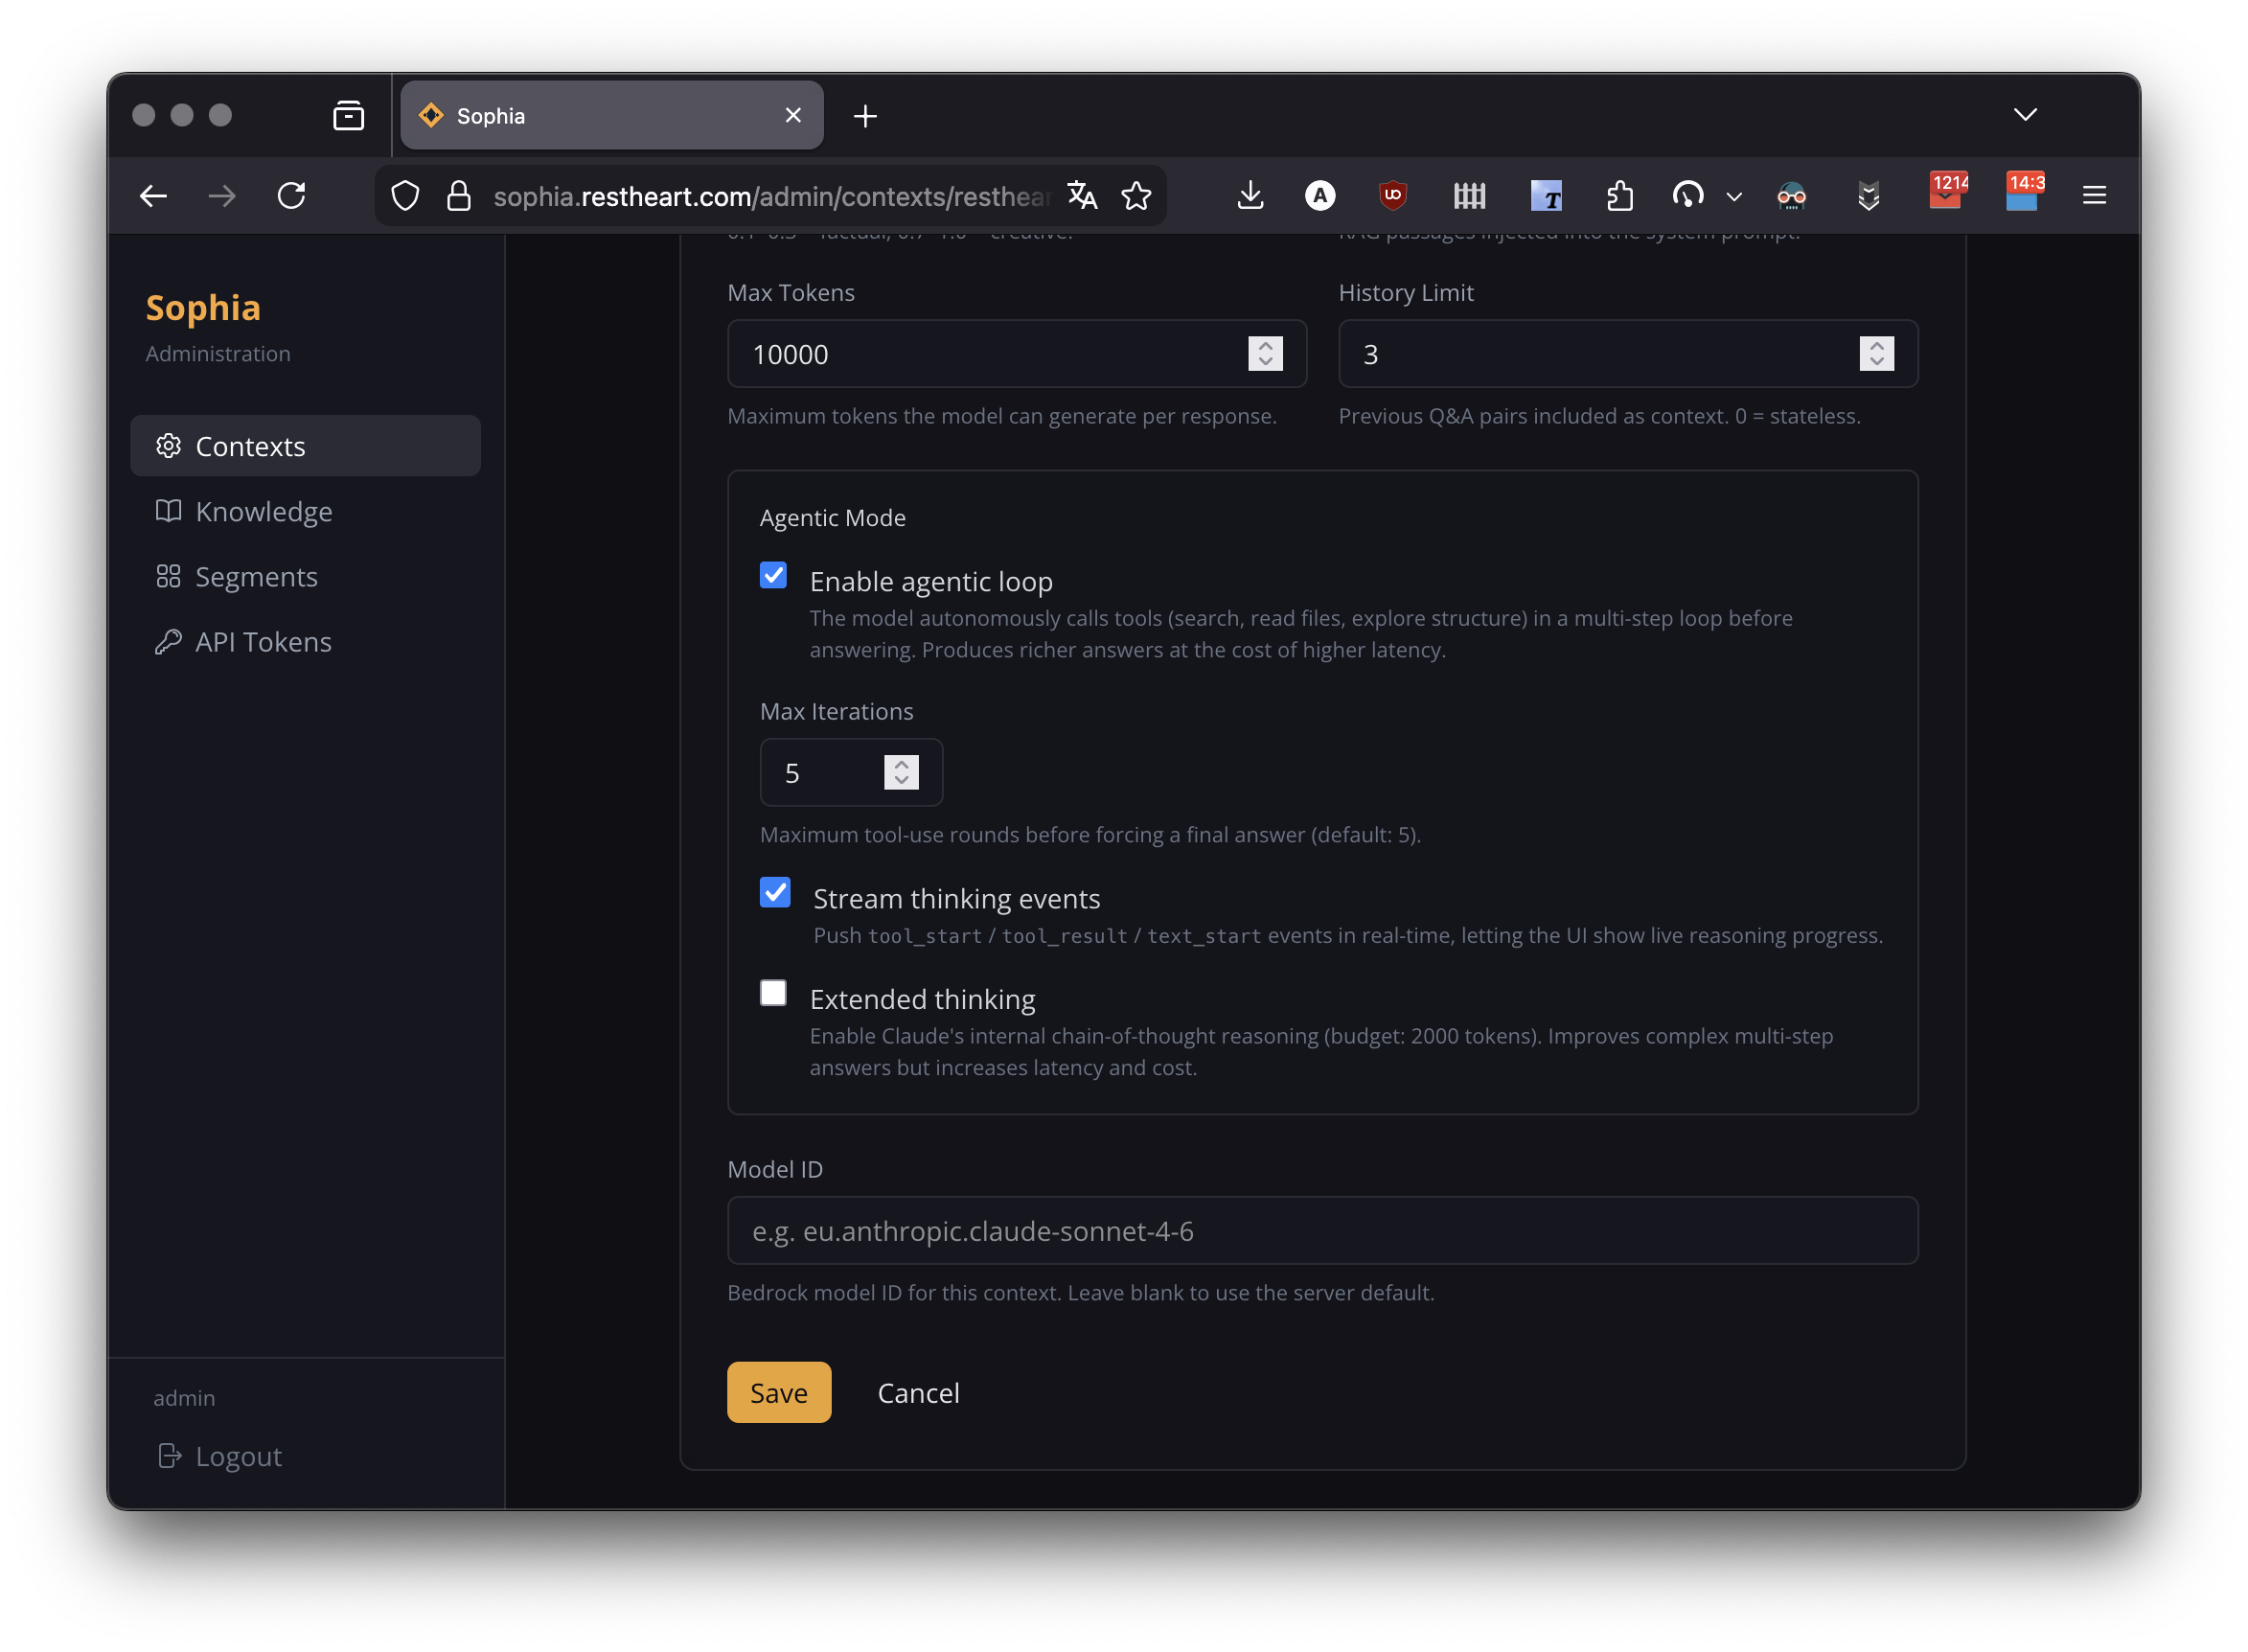
Agentic Mode
Enable Agentic Mode on an agent to let Sophia operate as an autonomous agent: it iteratively calls tools (search, file retrieval, list-paths, list-tags) before composing a final answer.
| Option | Type | Default | Description |
|---|---|---|---|
|
boolean |
|
Enable the autonomous tool-use loop. |
|
number |
|
Maximum tool-use rounds (1–20). Higher values cost more and take longer. |
|
boolean |
|
Stream |
|
boolean |
|
Enable Claude’s internal chain-of-thought reasoning. Only effective on Claude models. |
|
boolean |
|
Make |
|
boolean |
|
Run a deterministic search + read on the top result before the model loop, injected as iteration 0 — typically reduces total iterations from 3–4 to 1. |
|
boolean |
|
Replace classic history with a persistent context document keyed by |
When a user asks a question in an agent with Agentic Mode, Sophia:
-
Optionally runs the Search & Fetch Preamble (synthetic iteration 0)
-
Calls tools, inspects results, decides next step
-
Repeats up to
maxAgentIterations -
Composes the final response
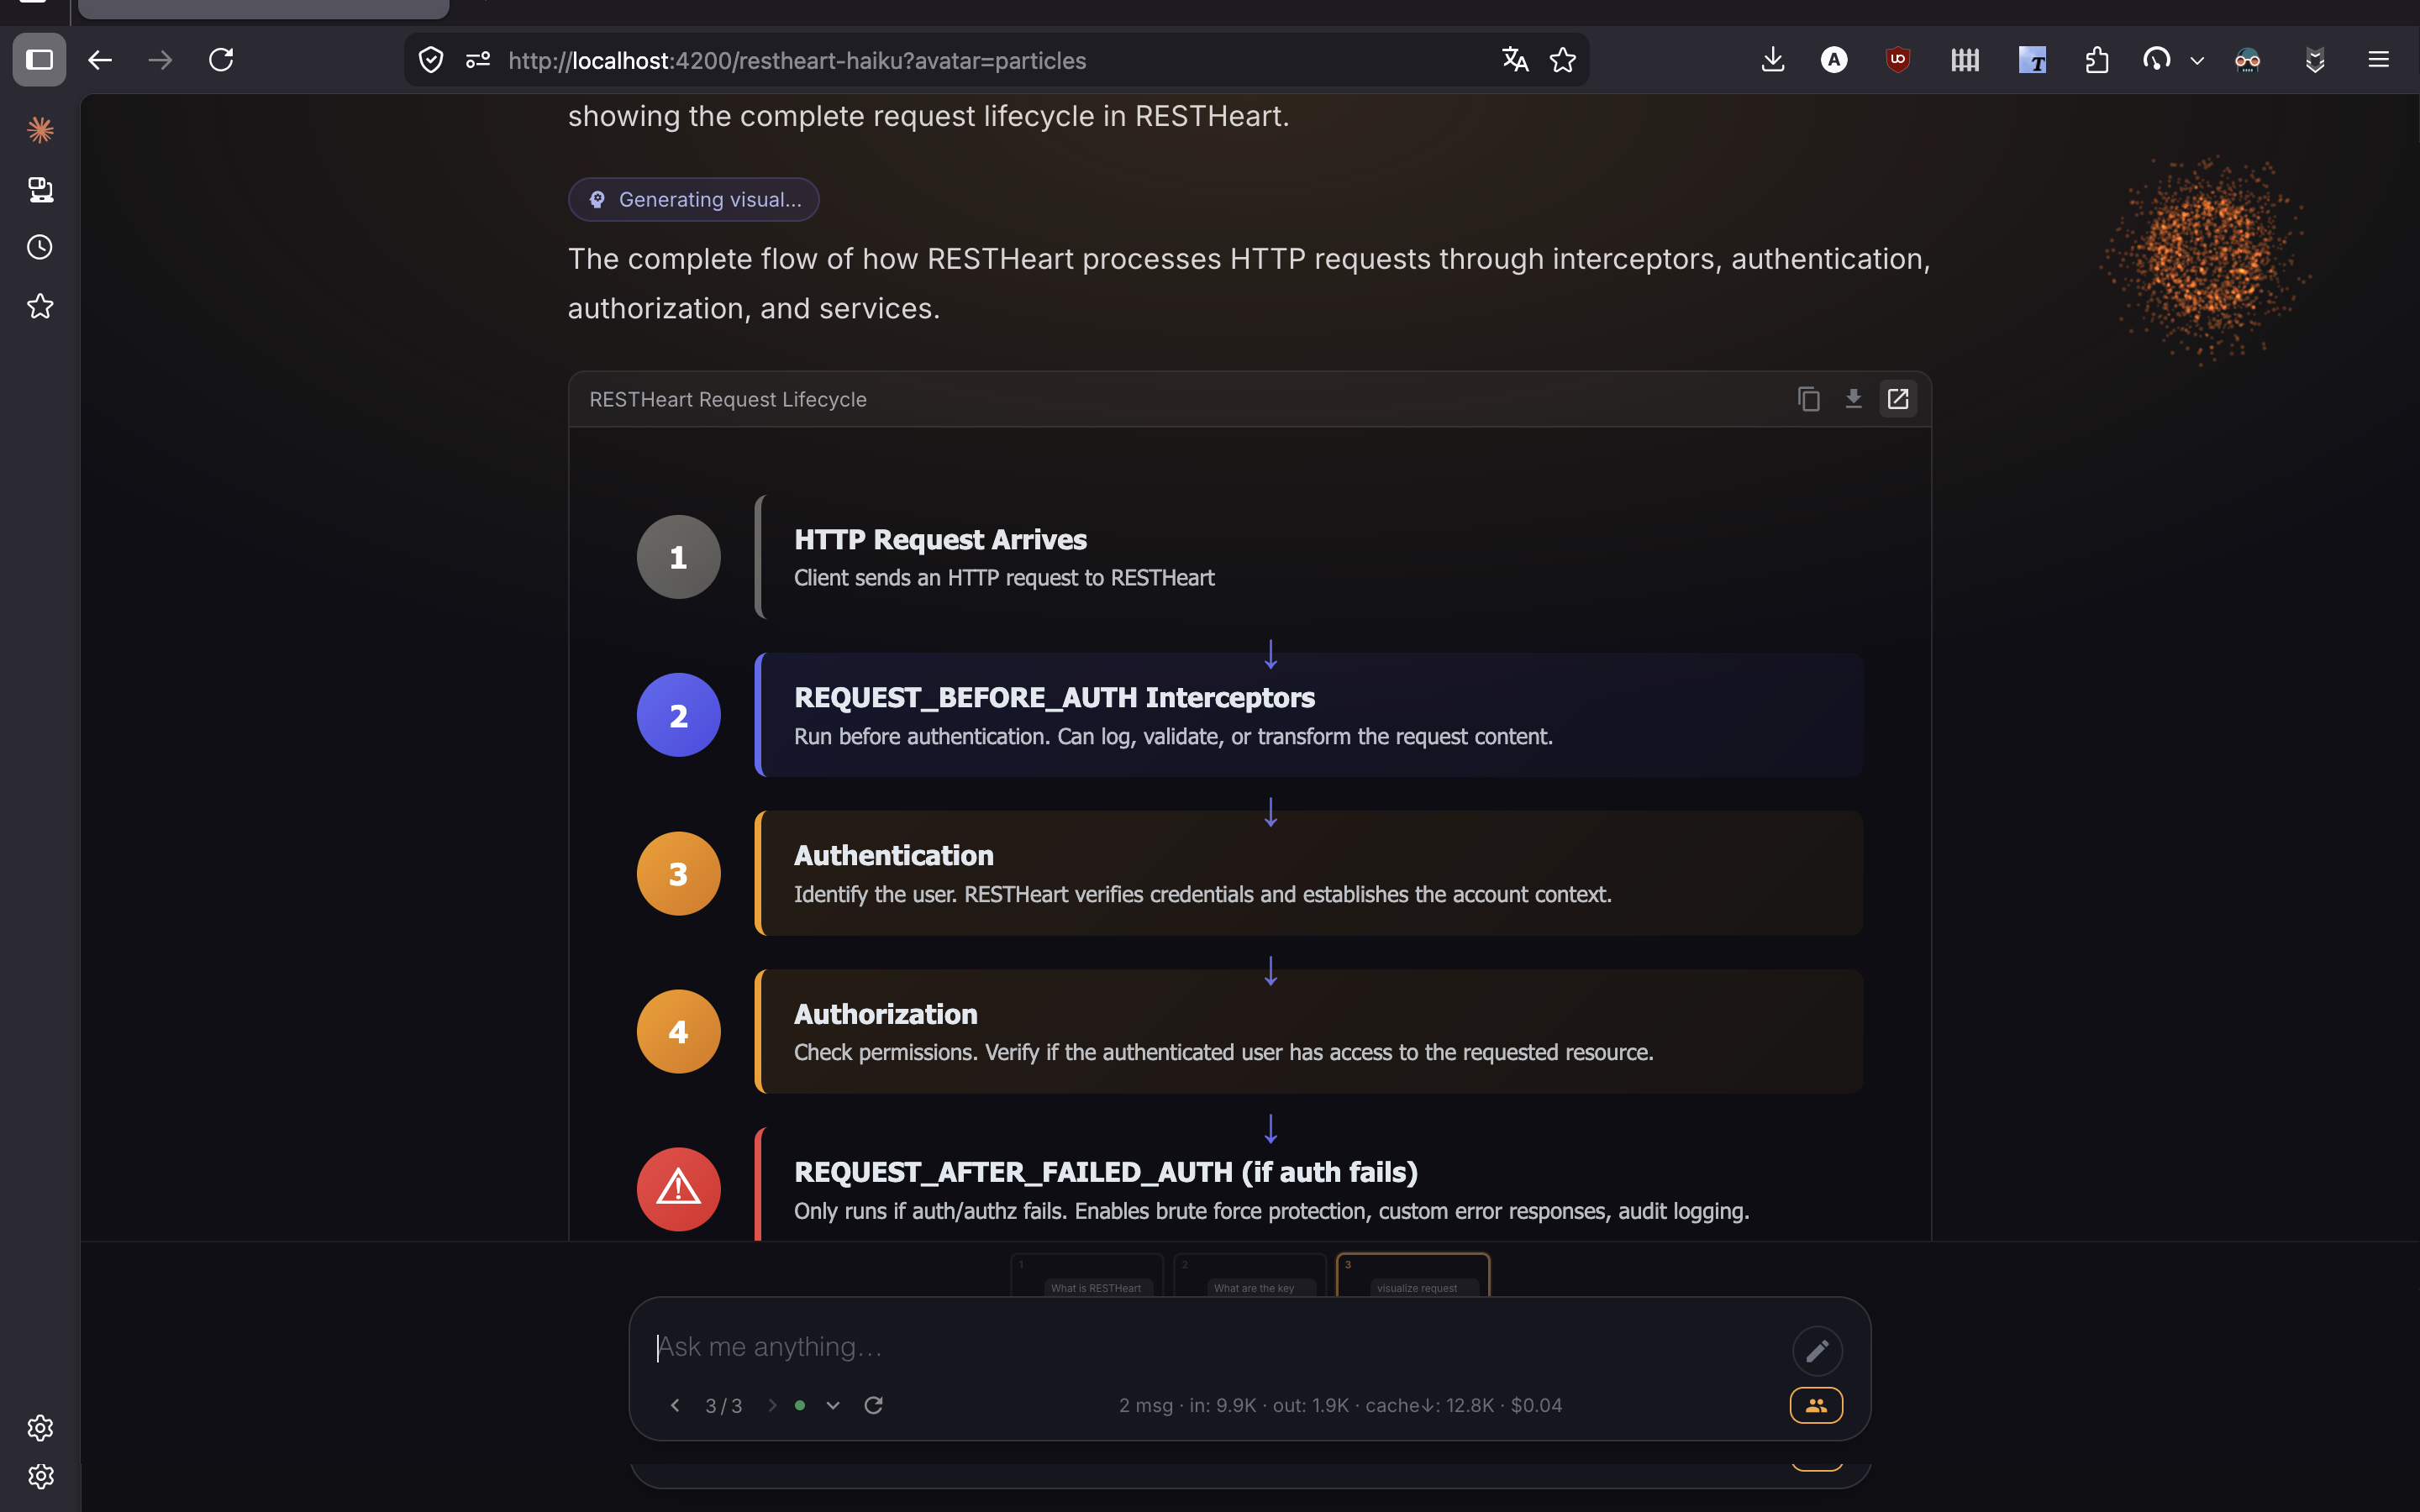
Users see the agentic phase in real time when streamThinkingEvents is on — each tool call becomes a badge with name, arguments, and result summary; expanding it reveals the full breakdown.
Agentic Context Management
When agenticContextManagement is enabled, Sophia replaces classic history injection with a persistent markdown context document keyed by chatId:
-
Start of turn: if a saved context exists, the system auto-injects it as a synthetic
context_loadtool result before the main loop.historyLimitis ignored. -
End of turn: after the model’s text answer, the system runs a separate forced call asking the model to summarise via
context_save,context_append, orcontext_skip. Those tools are not available in the main loop — they are invoked only by the synthetic post-answer step.
This frees the main loop from history-token cost on every turn and keeps long-session coherence. The prompt template should not instruct the model to call context_* itself — doing so blocks the synthetic flow.
Collaborative Mode
Enable Collaborative Mode (under Agentic settings) to let the model render rich interactive HTML artifacts directly in the chat:
| Option | Type | Default | Description |
|---|---|---|---|
|
boolean |
|
Add |
|
string |
server default |
Override the description of the |
|
string |
server default |
Override the description of the |
show produces HTML in an iframe injected into the chat — diagrams, calculators, mini-dashboards, REST micro-tools. PicoCSS v2 with dark theme is pre-loaded; the model can also use a <style> block for custom CSS.
ask is not available in the main loop. It is invoked only by the post-answer synthetic call, which constrains the model to attach 2–4 follow-up buttons. The prompt template should not instruct the model to call ask directly — doing so prevents the synthetic flow.
A per-message toggle in the chat UI lets the end user activate Collaborative Mode for a specific question, even on agents where it is off by default.
Deck View
Set deckView: true to replace the linear chat layout with a horizontal deck of cards — each interaction becomes a swipeable card, prompt above, scrollable answer below. Useful for guided tours, lesson decks, and product demos.
Selecting an Agent
The active agent is encoded in the URL path:
https://your-sophia-instance/                  → default agent
https://your-sophia-instance/{agent-id}      → "{agent-id}" agent
Use these URLs when embedding Sophia in an iframe:
<iframe src="https://your-sophia-instance/{agent-id}" ...></iframe>For MCP clients, the agent is selected via the URL path (see Sophia MCP Server).
Private Agents
Set private: true to require authentication. Access is granted to:
-
Sessions whose JWT contains this agent’s id in the
agentsclaim (cookie auth orAuthorization: Bearer) -
MCP clients using a long-lived API token issued from the API Tokens page
-
MCP clients completing the OAuth
client_credentialsflow (Claude Desktop)
Public agents work without authentication.
Managing Agents via API
List all agents:
http -a admin:password GET :8080/agentsCreate or replace an agent:
echo '{
  "template": "You are Sophia...\n\n<documents-placeholder>",
  "tags": ["support"],
  "options": {
    "agenticMode": true,
    "maxAgentIterations": 8,
    "compactSearch": true,
    "searchAndFetchPreamble": true,
    "agenticContextManagement": true,
    "collaborative": false
  },
  "mcp": { "description": "Customer-facing support assistant." }
}' | http -a admin:password PUT :8080/agents/support
Update options only:
echo '{"options": {"relevantsLimit": 8, "temperature": 0.2}}' | \
  http -a admin:password PATCH :8080/agents/support
Delete an agent:
http -a admin:password DELETE :8080/agents/supportKnowledge Base Management
Navigate to Admin > Knowledge to manage the documents that form Sophia’s knowledge base.
Supported File Formats
| Category | Extensions |
|---|---|
Plain text & markup |
|
Office documents |
|
Open document |
|
Apple iWork |
|
eBook |
|
Source code |
|
Apache Tika handles parsing for prose formats; code-aware splitters preserve semantic boundaries (functions, classes) for source files.
Uploading Documents
Click Upload to open the upload dialog.
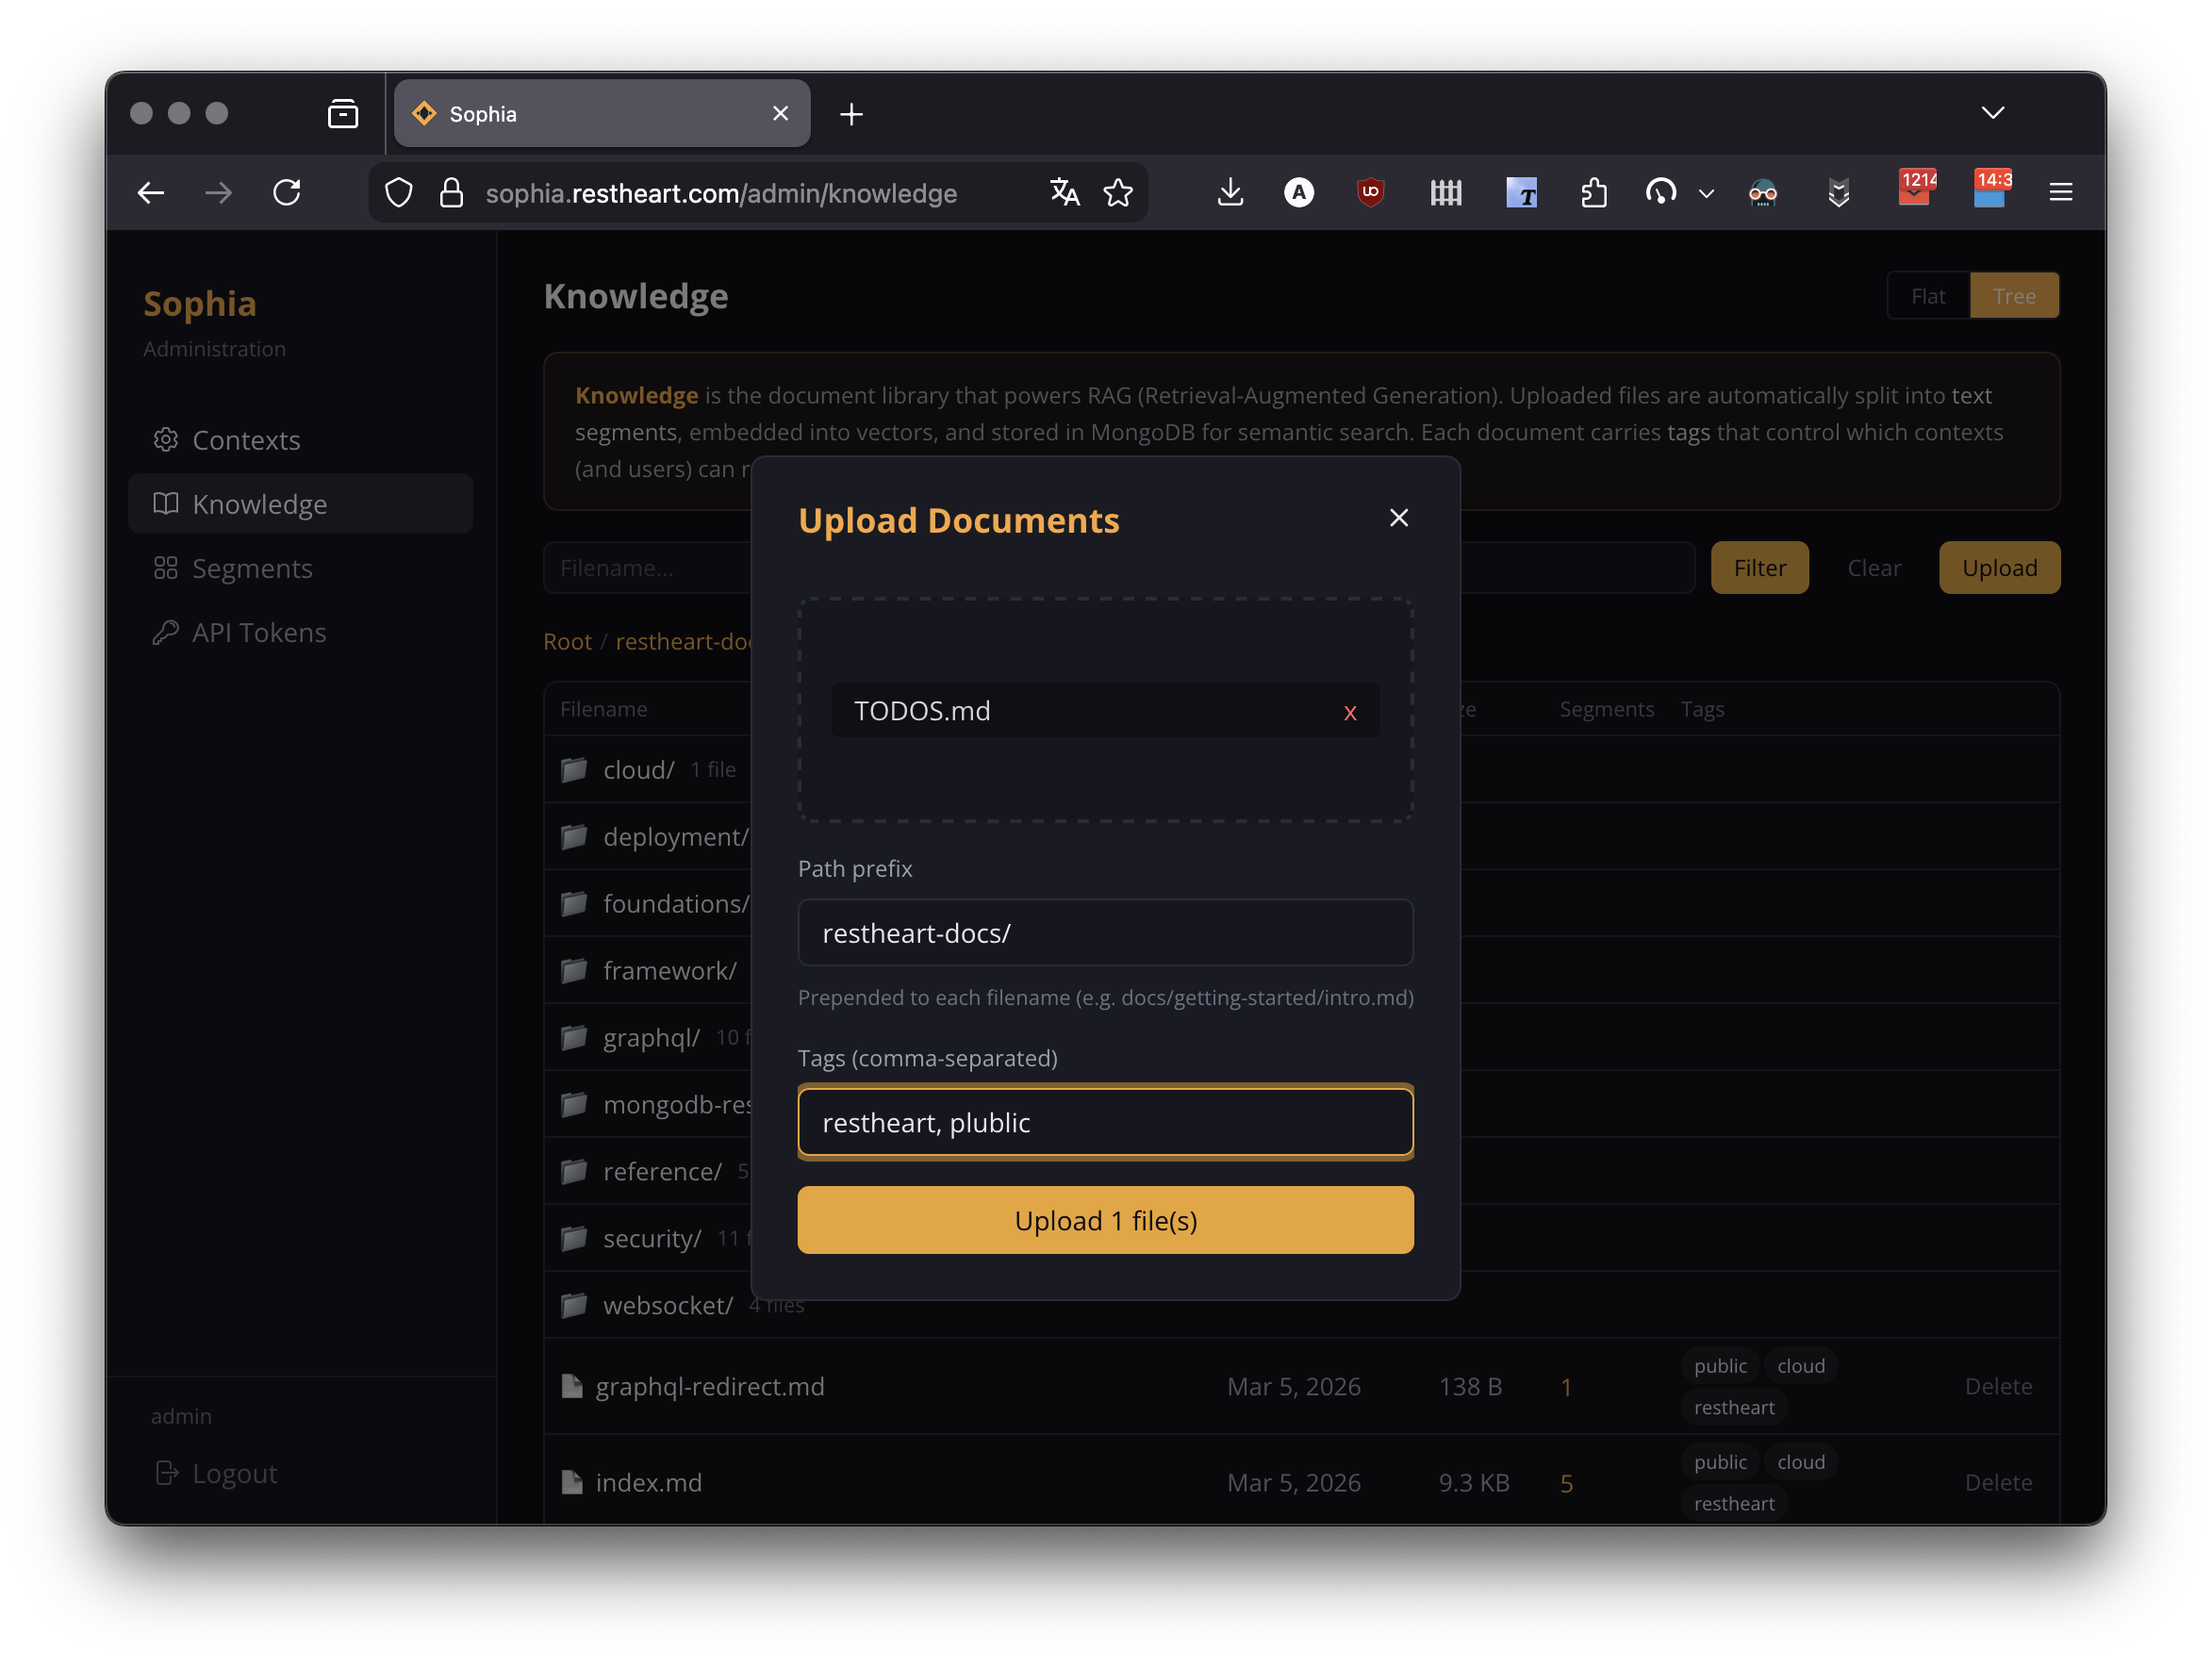
The dialog supports:
-
Drag-and-drop or click-to-browse, multiple files at once
-
Path prefix — prepended to filenames for organising into directories. Auto-completes against existing directories; if the entered prefix doesn’t exist yet, a banner indicates the new directory will be created.
-
Tags — free-form, comma-separated. By default the chip "Accessible from public agents (adds
publictag)" is on, simulating the most common case; toggle it off to make the upload accessible only to authenticated users matching the agent tags.
After upload, documents are processed automatically:
-
Text is extracted via Tika or a code-aware splitter
-
Content is split into segments
-
Segments are embedded with Amazon Titan Embed Text v2
-
Vectors are persisted in the
textSegmentscollection
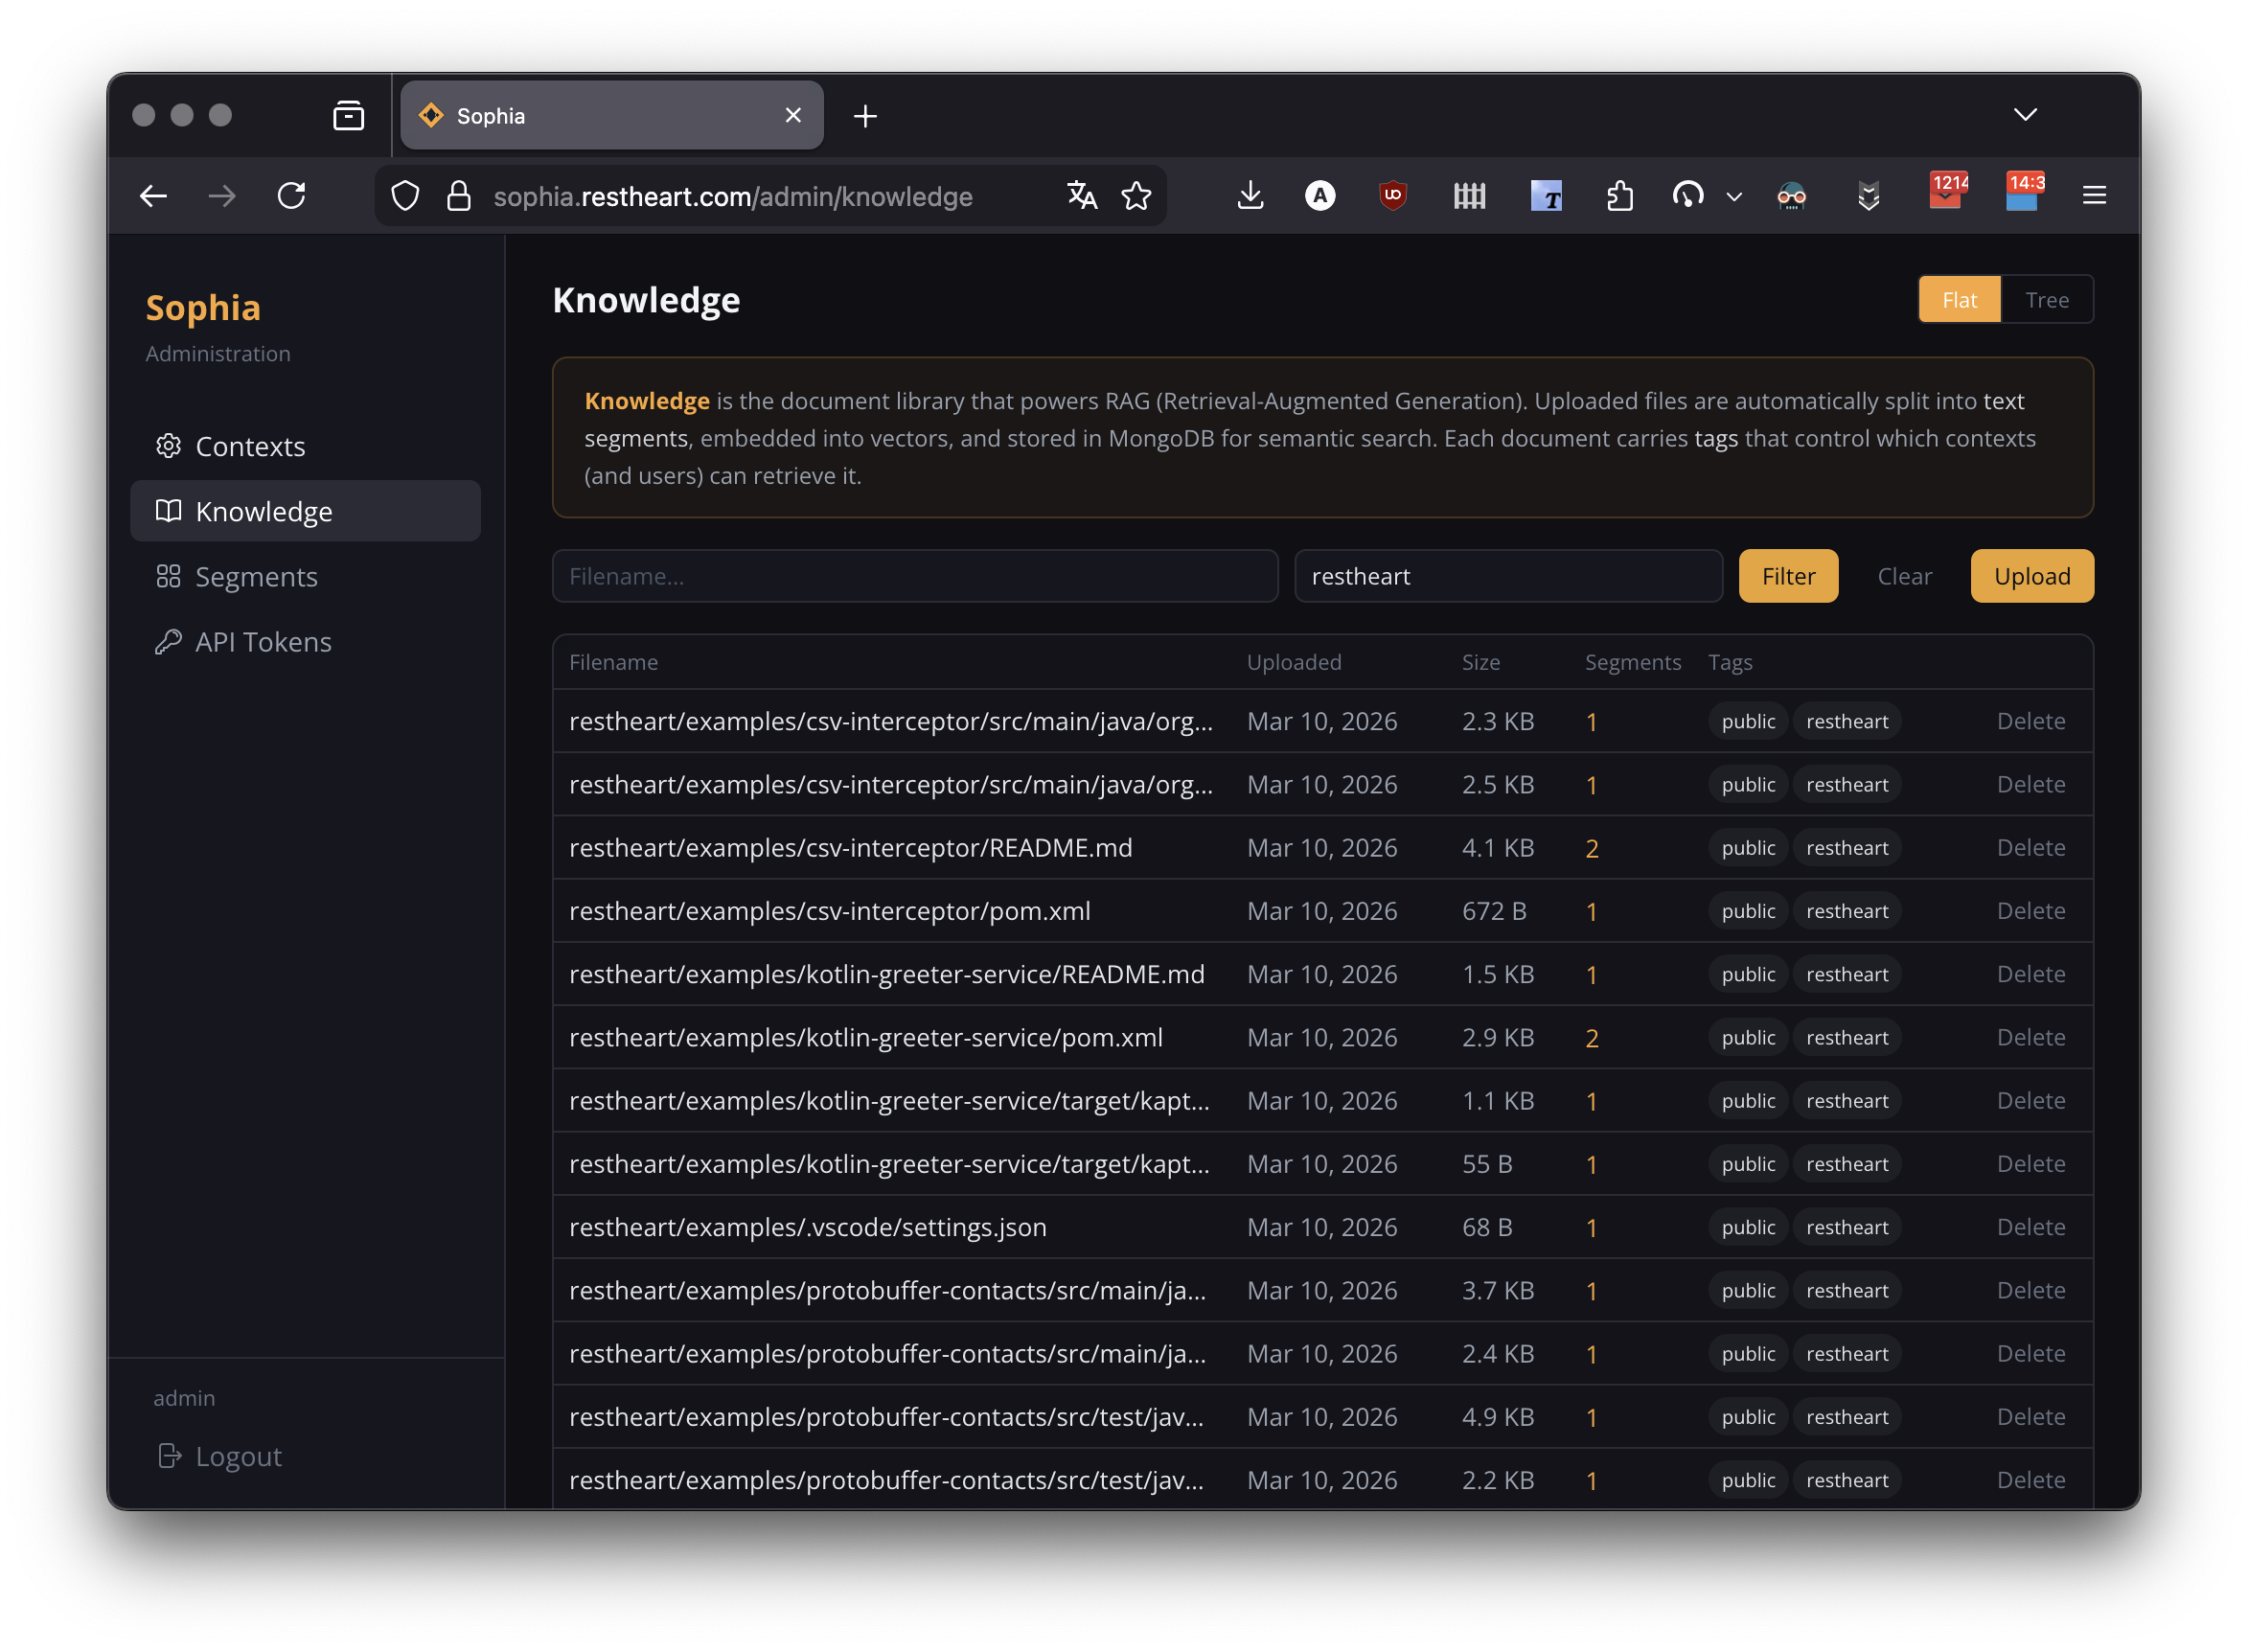
Browsing Documents
Two viewing modes:
-
Flat: a paginated table of all documents — filename, upload date, size, segment count, tags
-
Tree: a directory browser showing immediate children of the current path

Filters: filename ($regex substring), tags (comma-separated, AND filter), failed-only (toggle that switches to flat view and isolates documents whose indexing failed).
Failed Indexing & Retry
Documents whose vectorization failed are flagged with a red ⚠ icon and a tooltip exposing the error message. A Retry button clears the failure flag and re-queues the document for processing. Common causes: malformed PDF, throttled embedding model, transient AWS errors.
Editing Tags
Hover any document row to reveal a small ✎ icon next to the tag chips: click it to inline-edit tags for a single document. Press Enter to save, Escape to cancel.
For bulk operations use Batch Tags in the toolbar:
| Operation | Effect |
|---|---|
Replace |
Set the given tags on all matching documents (overwrites existing tags). |
Add |
Union the given tags with each document’s existing tags. |
Remove |
Subtract the given tags from each document’s existing tags. |
When in tree mode the dialog operates within the current directory; an Include subdirectories checkbox (on by default) controls whether the operation recurses. The status text under the input shows the active scope and tag/filename filters in effect. A progress bar appears during execution.
Deleting Documents
Deleting a document also removes all its text segments from the vector store. Bulk delete is supported via the REST API.
Managing Documents via API
Upload a document:
FILE="document.pdf"
http -a admin:password --form POST :8080/docs.files \
  @${FILE} \
  metadata="{\"filename\": \"${FILE}\", \"tags\": [\"public\", \"support\"]}"
List documents:
http -a admin:password GET ":8080/docs.files?page=1&pagesize=20"Filter by directory prefix:
http -a admin:password GET ":8080/docs.files?filter={\"filename\":{\"\$regex\":\"^docs/\"}}"Update tags on a single document:
echo '{"tags": ["public", "support", "v2"]}' | \
http -a admin:password PATCH :8080/docs.files/{file_id}|
Note
|
For GridFS files the PATCH body is merged into the metadata subdocument — use tags (without the metadata. prefix).
|
Delete a document:
http -a admin:password DELETE :8080/docs.files/{file_id}Segment Management
Navigate to Admin > Segments to inspect the text segments generated from uploaded documents.
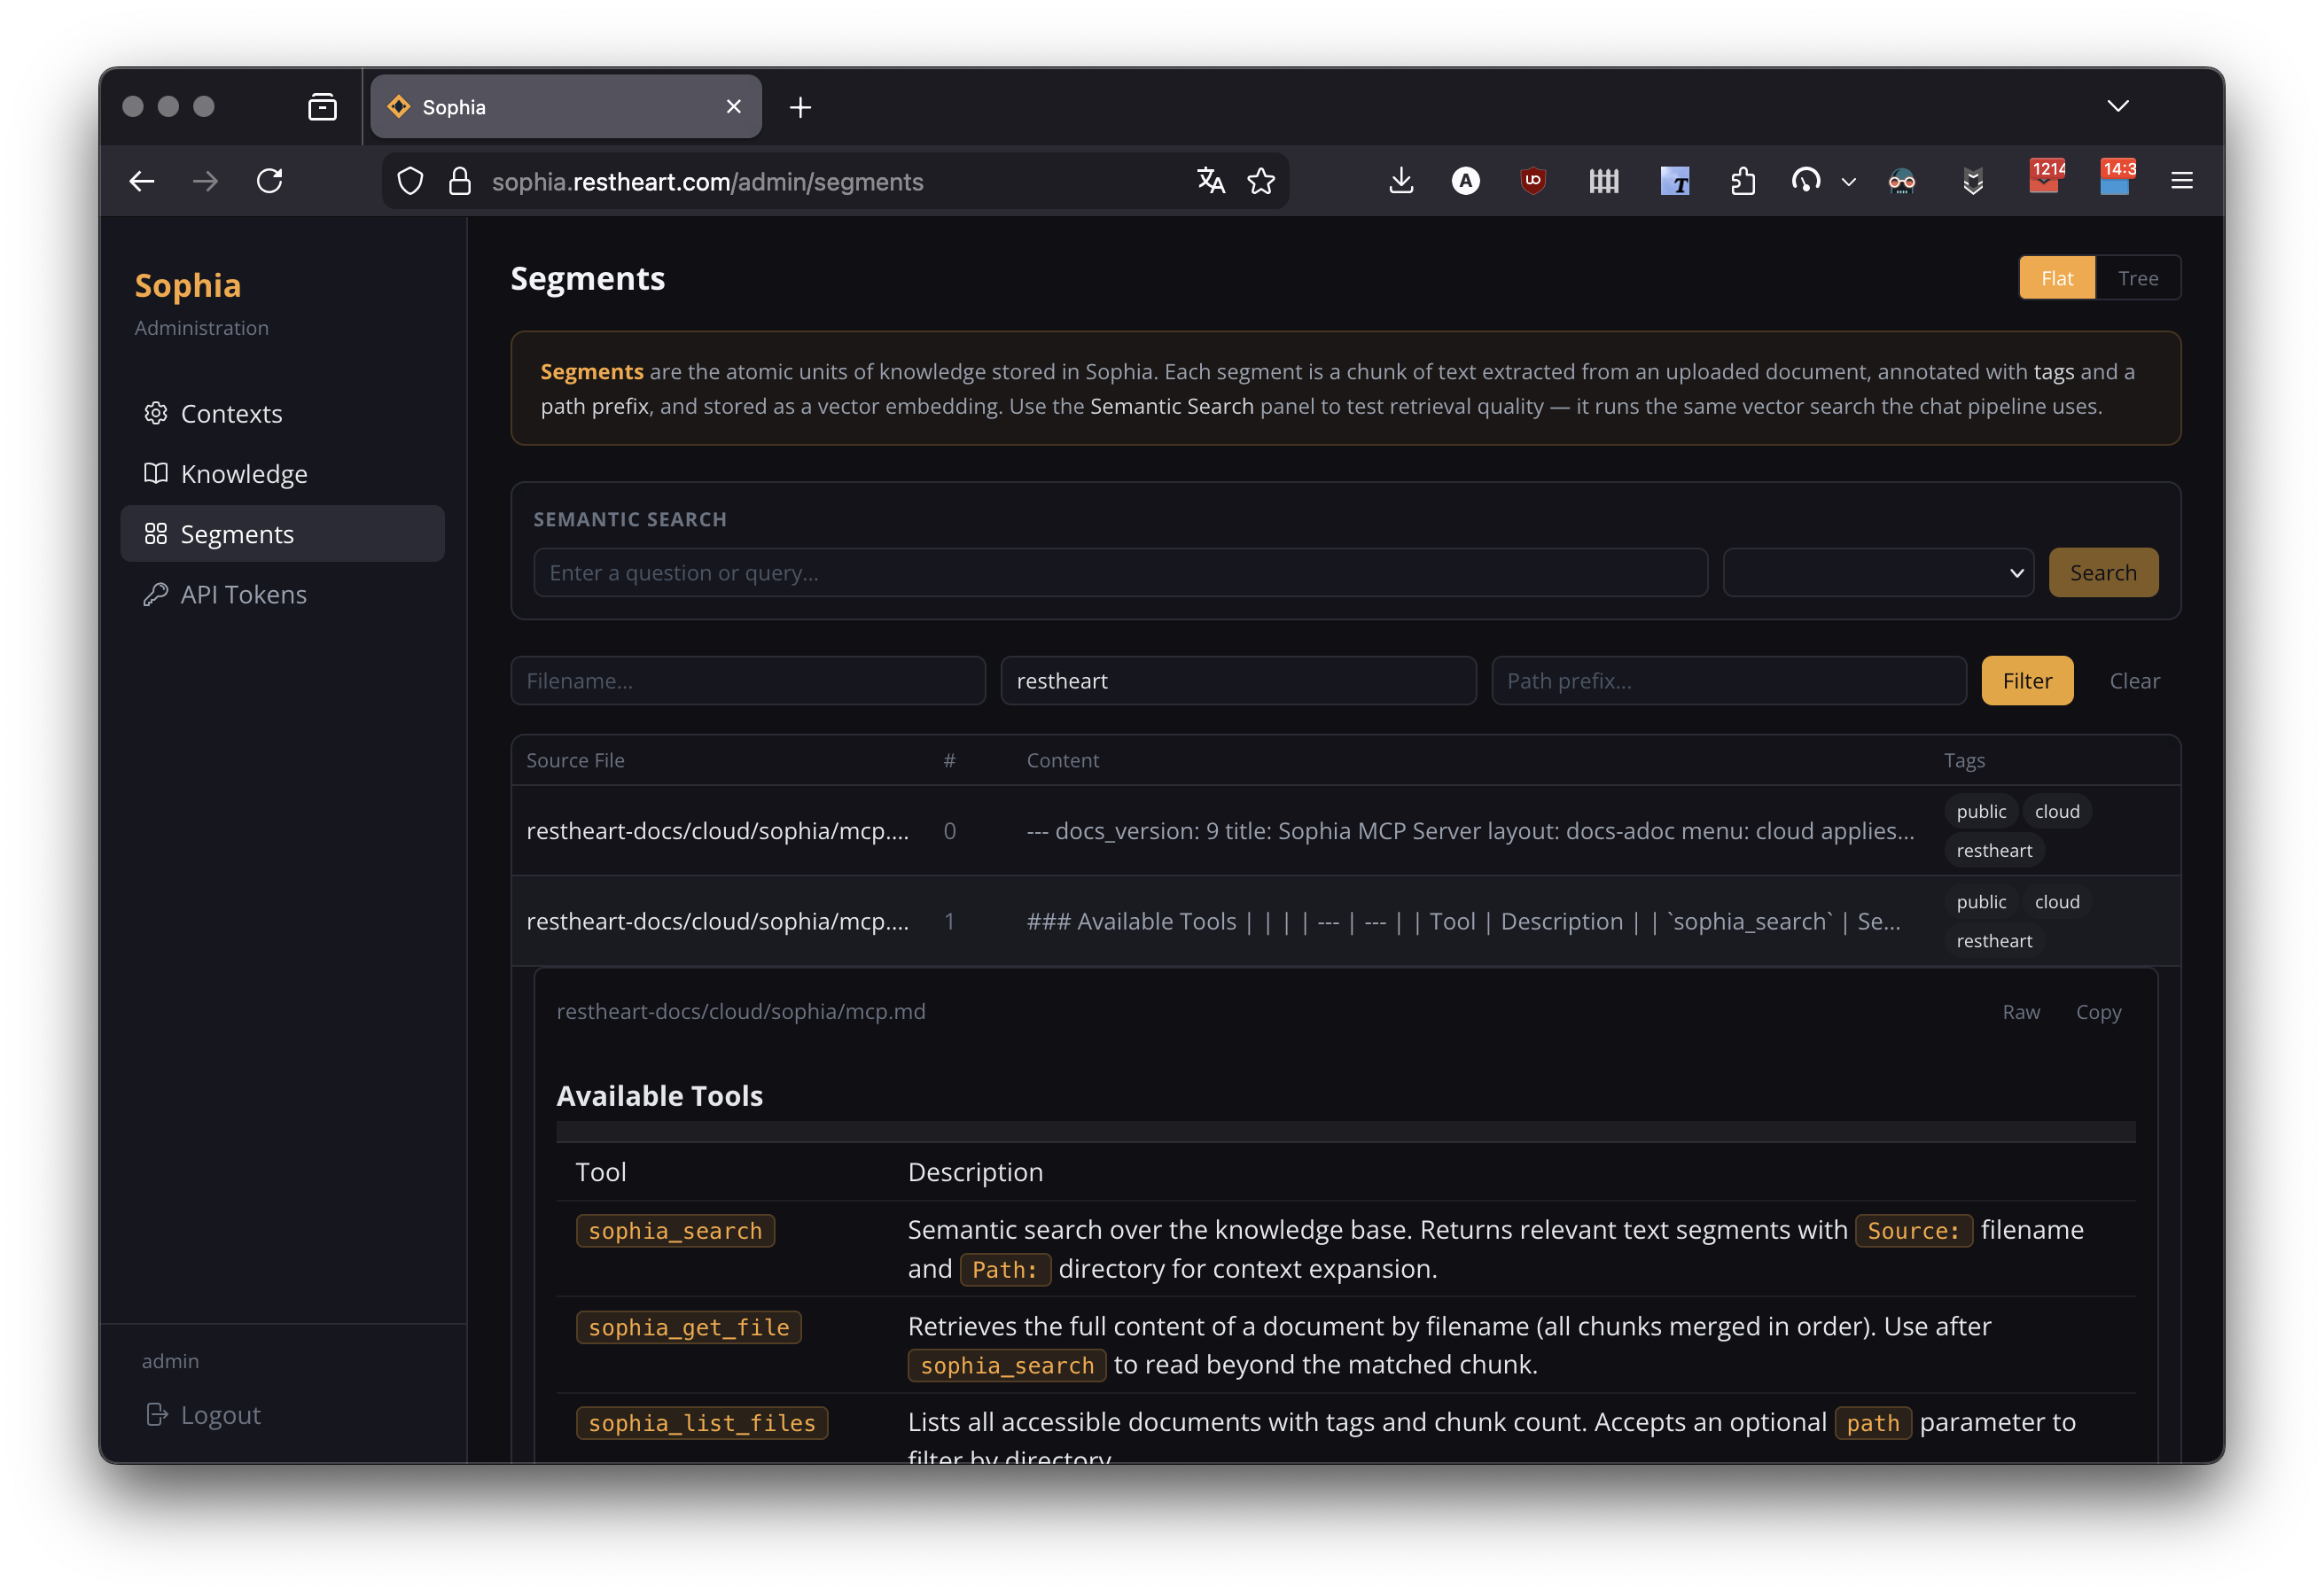
Browsing Segments
Two viewing modes (flat / tree). Each row shows source file, segment index, content preview, and tags. Expand a row to see the full segment rendered as raw text or markdown; a copy button copies the segment text.
Filtering
-
Filename — show segments from a specific document
-
Tags — comma-separated AND filter
-
Path prefix — show segments from documents in a directory subtree
Semantic Search Testing
The Semantic Search panel lets you test RAG retrieval directly against the knowledge base:
-
Enter a test query
-
Optionally select an agent to apply that agent’s tag filters
-
View matching segments ranked by score
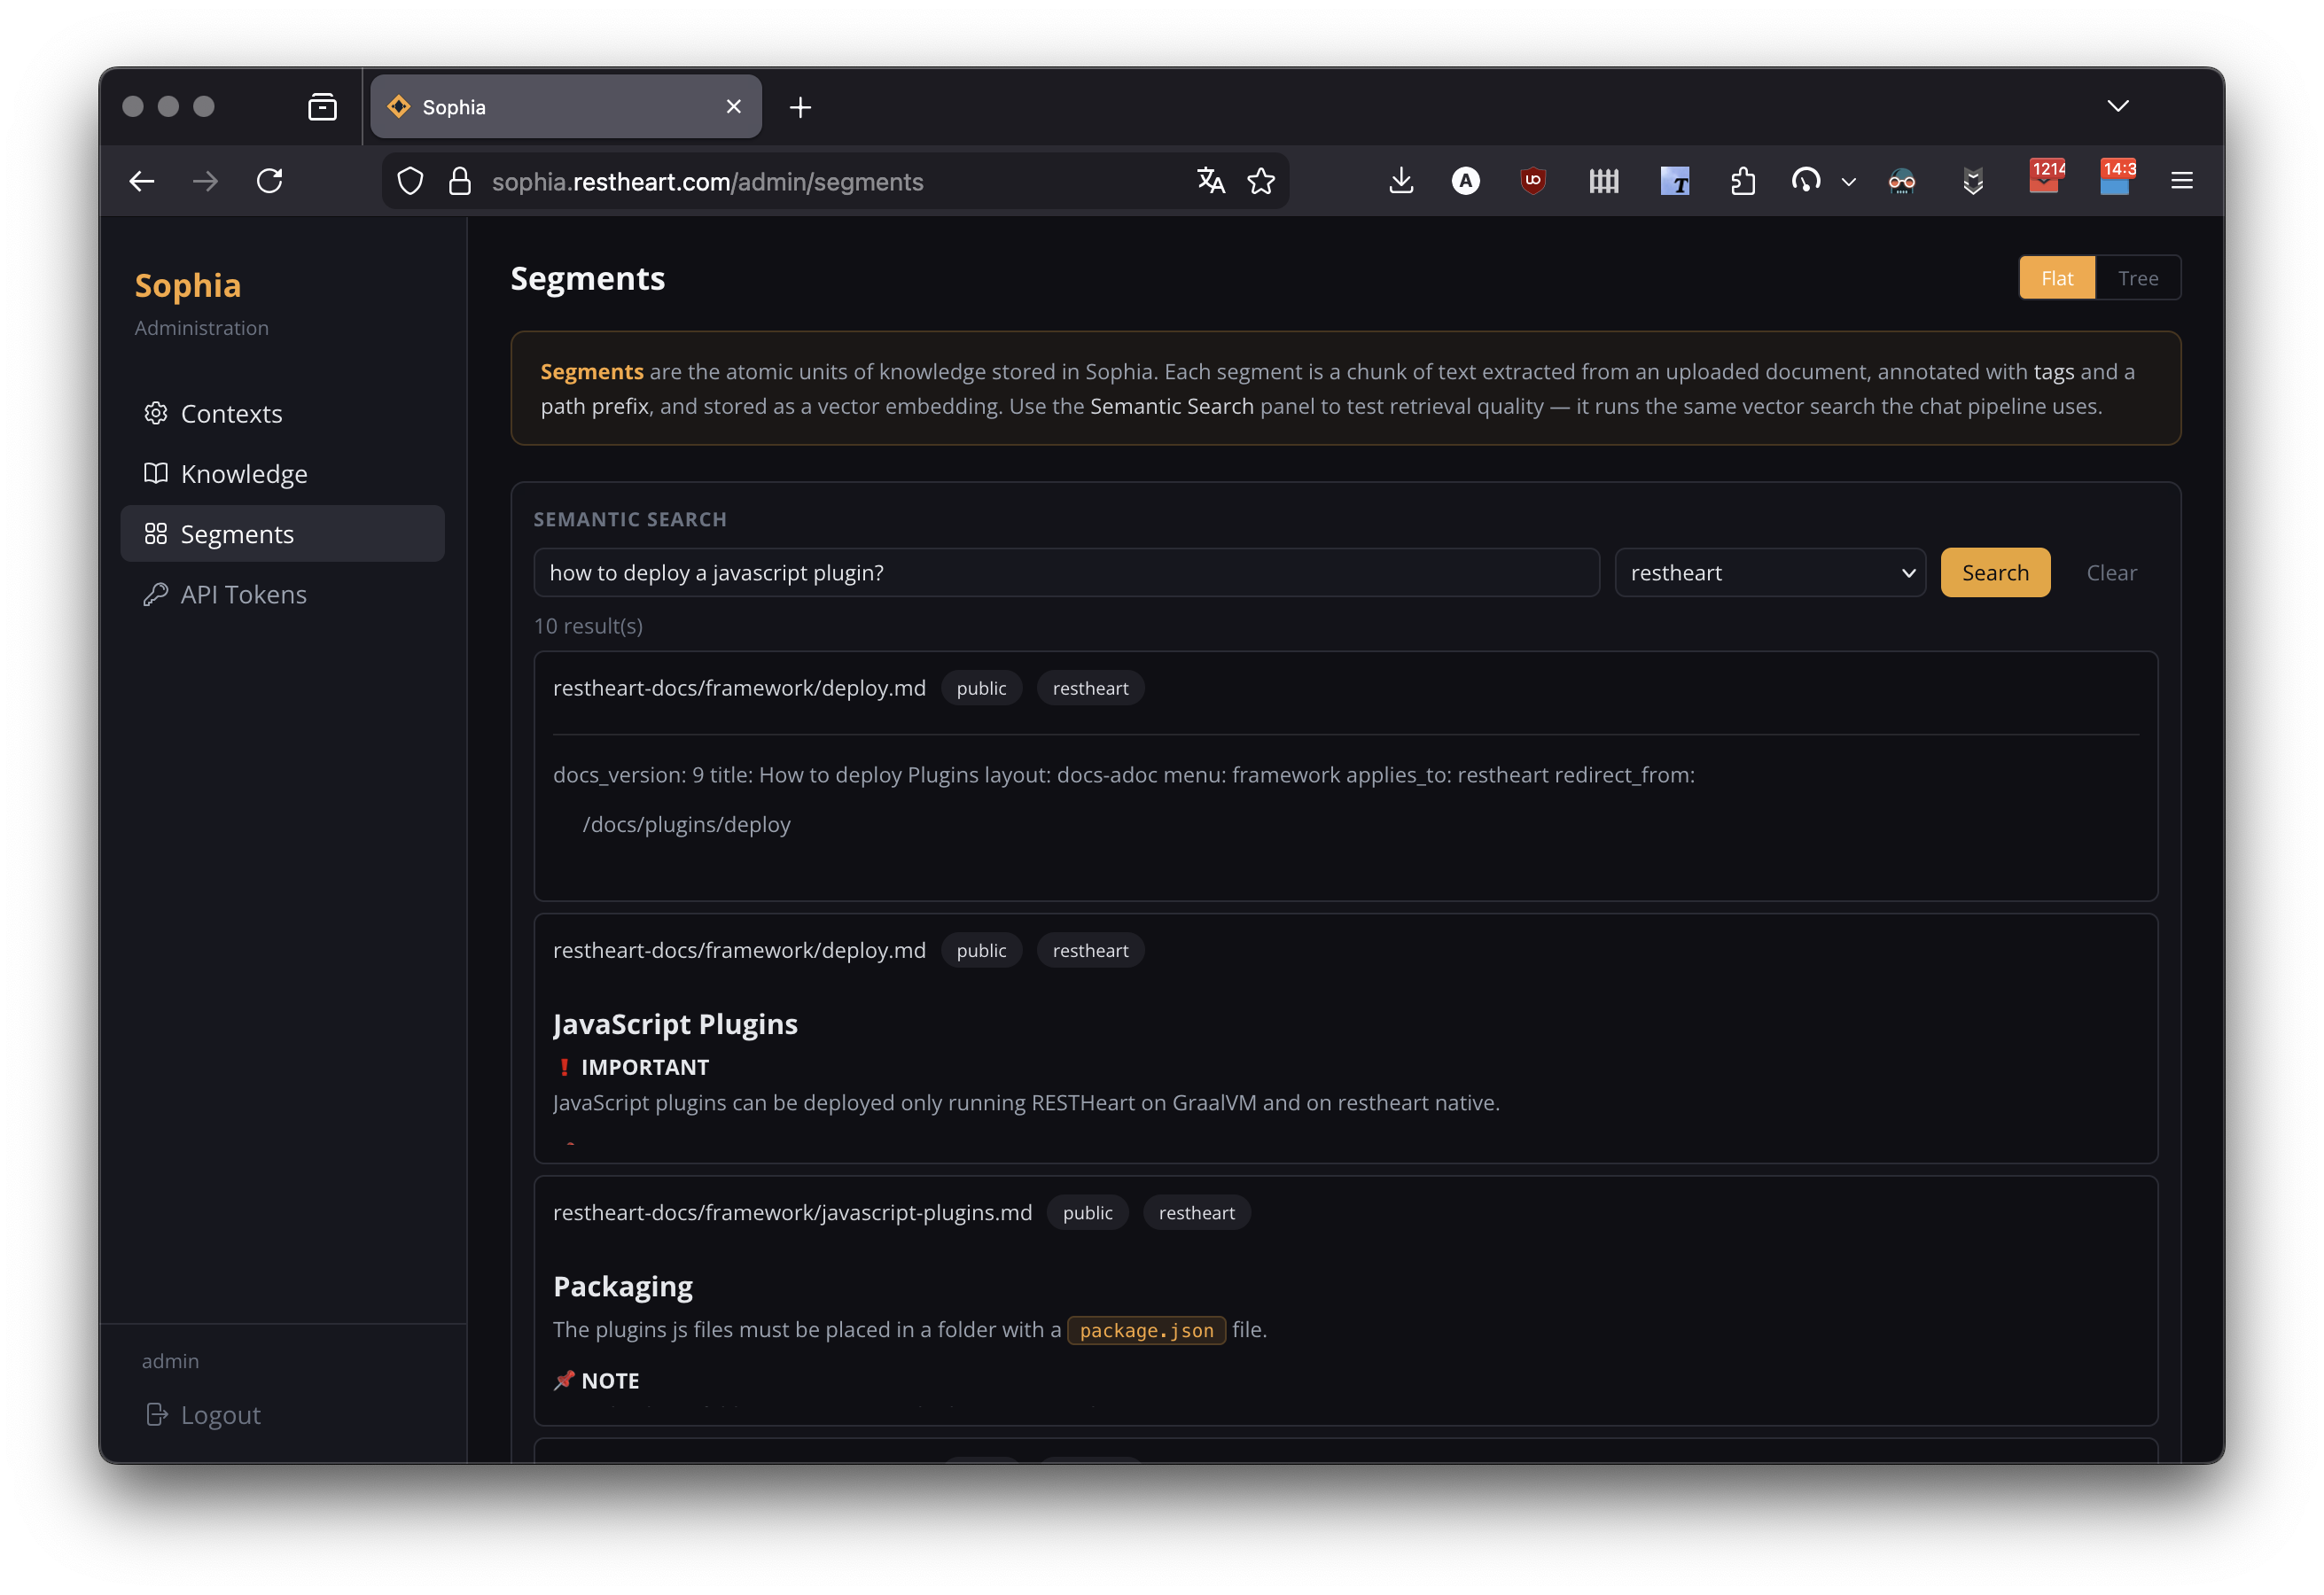
Useful for tuning relevantsLimit, debugging missing-document issues, and verifying tag filters.
User Management
Navigate to Admin > Users to manage user accounts. Sophia uses an invitation-only model: administrators do not set passwords — they invite users by email, and users complete activation by choosing their own password and accepting the legal policies.
| Role | Capability |
|---|---|
|
Default role for end users — can chat against agents whose id is in the user’s |
|
Manages every resource (agents, knowledge, users, tokens) belonging to their own tenant. Cannot reach other tenants' data. See Multi-tenant Isolation. |
|
Global administrator — manages every tenant and every resource. Required for managing the |
Account properties:
-
_id— username; must be a valid email address (lowercased). Immutable after creation. -
password— hashed automatically (bcrypt) on write. The user chooses it during activation; administrators never see nor set it. Strength is enforced server-side bymongoRealmAuthenticator.enforce-minimum-password-strength(score ≥ 3 on zxcvbn). -
name— optional display name. Editable by the user themself from the Profile page; visible to administrators in the user list. -
notes— optional internal note (admin-only — never exposed to the user). Useful to track onboarding context, support escalations, etc. -
roles— array of roles -
agents— list of agent ids the user is explicitly authorised for. Required for accessing private agents; public agents are reachable without listing. -
tags— optional global knowledge restriction. When non-empty, applies as the default tag filter to every agent the user accesses (intersected with the agent’s own tags). Empty / absent = no per-user filter. See Knowledge Tag Restrictions. -
agentTagRestrictions— optional per-agent overrides oftags. Map ofagentId→string[]; an entry wins over the globaltagsfor that agent. Use it to grant different scopes per agent (e.g.hron the HR agent,saleson the Sales agent). See Knowledge Tag Restrictions. -
tenant— the tenant the user belongs to (mandatory fortenant-adminanduser; the globaladmintypically has no tenant) -
status— lifecycle marker, one ofinvited/active/disabled. See User Invitation Flow. Login is allowed only foractiveusers; any other status is rejected by theLoginStatusVetoerwith401. -
inviteToken,inviteCreatedAt— opaque random token and its creation timestamp, generated server-side on invitation. Cleared once the user activates. -
passwordResetToken,passwordResetCreatedAt— opaque random token and its creation timestamp, generated when the user requests a password reset. Cleared on successful reset or natural expiry (1 hour). -
consents— record of accepted Terms of Service, Privacy Policy and art. 1341 c.c. clauses. Populated automatically by the legal-acceptance flow. See Legal Documents and Consents.
A user can change their own password and display name (from the Profile page) but not their roles, tenant, agents, tags or notes. Only an administrator can grant/revoke roles or change access scope.
The users collection carries three indexes ensured at boot by the UserIndexesInitializer: inviteToken (sparse), passwordResetToken (sparse), and status. The two token indexes are sparse because the fields are $unset as soon as the token is consumed.
User Invitation Flow
There is no self-service signup. The only way for a user to enter the system is to receive an invitation from an administrator.
Sending an Invitation
In the Admin > Users page, click Invite User, then fill in:
-
Email — used both as the account
_idand as the destination of the invitation email -
Display name — optional, free-form. Helpful for at-a-glance identification in the user list.
-
Roles —
user,tenant-admin(andadminonly when invited by a global admin) -
Tenant — visible only to global admins. A
tenant-adminautomatically assigns invitees to their own tenant (forced server-side via the ACLmergeRequest). The field offers autocomplete from the existing tenants and shows an amber banner if you type a tenant that doesn’t exist yet — create it from Admin > Tenants before the user logs in (the user form does not auto-create tenants). -
Accessible agents — the agents the user will be authorised for after activation. The list is scoped to the selected tenant (public agents + agents owned by that tenant) and hides public agents by default to keep the picker tight; toggle the Show public agents checkbox to include them. Each selected agent reveals an inline Restrict to tags: input (see Knowledge Tag Restrictions).
-
Knowledge tag restrictions (global) — comma-separated. Applies to any agent without its own per-agent override. Leave empty for no per-user filter by default.
-
Internal notes — admin-only, never exposed to the user.
Click Send invitation. Sophia:
-
Persists a new user document with
status: "invited", a freshly generatedinviteToken(crypto-random, ~32 bytes base64url), and aninviteTokenExpiresAtset 7 days in the future. Nopasswordfield is written. -
Fires a
RESPONSE_ASYNCinterceptor (InviteEmailSender) that sends a dark-themed HTML email via AWS SES (configured under/emailsinconf-prod.yml). -
Returns
201 Createdto the admin client.
The invited user appears in the user list with an invited badge in amber.
The Invitation Email
The activation link in the email has the form:
https://<your-sophia-host>/auth/activate?email=<email>&token=<inviteToken>It is wrapped by AWS SES click-tracking (awstrack.me) when click-tracking is on at the SES configuration-set level. The token can only be used once, expires after 7 days, and is cleared from the user document on successful activation.
Activation Page
The /auth/activate route is public (no authentication required). On load it:
-
Force-clears any stale
rh_authcookie so the activation request cannot be misattributed to a different user already logged into the same browser. -
Fetches
GET /legal-policiesto render the current Terms and Privacy versions with their canonical URLs. -
Shows a form with a new password + confirm password pair and three checkboxes (Terms, Privacy, art. 1341 c.c. clauses).
On submit it sends PATCH /users/{email}?token=<token> with the cleartext password. The server-side InviteActivationInterceptor (priority 20, running after userPwdHasher):
-
Verifies
tokenmatchesinviteToken, has not expired, and the user is still ininvitedstatus -
Verifies the accepted versions match the currently configured
legalPolicies.terms.versionandlegalPolicies.privacy.version -
Transforms the body into
$set(password, statusactive, consents) +$unset(inviteToken, inviteTokenExpiresAt) -
On success returns
200, and the web client immediately callsPOST /token/cookieto log the user in.
Failure modes are surfaced to the user:
| Result | UI message |
|---|---|
|
"This invitation link is no longer valid. Ask your administrator to send a new one." |
|
"Password too weak — please choose a stronger one." |
|
"The legal policies have just been updated. Reload the page and try again." |
Status Lifecycle
            POST /users (admin)
            ──────────▶  invited ──────────▶  active
                                  PATCH /users/{id}?token=...
                                  (InviteActivationInterceptor)

            PATCH /users/{id}  status=disabled (admin override)
            ─────────────────────▶ disabled  (login refused)
A disabled user can log in only after an admin re-sets status: "active". The LoginStatusVetoer runs before token issuance and inspects this field.
Inviting via the REST API
echo '{
  "_id": "alice@example.com",
  "name": "Alice Wonderland",
  "roles": ["user"],
  "tenant": "acme",
  "agents": ["acme-support", "acme-hr"],
  "tags": ["acme"],
  "agentTagRestrictions": {
    "acme-hr": ["hr-internal"]
  },
  "notes": "Onboarded via Linear ticket #1234"
}' | http -a admin:password POST :8080/users
The server fills in status: "invited", generates inviteToken / inviteCreatedAt (via the ACL mergeRequest with the @rnd(bits) placeholder), and the RESPONSE_ASYNC interceptor sends the email. Do not include a password field — the UserPersistInterceptor rejects POSTs that carry one. The interceptor also rejects agentTagRestrictions whose keys are not in agents.
Resending an Invite
If the user lost the email (or it expired after 7 days), in Admin > Users the row of any user still in invited status shows a Resend invite button. Clicking it:
-
Rotates the
inviteTokento a fresh random value (the previous link becomes invalid immediately — important if the user thinks the original was lost in transit but it was actually delivered). -
Refreshes
inviteCreatedAtso the new link has the full 7-day TTL. -
Sends a fresh invitation email via the same emails channel used for the first send.
Tenant scoping is enforced by the InviteResendService itself: a tenant-admin can only resend invites for users in their own tenant (403 otherwise). The endpoint is POST /resend-invite/<email> — there is no body. A 409 Conflict is returned if the user is already active or disabled (re-sending an invite to a fully onboarded user is a no-op the UI surfaces as a toast).
Password Reset
Users who forget their password use the Forgot your password? link on /login, which leads to /auth/forgot-password. They enter their email; the public endpoint POST /password-reset/<email> always returns 202 Accepted regardless of whether the address is registered — this is intentional to prevent account-enumeration attacks. The neutral UI message confirms only "If an account exists, we’ve sent an email."
Server-side flow (PasswordResetRequestService):
-
Rate limit: at most one reset request per email every 60 seconds. Subsequent requests within the window are silently dropped (still
202to the caller). The in-memory LRU cap is 10,000 entries. -
Account lookup by
_id. -
If the user is
active: generate a freshpasswordResetToken(256 bits ofSecureRandomentropy, hex-encoded), persist withpasswordResetCreatedAt = now, send the reset email containing${baseAppUrl}/auth/reset-password?email=<email>&token=<token>. The link expires after 1 hour. -
If the user is still
invited(never activated): re-send the invite email with a freshly rotatedinviteToken. From the user’s perspective they "forgot their password" because they never set one — this maps cleanly to the activation flow. -
If the user is
disabledor doesn’t exist: no email sent.
Confirmation flow: clicking the link opens /auth/reset-password, the user enters a new password (twice), and the SPA calls PATCH /users/<email> with {password, passwordResetToken}. The InviteActivationInterceptor (shared with the invitation flow) validates the token, persists the new password and clears both passwordResetToken / passwordResetCreatedAt. The user is auto-logged-in.
There is no policy-acceptance step in the reset flow: the user already accepted the policies at activation and a major-version bump would have already gated them via the in-app modal before they could even sign in.
Brute-force Protection
RESTHeart’s bruteForceAttackGuard is enabled in both conf-local.yml and conf-prod.yml. It runs a sliding 10-second window of failed authentication attempts per IP; after 5 failures the same IP receives 429 Too Many Requests until the window expires. In production we set trust-x-forwarded-for: true because Sophia sits behind a reverse proxy (the value used is the rightmost element of the X-Forwarded-For header).
The guard protects every credential-based authentication entry point — POST /token/cookie, POST /token, and the PATCH /users/<email>?token=… activation/reset endpoint (any invalid token counts as a failed authentication attempt for this purpose). Legitimate users hit by the limiter need to wait 10 seconds before retrying.
Knowledge Tag Restrictions
Tags are the primary mechanism Sophia uses to scope what knowledge an agent can retrieve, and to further narrow what a specific user can see within that scope. Understanding the three actors and how they combine is essential to grant access correctly.
The three sources of tags
| Source | Role |
|---|---|
Agent |
The universe the agent retrieves from. Every vector search includes |
User |
Optional global default restriction. When non-empty, intersected with |
User |
Optional per-agent override. When present and non-empty, replaces the global |
A fourth source — Knowledge document tags — is the data side: every uploaded document carries an array of tags that the retrieval pipeline matches against. The agent + user filters merely restrict which documents are eligible.
Resolution algorithm
For a single query, Sophia builds the effective anyTags filter as follows (identical between the web chat and MCP paths):
-
Look up
user.agentTagRestrictions[currentAgent]:-
If present and non-empty → use that as the user’s restriction (skip step 2).
-
Otherwise → fall through.
-
-
Use the global
user.tags(also possibly empty/absent). -
If the resolved restriction is empty or absent → no per-user filter. The effective
anyTagsis simplyagent.tags. -
Otherwise → intersect
agent.tagswith the restriction. The effectiveanyTagsis the result. -
If the intersection is empty, the filter degrades to the sentinel
["no_match"], which matches no documents. The query returns zero results for this turn — by design.
Unauthenticated users skip steps 1–4 entirely (no user document) and additionally get mustTags = ["public"] ANDed into the query so they can only see documents explicitly marked public.
Worked example
Given:
Agent "hr-agent":      tags = ["hr", "public"]
Agent "sales-agent":   tags = ["sales", "public"]
Agent "faq-agent":     tags = ["faq"]

User alice@acme.com:
  agents               = ["hr-agent", "sales-agent", "faq-agent"]
  tags                 = ["acme"]
  agentTagRestrictions = { "sales-agent": ["sales-internal"] }
What Alice sees per agent:
| Chat with… | Effective restriction lookup | Effective anyTags (intersection with agent.tags) |
|---|---|---|
|
global |
|
|
override |
|
|
global |
|
This example illustrates the most common pitfall: setting a restrictive global tags without realising it must overlap with every agent’s tags. To fix it, either:
-
Remove the global
["acme"](Alice then sees everything within each agent’s scope), or -
Add per-agent overrides for every agent Alice should access, where each override overlaps with the agent’s tags. For instance:
{ "hr-agent": ["hr"], "sales-agent": ["sales-internal"], "faq-agent": ["faq"] }.
A useful pattern is to set the global tags to a tenant marker like ["acme"], then ensure every agent and every document carries that marker — that way the global filter is a hard tenant boundary and per-agent overrides are added only when a stricter scope is needed.
Configuring restrictions from the UI
In Admin > Users, both the create and edit forms show:
-
Accessible agents — each selected agent reveals an inline Restrict to tags: input. Leave it empty to inherit the global default; enter a comma-separated list to set a per-agent override.
-
Global tag restriction (optional, comma-separated) — the default applied to any agent without its own override.
When you deselect an agent the per-agent override for that agent is dropped automatically. Changing the tenant in the form may drop ineligible agents and their overrides (a toast notifies you).
The Profile page also surfaces the Knowledge tags and Per-agent overrides read-only for the user themself, so they can understand what scope they’re operating under — but only an administrator can change them.
Configuring restrictions via the REST API
echo '{
  "tags": ["acme"],
  "agentTagRestrictions": {
    "hr-agent":    ["hr"],
    "sales-agent": ["sales-internal"]
  }
}' | http -a admin:password PATCH :8080/users/alice@acme.com
To clear all per-agent overrides while keeping the global default:
echo '{"agentTagRestrictions": null}' | http -a admin:password PATCH :8080/users/alice@acme.comTo clear the global default while keeping per-agent overrides:
echo '{"tags": []}' | http -a admin:password PATCH :8080/users/alice@acme.comThe UserPersistInterceptor rejects agentTagRestrictions whose keys are not in the user’s agents list (HTTP 400) — a restriction for an agent the user can’t access is dead config.
Propagation to live sessions
tags and agentTagRestrictions are surfaced as JWT account-properties claims (account-properties-claims on jwtTokenManager and jwtAuthenticationMechanism). A user already logged-in with a cookie continues to use the claims from the JWT issued at their last login — changing the user document does not retroactively update their session. The user must log out and back in (or wait for the cookie to expire) to see the new restrictions take effect.
API tokens inherit the snapshot of the issuing user’s claims and behave the same way: revoke and re-issue from the API Tokens page if you need to push a change.
Multi-tenant Isolation
A tenant-admin sees only resources whose tenant field equals their own. The isolation is enforced via RESTHeart’s mongoAclAuthorizer (readFilter + writeFilter + mergeRequest) and complemented by server-side interceptors for documents that the backend creates on behalf of the user (chats, segments, MCP sessions, API tokens).
To create a new tenant: open Admin > Tenants as a global admin, click New Tenant, and assign a tenant administrator. The global admin remains responsible for tenant CRUD; tenant-admins cannot manage tenants other than their own.
User Profile Page
Every authenticated user (regardless of role) has access to /profile — a single self-service page exposing:
-
Account — email (=
_id), display name (inline-editable; onlypasswordandnameare in the user-self PATCH whitelist), tenant, roles, status, "member since". When the user has knowledge tag restrictions, this section additionally shows the global Knowledge tags and any Per-agent overrides read-only, with a short explanation of the intersection semantics so the user understands the scope they’re operating in. -
Accessible Agents (collapsible) — list of agents the user can chat with, badged
publicorprivate -
Change Password (collapsible) — form to change the user’s own password; the current password is re-verified before the change is committed (UX hardening against session hijack)
-
Accepted Policies — version + date of accepted Terms / Privacy / Cookie policy, with a "re-acceptance required" badge when an outdated version is detected. A Refresh button re-fetches
GET /legal-policiesto detect a server-side bump without reloading the page. -
Session — explicit Logout button (centralized; the avatar dropdown and admin sidebar link to this page rather than logging out directly)
Administrators reach the page from the Profile link in the admin sidebar; regular users via the avatar at the top-right of the chat. Both entry points append a ?back=<currentUrl> query parameter, and the profile page’s ← Back button honours it — returning the user to the exact chat or admin section they came from. The fallback is /admin for administrators and / (the default agent) for regular users; the back target is ignored if it points to /profile itself (to avoid loops) or is not a same-origin path (for security).
The user-self PATCH is whitelisted at the ACL layer to password and name only — every other field (roles, tenant, agents, tags, agentTagRestrictions, notes) remains administrator-only.
Legal Documents and Consents
Sophia’s legal documents — Terms of Service, Privacy Policy and Cookie Policy — are hosted externally on restheart.com and referenced from Sophia by canonical URLs declared in the backend configuration (legalPolicies section). The backend exposes them at GET /legal-policies:
{
  "terms":   { "version": "1.0", "url": "https://restheart.com/legal/terms/sophia/" },
  "privacy": { "version": "1.0", "url": "https://restheart.com/legal/privacy-policy/" },
  "cookies": { "url":     "https://restheart.com/legal/cookie-policy/" }
}
Only Terms and Privacy carry a version (and trigger re-acceptance on major bumps). The Cookie Policy is informational only and does not require consent: Sophia uses a single essential authentication cookie (rh_auth).
Acceptance Recording
When a user accepts (at activation or during re-acceptance), Sophia records three nested objects under users.<_id>.consents:
{
  "consents": {
    "termsAndConditions":       { "version": "1.0", "url": "...", "acceptedAt": <date>, "ip": "..." },
    "privacyPolicy":            { "version": "1.0", "url": "...", "acceptedAt": <date>, "ip": "..." },
    "unfairTermsAndConditions": { "version": "1.0",               "acceptedAt": <date>, "ip": "..." }
  }
}
The unfairTermsAndConditions entry attests to the explicit approval of art. 1341 c.c. clauses listed in §13.5 of the Terms. The url field stores the exact versioned document the user accepted — an immutable audit reference.
Acceptance Enforcement
The AcceptanceCheckInterceptor runs after authentication on every Mongo request. If consents.termsAndConditions.version or consents.privacyPolicy.version differs in MAJOR component from the configured current versions (or is missing), the interceptor replies with 403 and body { "error": "AcceptanceRequired", "policies": ["terms", "privacy"] }. The web client’s HTTP interceptor catches this response and opens the blocking acceptance modal.
API tokens are not exempt — they inherit the consents of the user who issued them. A major-version bump therefore blocks the token until the issuing user re-accepts via the web UI. To rotate an API token under a different user, revoke and re-issue from the API Tokens page.
Publishing a New Version
-
Edit the markdown source on
restheart.com(src/legal/terms/sophia.mdorsrc/legal/privacy-policy.md). For a MAJOR change, publish under a new versioned path (e.g.src/legal/sophia/2.0/terms.md) and update the canonical redirect. -
Run the site build (
npm run buildin therestheart.comrepo) and deploy. -
Update Sophia’s backend config (
conf-prod.yml→legalPolicies.terms.versionandlegalPolicies.terms.url). -
Redeploy Sophia. The
AcceptanceCheckInterceptorimmediately starts blocking users with consents on the previous MAJOR — they will see the modal at their next request and re-accept.
MINOR changes do not require config changes nor re-acceptance: the URL is canonical, the content can be amended in place.
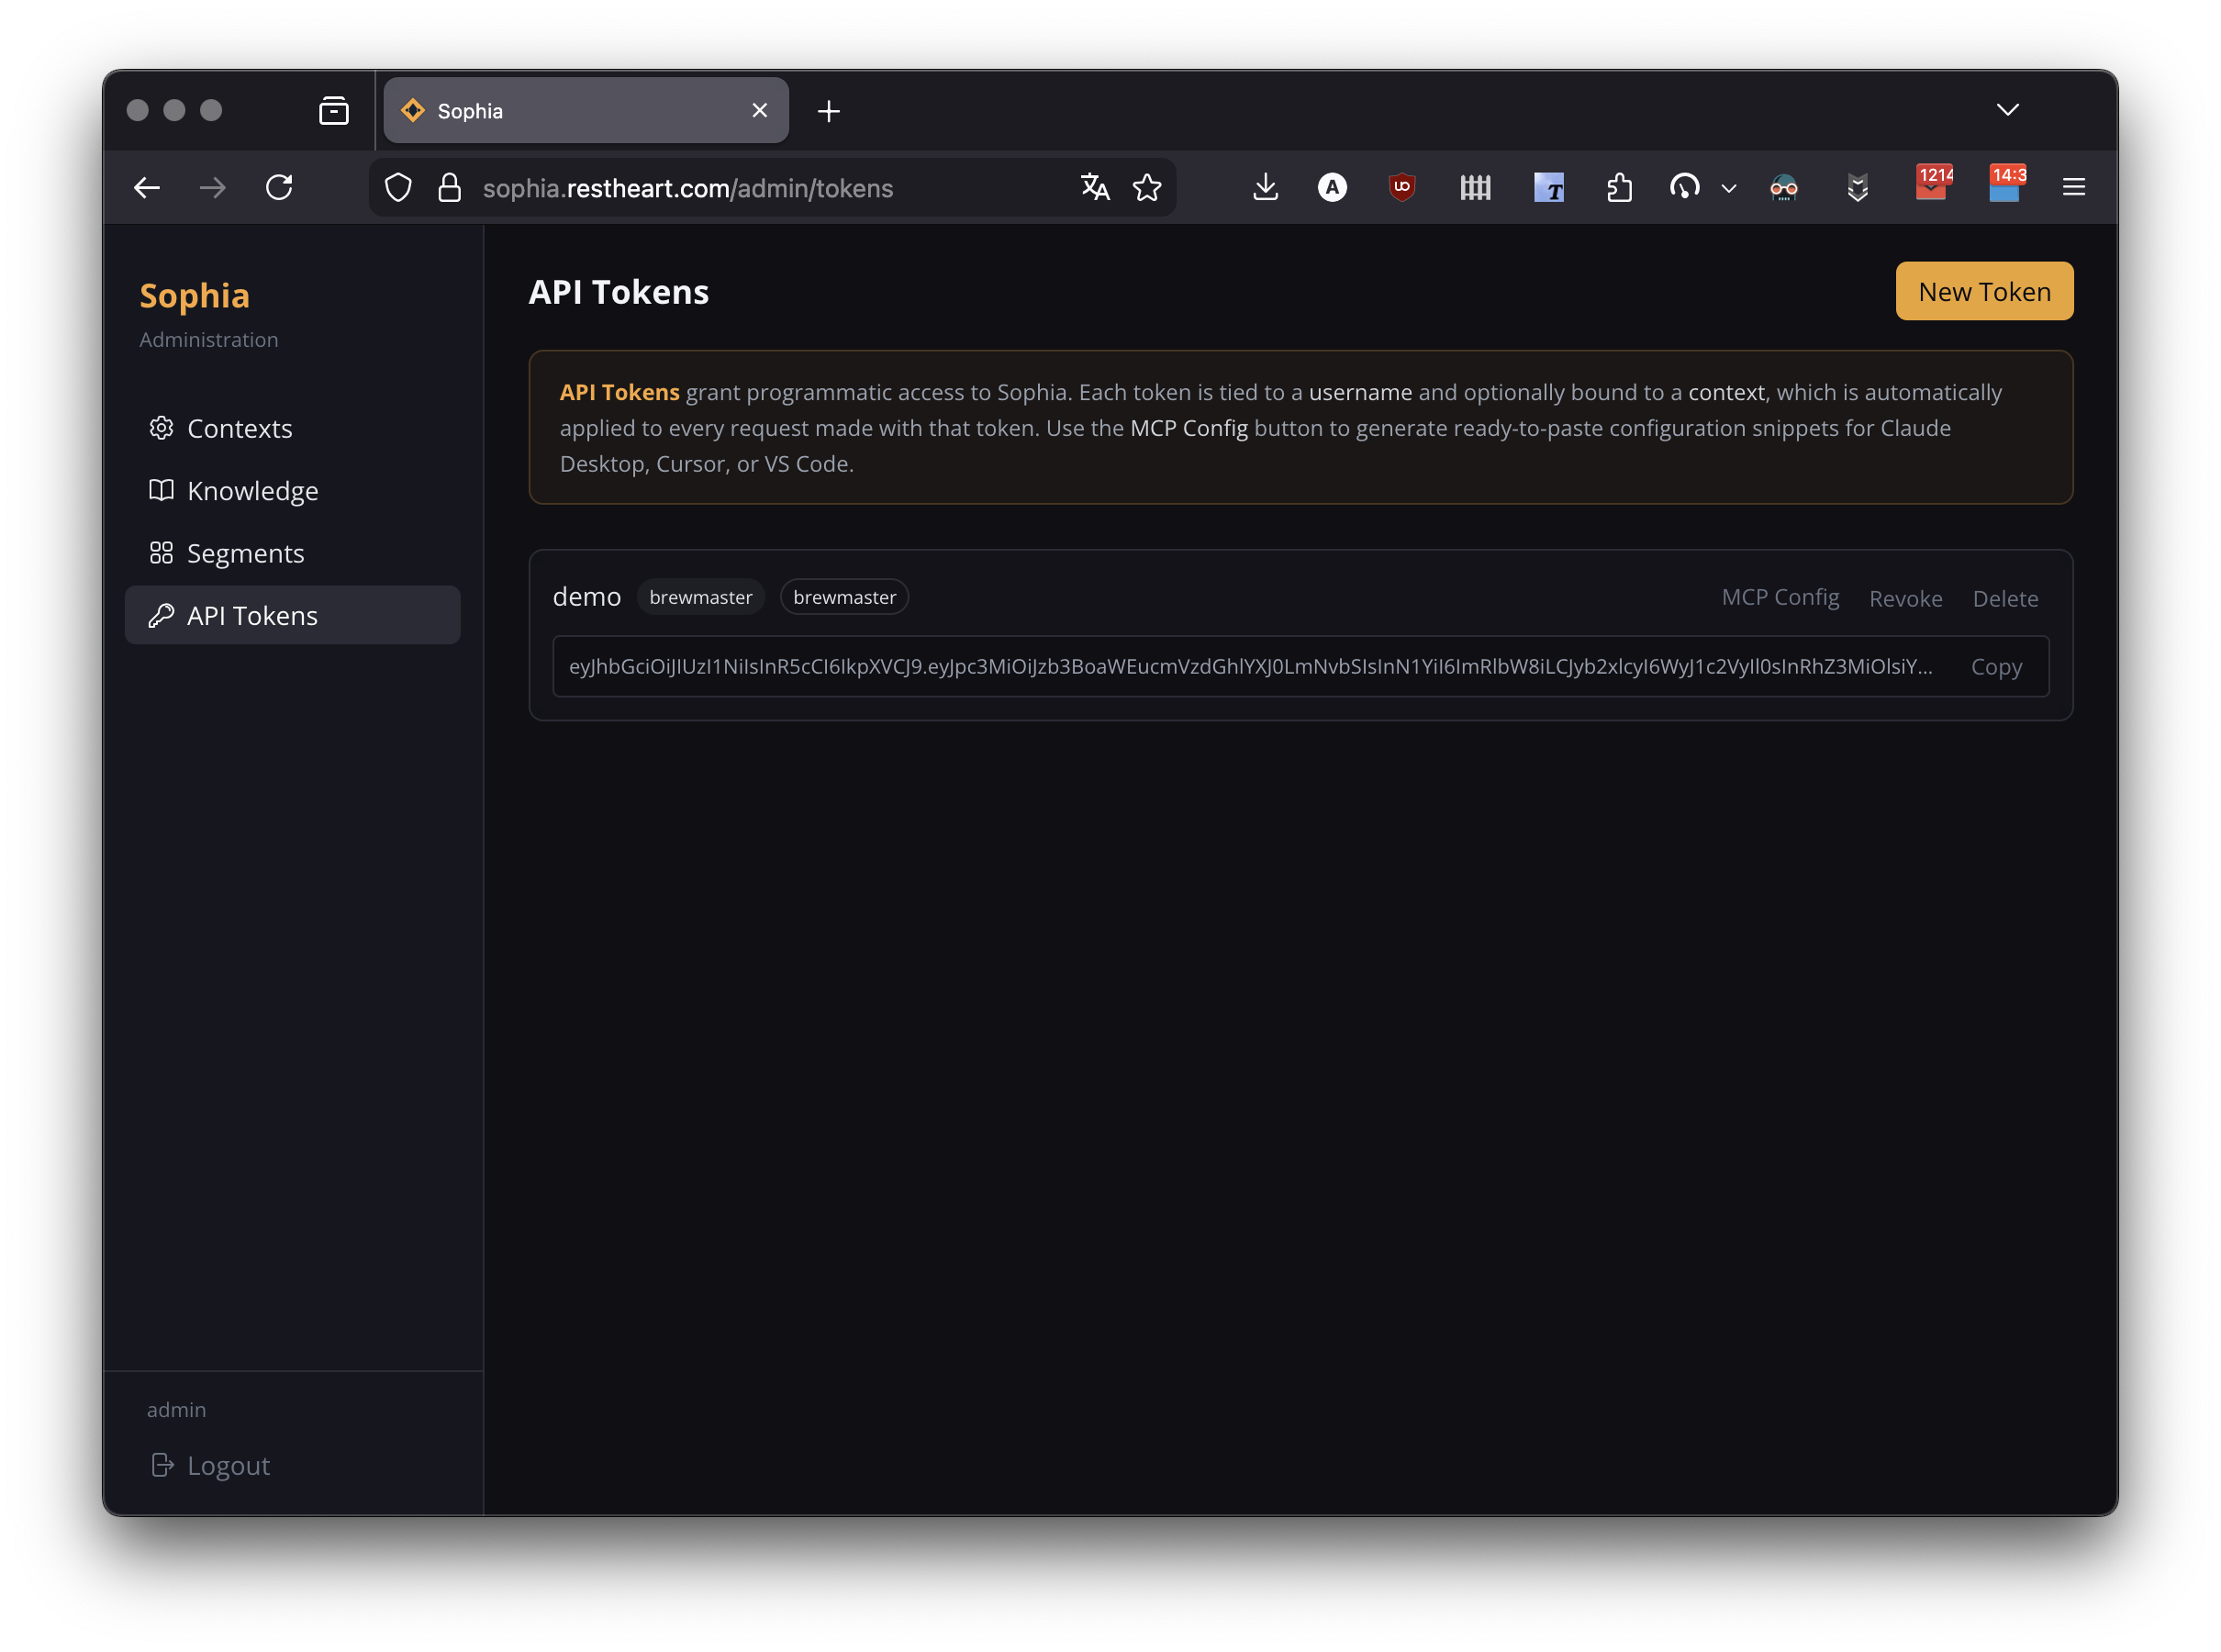
API Token Management
Navigate to Admin > API Tokens to manage long-lived JWT tokens for programmatic access and MCP client configuration.
Creating a Token
Click New Token and configure:
-
Username — identity associated with the token (does not need to match a user account, but is used in audit logs)
-
Agents — the agents this token can access. For private agents, the agent id MUST be included here.
-
Tags — optional further restriction on retrievable documents (pre-populated from the selected contexts' tags)
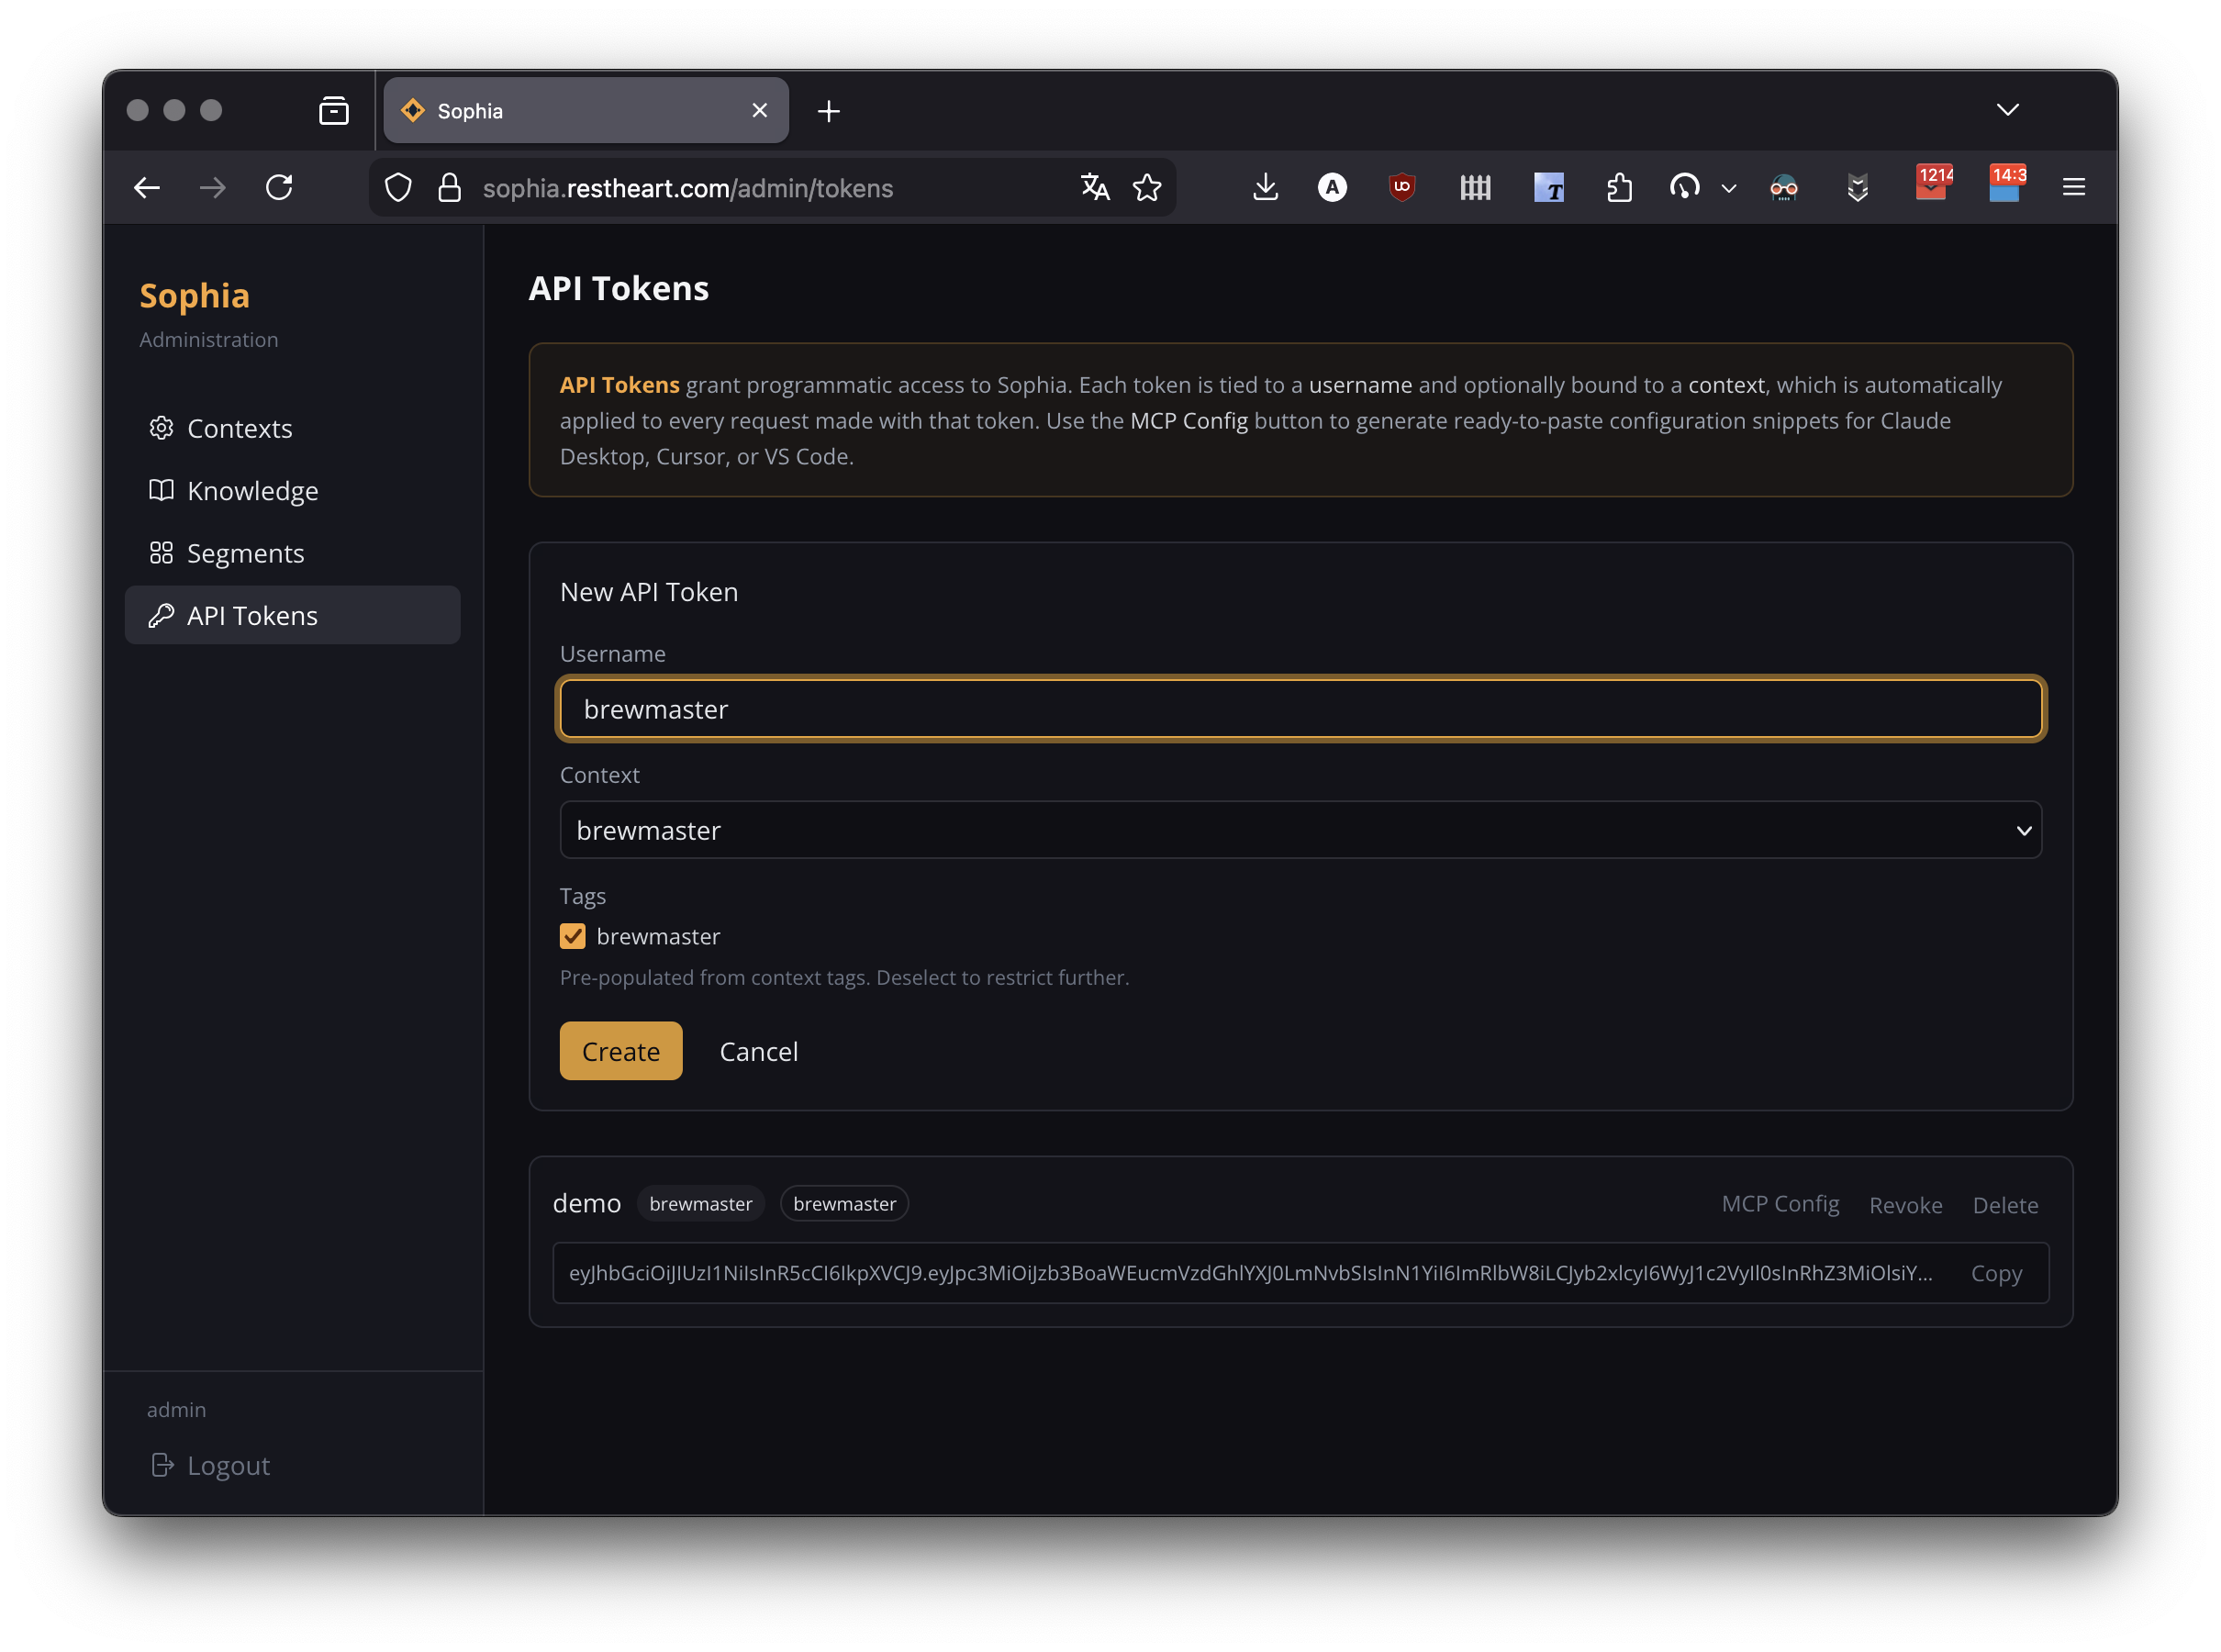
The JWT token value is shown only once after creation — copy it immediately. Token TTL is approximately ten years; use Revoke to invalidate ahead of expiry.
Token Security
-
A revoked token is rejected by a vetoer on every request before reaching the service layer
-
Tokens scoped to specific contexts cannot access other contexts
-
Tags on a token can further restrict (but not expand) the contexts' tag filters
MCP Configuration Generation
The MCP Config button next to each token generates ready-to-paste configuration snippets for Claude Desktop, Cursor, Claude Code, and VS Code, including the token in the Authorization: Bearer header.
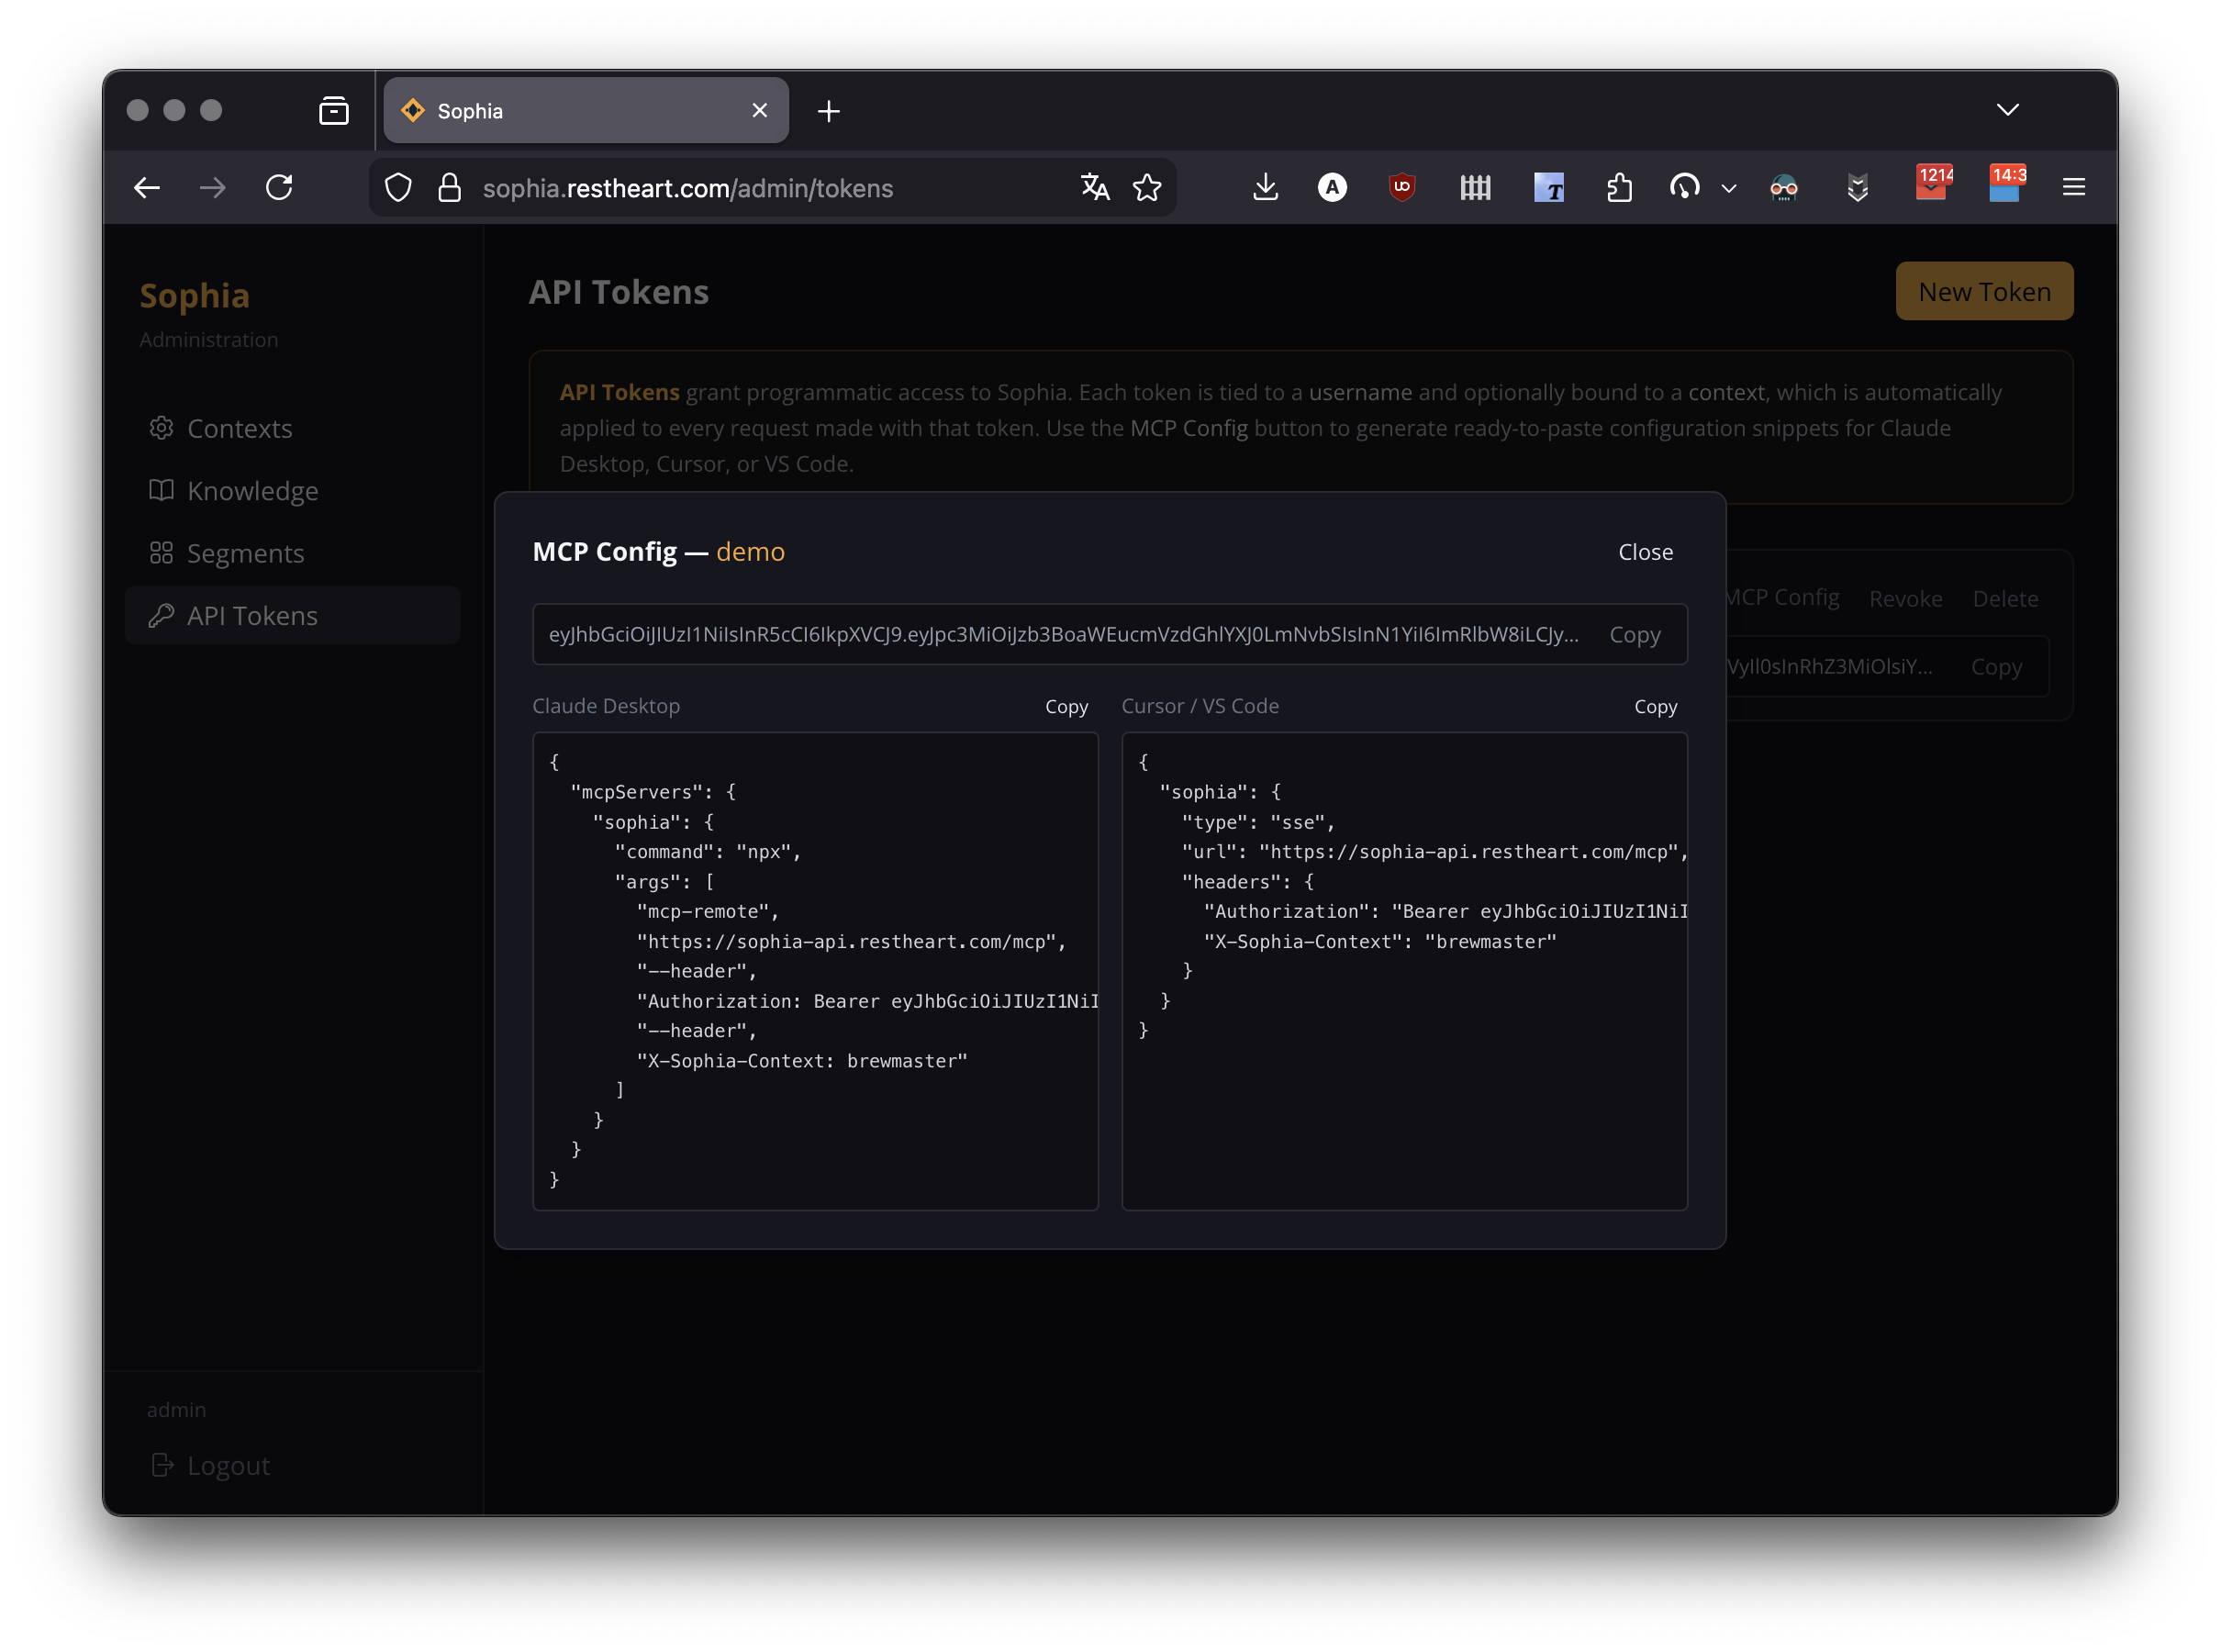
See Sophia MCP Server for full setup details and the OAuth alternative.
Managing Tokens via API
Issue a new token:
echo '{
  "username": "mcp-client",
  "contexts": ["support"],
  "tags": ["public"]
}' | http -a admin:password POST :8080/apiTokens
Revoke a token:
echo '{"revoked": true}' | http -a admin:password PATCH :8080/apiTokens/{jti}Delete a token:
http -a admin:password DELETE :8080/apiTokens/{jti}Chat Sessions Viewer
Navigate to Admin > Chats to browse all chat sessions in your instance.
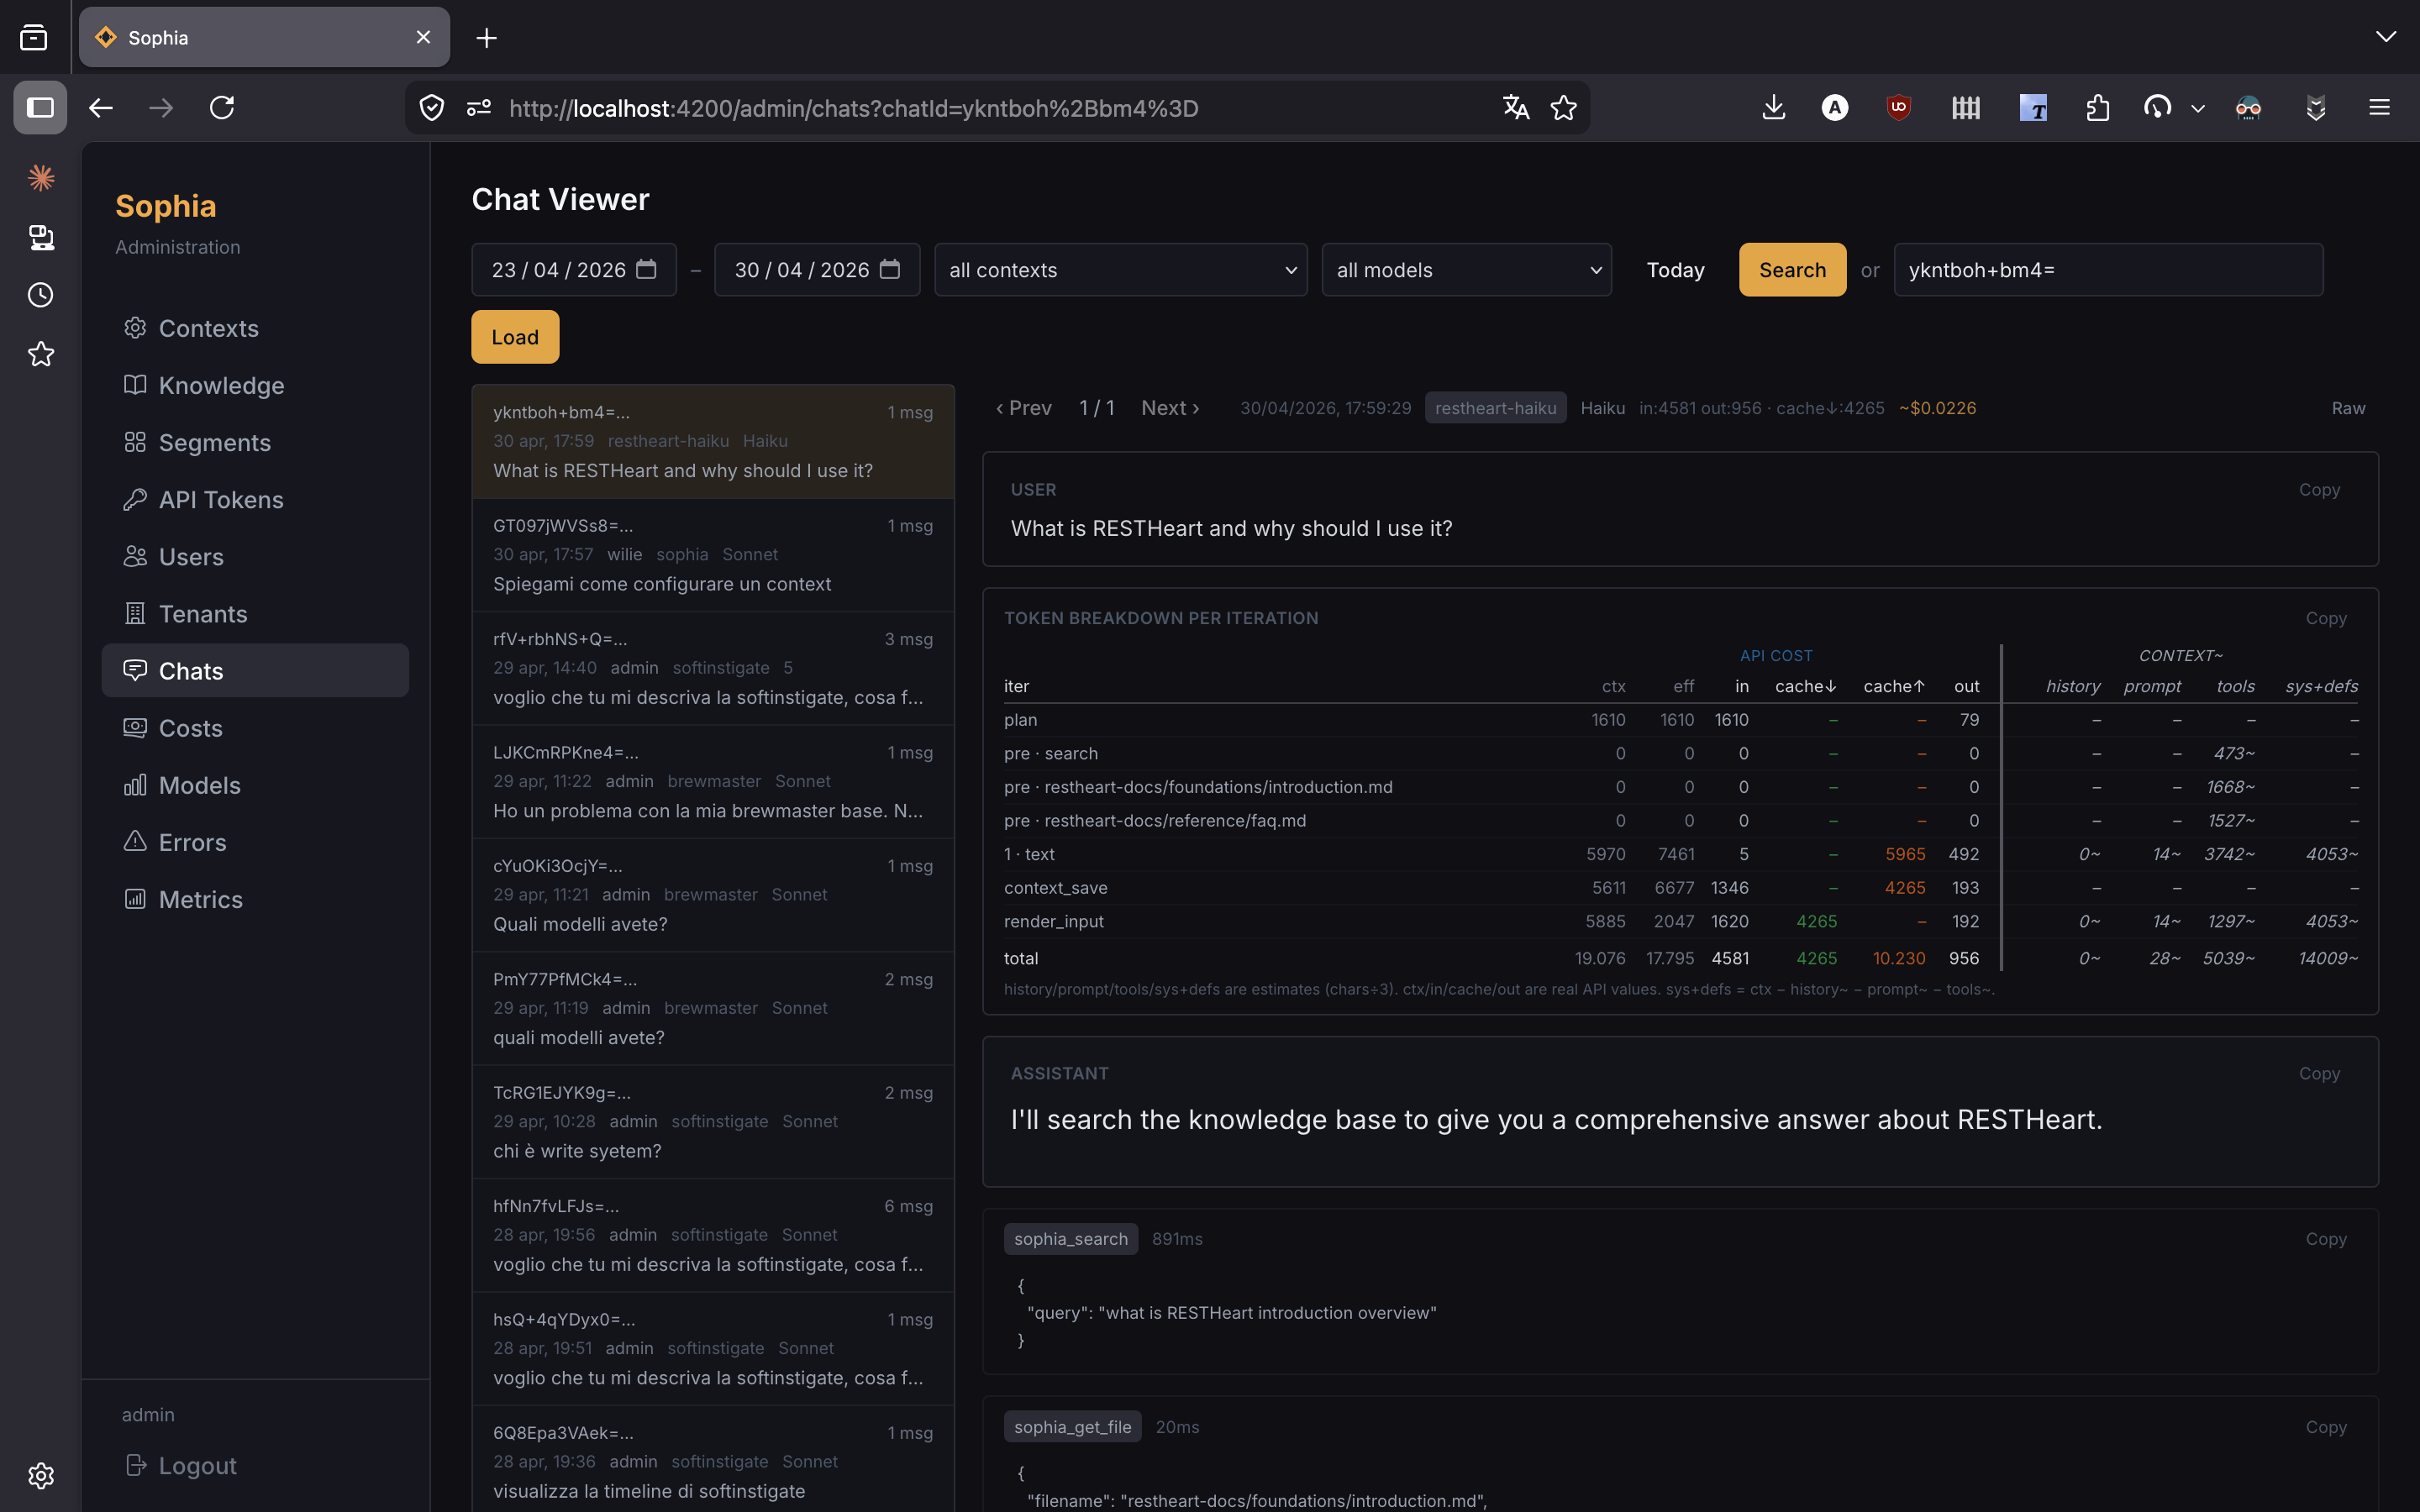
The list shows recent sessions across all agents and users, with filters for date range, agent, model, and username.
Selecting a session opens a detail view with:
-
Full prompt and final answer
-
Iteration-by-iteration breakdown of token usage (input, output, cache read/write, history chars, system prompt chars, tool definitions chars)
-
Effective token cost in dollars per iteration, with cache support indicators
-
Tool-call timeline with arguments, result summaries, and durations
-
Copy buttons for prompt, answer, and per-iteration data
Use this view to debug agentic loops, identify inefficient prompt designs, and validate prompt-caching effectiveness.
Costs Dashboard
Navigate to Admin > Costs for a dollar-aware view of model spend.
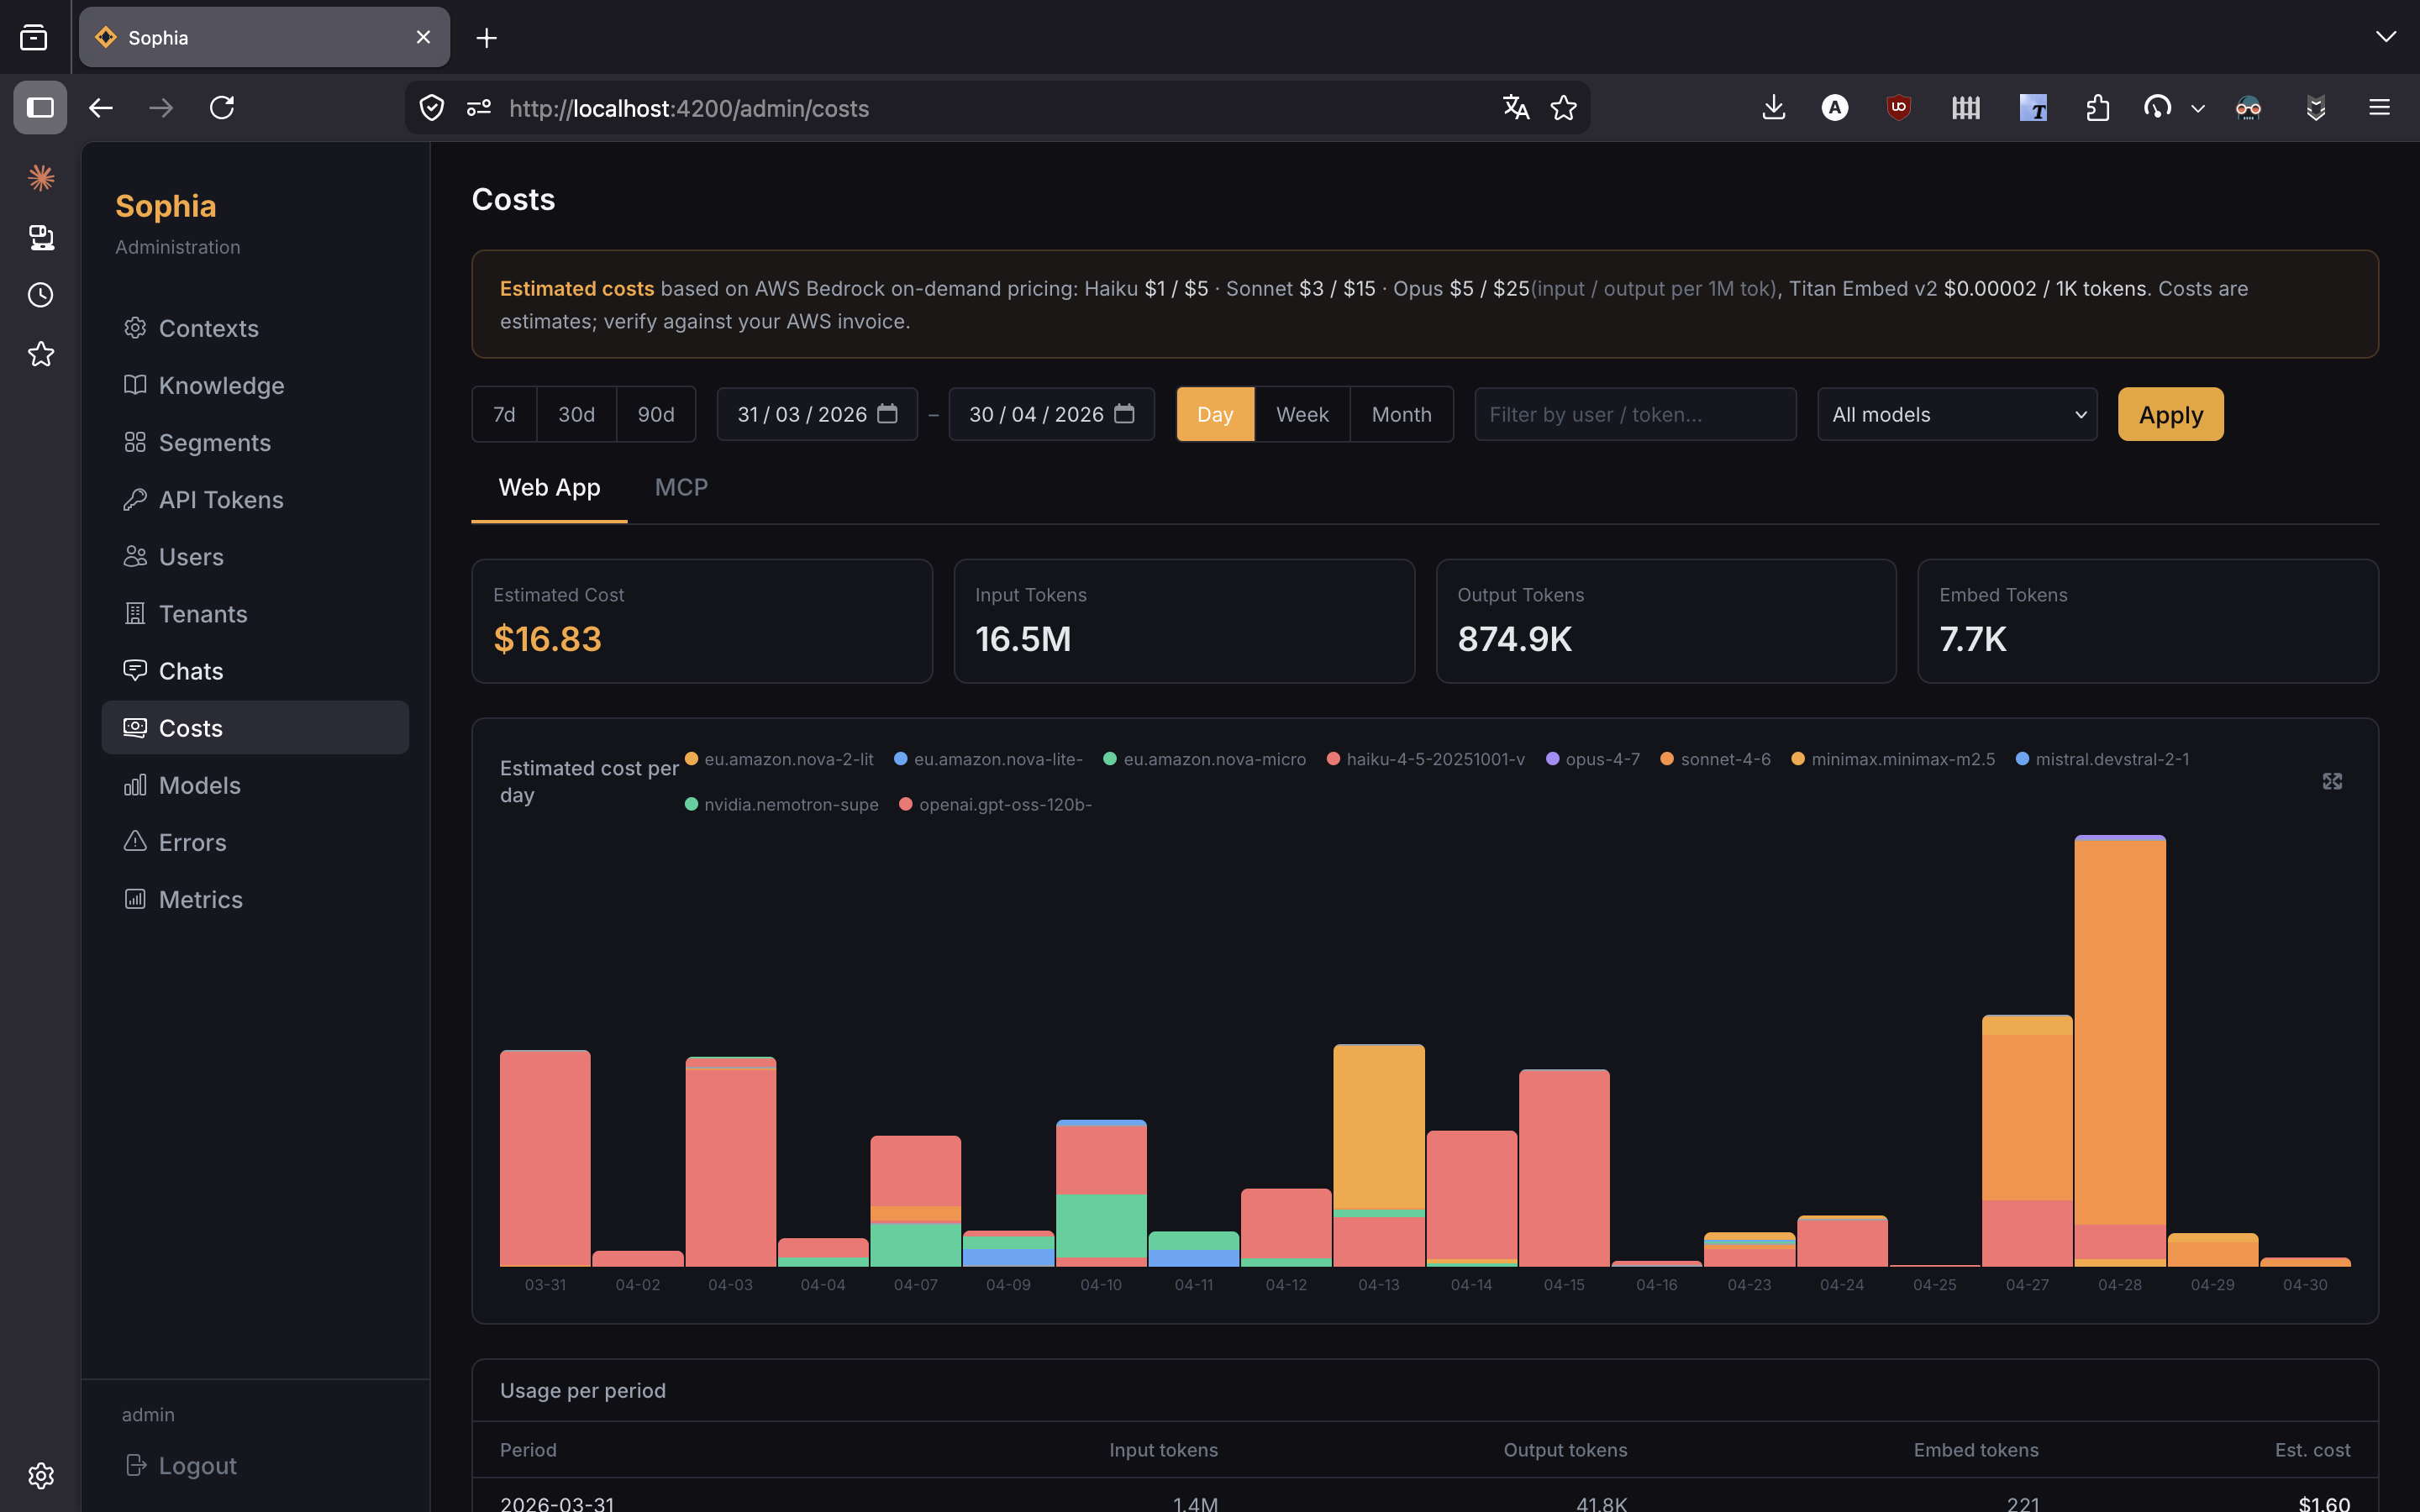
The dashboard provides:
-
Time-series charts of token usage and dollar cost over a selectable date range
-
Stacked breakdown by model (Claude Sonnet, Claude Haiku, Nova, Nemotron, …)
-
Filtering by agent and model
-
Fullscreen chart view for presentation/screenshots
-
Average tokens and average iterations per chat session
Cost calculations honour Bedrock pricing per model and account for prompt caching (cache reads at 10% of input price, cache writes at 125%).
Errors
Navigate to Admin > Errors to review failed chat completions over a date range. The list shows chat id, prompt, error message, and the failure step (planning, search, render, synthesis, tool execution). Useful for diagnosing model throttling, malformed contexts, or tool-side issues.
Models
Navigate to Admin > Models for the catalogue of available Bedrock inference profiles.
The table shows for each model:
-
Origin (EU / US)
-
Display name and inference-profile id
-
Input / output price per million tokens
-
Throttling quota (TPM, RPM)
-
Tool-use score (excellent / good / poor) — a hint about how reliably the model invokes tools in agentic loops
Pick a model id from this table when overriding the default in an agent.
Model Failover
Sophia automatically falls back across a configured chain of secondary models on transient errors (throttling, rate-limits, brief outages). A circuit breaker tracks recent failures per model and skips models in cool-down. The user receives a model_fallback event that the chat UI renders as an inline notice; the conversation continues seamlessly.
The fallback chain is configured server-side per environment.
Initial Setup
For first-time provisioning, AWS Bedrock IAM setup, and MongoDB Atlas vector index creation, see the Setup Guide.