An example Web application with AngularJS
Please provide us with your feedback, so that we can improve this tutorial.
Web API in action with AngularJS, RESTHeart and MongoDB
Imagine the following scenario: you want to develop a Web application on top of a data model, following simple CRUD operations. Data can be modeled as a hierarchy of documents, and MongoDB is a perfect fit for the job, or you already have some data in a MongoDB instance and you want to quickly build a user interface for it.
You know that most probably UI requirements will change, and your boss will ask for a mobile client in the future, so you want to achieve flexibility by developing a REST API; off course there’s no much time and you must deliver it in few days focusing on the user experience.
You know that a modern MVC javascript framework such as AngularJS can help you, it can be used to implement the Web interface and populate it with data using a bunch of AJAX calls to your REST API.
MongoDB will take care of the data, but you still have a missing piece: the server-side API layer. To implement it there are plenty of choices; if you are a front-end developer, you probably know JavaScript and Node.js, with some PHP and Ruby: writing a simple server to expose MongoDB data following REST principles shouldn’t be much hard with such technologies, right?
You start writing a lot of repetitive logic which is only meant to create a “bridge” between the database and the UI. Each collection will need some dedicated server-side logic. After a while you realize you also need to add authentication, authorization and provide a way to navigate all data via hyperlinks.
Things are growing in complexity and you are running out of time: “there must be a better way, I just want to model the data and create a nice-looking UI, without wasting time with boilerplate code” you think.
Here RESTHeart comes to the rescue!
This tutorial demonstrates a simple but fairly complete RESTful Web application built using AngularJS and MongoDB, without any server-side code. This is possible by exposing MongoDB as set of REST services via RESTHeart, the RESTful API Data Server for MongoDB.
RESTHeart is an open-source project written in Java, distributed under the same license as MongoDB (GNU AGPL v3.0). It uses internally the blazing fast Undertow HTTP server, which is at the core of the latest JBoss Application Server.
The most interesting characteristics of RESTHeart are:
- Zero development time: just start it and MongoDB documents can be exposed via a navigable REST API, ready to use;
- CRUD Data model operations API for MongoDB: create, read update and delete databases, collections, indexes and the data structure directly via HTTP;
- Pluggable security model, with User Management and ACL, so that you can expose only the MongoDB resources you really need;
- HATEOAS HAL hypermedia type, so that it’s extremely easy to navigate MongoDB resources via URLs only.
- Extremely lightweight: pipeline architecture, ~7Mb footprint, ~200Mb RAM peek usage, starts in milliseconds;
- Horizontally scalable: stateless architecture supporting MongoDB replica sets and shards;
- Support Cross-origin resource sharing CORS so that your one page Web application can deal with RESTHeart running on a different domain.
- A perfect fit for micro-services deployed in Docker containers.
So, wouldn’t be lovely if you could even leverage Docker for development and deployment? Docker is a cool technology, it allows you to create a development environment in few minutes and deploy exactly the same stuff in production. “This would be another huge time-saver!” You think with a smile.
The Web application we are going to build is a web notepad, where you’ll be able to insert and edit your notes. It will be deployed as a couple of Docker containers, one running MongoDB and the other running RESTHeart. Zero server-side code will be written, you need to know only a little AngularJS for the UI and, of course, some of MongoDB.
Ingredients
The main ingredients for our recipe are:
- MongoDB 3.0 - a cross-platform document-oriented database. Classified as a NoSQL database, MongoDB eschews the traditional table-based relational database structure in favor of JSON-like documents with dynamic schemas.
- RESTHeart API Server - RESTHeart is the RESTful Web API Server for MongoDB, ready to use with CRUD operations API and Data Model operations API. Create databases, collections, indexes and document by only using HTTP verbs.** **
- AngularJS - it lets you extend HTML vocabulary for your application. The resulting environment is extraordinarily expressive, readable, and quick to develop.
- Restangular - an AngularJS service that simplifies common GET, POST, DELETE, and UPDATE requests with a minimum of client code. It’s a perfect fit for any WebApp that consumes data from a RESTful API.
- Docker - Docker containers wrap up a piece of software in a complete filesystem that contains everything it needs to run: code, runtime, system tools, system libraries – anything you can install on a server. This guarantees that it will always run the same, regardless of the environment it is running in.
Introduction
RESTHeart is the perfect companion for MongoDB when you want to effectively expose data CRUD operations via a RESTful Web API, i.e. an application program interface that relies on Web technologies, notably the HTTP protocol, to Create, Read, Update and Delete data. With such API you can easily build a modern Web application, for example leveraging one of the many MVC JavaScript frameworks such as AngularJS or Backbone.js.
RESTHeart fully implements HATEOAS principles. HATEOAS, an abbreviation for Hypermedia as the Engine of Application State, is a constraint of the REST application architecture. The principle is that a client interacts with a network application entirely through hypermedia, provided dynamically by application servers. A REST client needs no prior knowledge about how to interact with any particular application beyond a generic understanding of hypermedia.
These are the ingredients for an HATEOAS recipe, where the application state is held by the client and the server is completely stateless: a good recipe indeed, that will lead you to serve many concurrent users with a single node and that can be easily scaled up horizontally. In this architecture, the data model is effectively represented by a set of HTTP resources, while the representation logic is managed entirely client-side by AngularJS.
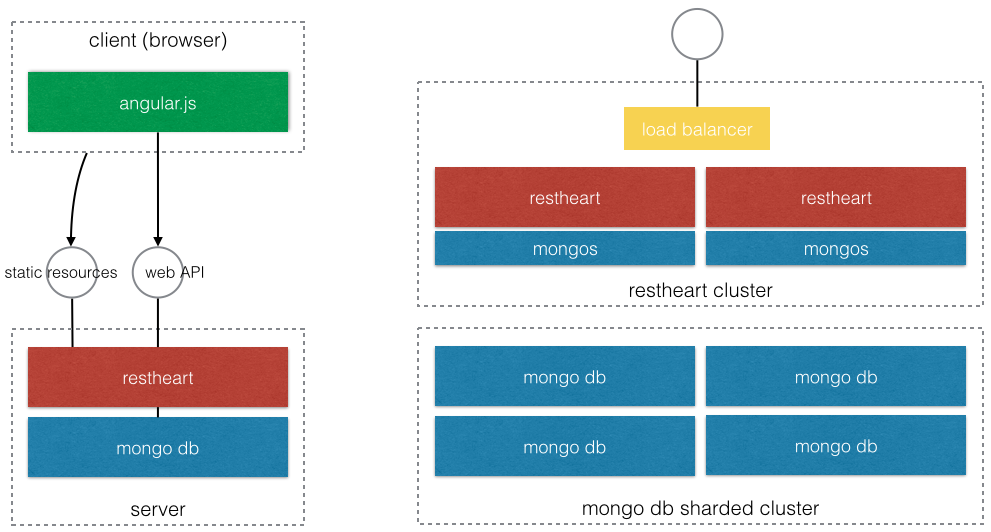
The following image depicts the client browser with AngularJS connecting to the Web API, exposed by RESTHeart, that in turns connects to MongoDB. On the right, a more complex deployment, with MongoDB scaled up in a shared cluster, and two RESTHeart instances mediated by a load balancer. The latter configuration is likely to support thousands of concurrent users.
 {height=”400”}
Goals
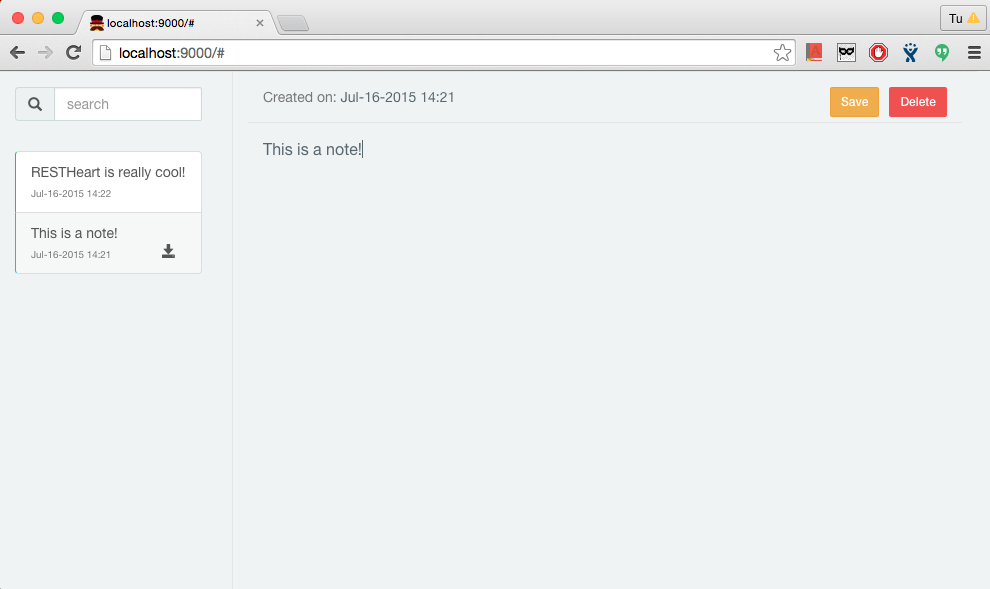
We will create a simple notes Web application.
- After login, the user will see its notes in a list on the left; a search box allows to filter the notes list;
- Clicking a note in the list, displays it in the content area also allowing to edit it;
- Buttons allow to create a new note or delete an existing one.
 {height=”400”}
Getting the servers up and running
You can refer to Installation and Setup documentation section for detailed instructions on how to install RESTHeart and MongoDB. However, the suggested way to get ready is using the official RESTHeart Docker image.
How to install and use Docker depends on the operating system you are running:
In a Docker installation on Linux, your machine is both the localhost and the Docker host. In networking, localhost means your computer. The Docker host is the machine on which the containers run. On a typical Linux installation, the Docker client, the Docker daemon, and any containers run directly on your localhost. This means you can address ports on a Docker container using standard localhost addressing such as localhost:8000 or 0.0.0.0:8376. In a Windows or OSX installation, the Docker daemon instead is running inside a Linux virtual machine provided by Boot2Docker.
Full Docker setup instructions are available at https://docs.docker.com/installation/. Please go there and follow your operating system’s instructions if you want to use Docker.
Now, if you Docker setup is terminated, we can proceed.
On Windows and Mac OSX you’ll first have to start the Docker virtual
machine host by running boot2docker. To run a Docker container, you
first start the boot2docker VM and then issue docker commands to create,
load, and manage containers. You can launch Boot2Docker from your
Applications folder or from the command line. In summary, with
Boot2Docker you have the following additional steps, while if you are on
Linux you don’t need them (the boot2docker init commando needs to be
issued only the very first time):
Start boot2docker (only needed in Windows and MacOS X)
$ boot2docker init
$ boot2docker start
$ eval "$(boot2docker shellinit)"
Boot2Docker will ask you to copy and set some environment variable and
it indicates the DOCKER_HOST variable, which is the IP address of the
Docker VM running in your system. Usually it should be something like
192.168.59.103, so later you’ll point your browser
to https://192.168.59.103:8080 to access RESTHeart. But let’s go on
with our setup for now.
Run the hello-world container to verify your setup:
Hello, world!
$ docker run hello-world
If everything looks fine, then you can download the two Docker images necessary for this tutorial, one for MongoDB and one for RESTHeart.
Pull the docker images
$ docker pull mongo
$ docker pull softinstigate/restheart
The pull commands can take some time to execute, as they are downloading the Linux images containing all the requisite software.
You can list the available Docker images via the
docker images command, which should display something like:
List local docker images
$ docker images

REPOSITORY                TAG                 IMAGE ID            CREATED             VIRTUAL SIZE
softinstigate/restheart   latest              2e1aaa05d0c5        26 hours ago        496.5 MB
mongo                     latest              a7b01f71af86        2 days ago          260.8 MB
Then, you can start MongoDB and RESTHeart containers, in this exact sequence.
Start the two images as daemons
$ docker run -d --name mongodb mongo:3.0
$ docker run -d -p 8080:8080 --name restheart --link mongodb:mongodb softinstigate/restheart
Without going into the finest detail, the RESTHeart container here is configured to link to the MongoDB container (for some additional information on Docker links please have a look to the References section at the end of this article).
Note that the first command is asking to specifically run the latest MongoDB 3.0.x release, which at the time of this article is 3.0.4. This is done by appending the specific Docker tag to the image name (mongo:3.0 in this case). This is not mandatory but recommended, as RESTHeart 0.10 now is mainly tested together with MongoDB 3.0, even it works fine also with versions 2.6 and 2.4.
Docker offers a simple way to access log files and check that everything
is fine, for example issuing the docker logs mongodb command:
MongoDB logs
$ docker logs mongodb

2015-07-09T14:41:56.938+0000 I JOURNAL  [initandlisten] journal dir=/data/db/journal
2015-07-09T14:41:56.939+0000 I JOURNAL  [initandlisten] recover : no journal files present, no recovery needed
2015-07-09T14:41:57.053+0000 I JOURNAL  [durability] Durability thread started
2015-07-09T14:41:57.053+0000 I JOURNAL  [journal writer] Journal writer thread started
2015-07-09T14:41:57.057+0000 I CONTROL  [initandlisten] MongoDB starting : pid=1 port=27017 dbpath=/data/db 64-bit host=916f68fe3455
...
2015-07-09T14:41:57.057+0000 I CONTROL  [initandlisten] db version v3.0.4
2015-07-09T14:41:57.057+0000 I CONTROL  [initandlisten] git version: 0481c958daeb2969800511e7475dc66986fa9ed5
2015-07-09T14:41:57.057+0000 I CONTROL  [initandlisten] OpenSSL version: OpenSSL 1.0.1e 11 Feb 2013
2015-07-09T14:41:57.057+0000 I CONTROL  [initandlisten] build info: Linux ip-10-146-31-239 3.2.0-4-amd64 #1 SMP Debian 3.2.46-1 x86_64 BOOST_LIB_VERSION=1_49
2015-07-09T14:41:57.057+0000 I CONTROL  [initandlisten] allocator: tcmalloc
2015-07-09T14:41:57.057+0000 I CONTROL  [initandlisten] options: {}
2015-07-09T14:41:57.058+0000 I INDEX    [initandlisten] allocating new ns file /data/db/local.ns, filling with zeroes...
2015-07-09T14:41:57.135+0000 I STORAGE  [FileAllocator] allocating new datafile /data/db/local.0, filling with zeroes...
2015-07-09T14:41:57.135+0000 I STORAGE  [FileAllocator] creating directory /data/db/_tmp
2015-07-09T14:41:57.141+0000 I STORAGE  [FileAllocator] done allocating datafile /data/db/local.0, size: 64MB,  took 0.002 secs
2015-07-09T14:41:57.145+0000 I NETWORK  [initandlisten] waiting for connections on port 27017
2015-07-09T14:42:13.606+0000 I NETWORK  [initandlisten] connection accepted from 172.17.0.4:42644 #1 (1 connection now open)
2015-07-09T14:42:13.641+0000 I NETWORK  [initandlisten] connection accepted from 172.17.0.4:42645 #2 (2 connections now open)
Do the same for RESTHeart, issuing the docker logs restheart command:
RESTHeart logs
$ docker logs restheart

14:42:13.076 [main] INFO  org.restheart.Bootstrapper - Starting RESTHeart ********************************************
14:42:13.100 [main] INFO  org.restheart.Bootstrapper - Creating pid file /var/run/restheart.pid
14:42:13.236 [main] INFO  org.restheart.Bootstrapper - RESTHeart version 0.10.3
14:42:13.341 [main] INFO  org.restheart.Bootstrapper - Initializing MongoDB connection pool to mongodb:27017
14:42:13.343 [main] INFO  org.restheart.Bootstrapper - MongoDB connection pool initialized
14:42:13.735 [main] INFO  org.restheart.Bootstrapper - Token based authentication enabled with token TTL 15 minutes
14:42:13.970 [main] INFO  org.restheart.Bootstrapper - HTTPS listener bound at 0.0.0.0:4443
14:42:13.970 [main] INFO  org.restheart.Bootstrapper - HTTP listener bound at 0.0.0.0:8080
14:42:13.972 [main] INFO  org.restheart.Bootstrapper - Local cache for db and collection properties enabled
14:42:13.991 [main] INFO  o.r.handlers.RequestDispacherHandler - Initialize default HTTP handlers:
14:42:13.993 [main] INFO  o.r.handlers.RequestDispacherHandler - putPipedHttpHandler( ROOT, GET, org.restheart.handlers.root.GetRootHandler )
...
14:42:14.029 [main] INFO  org.restheart.Bootstrapper - URL / bound to MongoDB resource *
14:42:14.143 [main] INFO  org.restheart.Bootstrapper - Embedded static resources browser extracted in /tmp/restheart-3350487661431988250
14:42:14.154 [main] INFO  org.restheart.Bootstrapper - URL /browser bound to static resources browser. access manager: false
14:42:14.157 [main] INFO  org.restheart.Bootstrapper - URL /_logic/ping bound to application logic handler org.restheart.handlers.applicationlogic.PingHandler. access manager: false
14:42:14.159 [main] INFO  org.restheart.Bootstrapper - URL /_logic/roles bound to application logic handler org.restheart.handlers.applicationlogic.GetRoleHandler. access manager: false
14:42:14.399 [main] INFO  org.restheart.Bootstrapper - RESTHeart started **********************************************
The last line shows that RESTHeart has started correctly and is ready to accept HTTP connections.
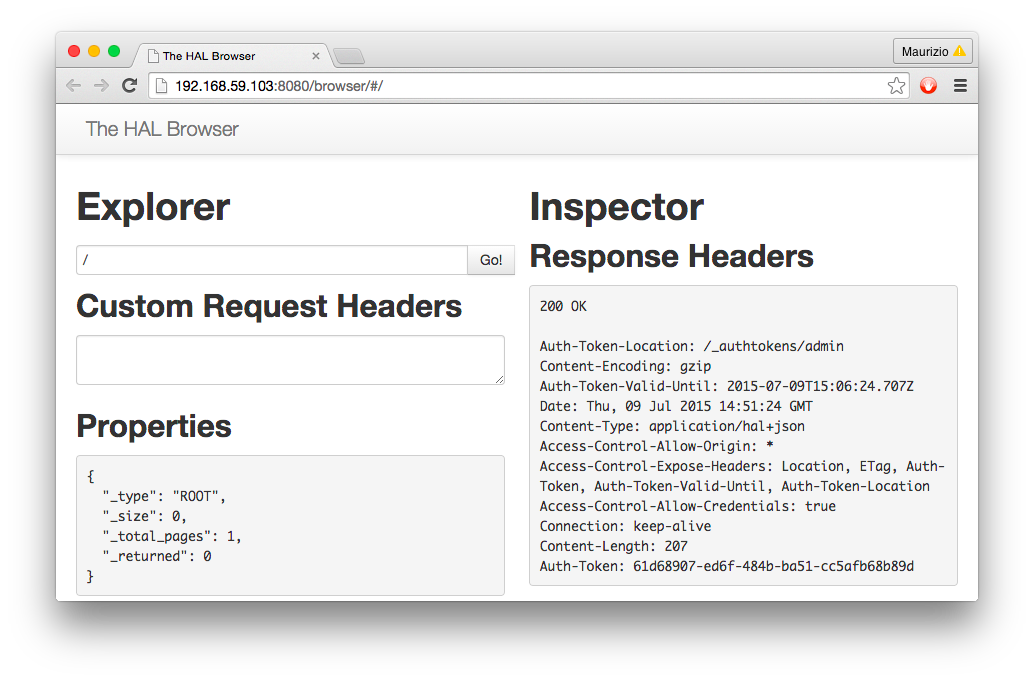
Now MongoDB and RESTHeart should be running in background, with RESTHeart linked to the MongoDB network interface, and you can check that everything works opening the embedded HAL browser, this way:
If you are running boot2docker, point your browser
at https://192.168.59.103:8080/browser (note that the IP address might
be different, to know it issue the boot2docker ip command); if you are
on Linux, simply it is at http://localhost:8080/browser.
The browser will prompt you for authentication: use the pre-defined
user admin with password changeit.
Your browser will show you something like this:
For more information about the restheart docker image, check it at https://hub.docker.com/r/softinstigate/restheart/
For more information about the RESTHeart security model refer to the Security documentation section.
Creating the data structure
We will be using the RESTHeart API and the HTTPie (a modern curl replacement) client to create the data structure. The main reason is that HTTPie offers a beautifully colorized and indented output for HTTP responses, which is especially useful when dealing with large JSON payloads.
The following two commands create respectively the rhedb database and
the notes collection in it.
Get up and running
$ http -a admin:changeit PUT https://192.168.59.103:8080/rhnedb descr="restheart notes example db"
HTTP/1.1 201 Created
...
$ http -a admin:changeit PUT https://192.168.59.103:8080/rhnedb/notes descr="notes collection"
HTTP/1.1 201 Created
...
That’s it for the server-side logic; RESTHeart now already automatically exposes the necessary Web Services for CRUD operations on the notes collection. Note that we haven’t written a single line of server-side code!
The Web client
Clone the Web client code from the GitHub’s repository at https://github.com/SoftInstigate/restheart-notes-example:
Clone the Web client
$ git clone https://github.com/SoftInstigate/restheart-notes-example.git
$ cd restheart-notes-example
Depending on how you installed RESTHeart, you might need to adjust the RESTHEART_URL variable in the code.
Edit the following line in the file app/scripts/app.js
Set the RESTHEART_URL variable
var RESTHEART_URL = "https://192.168.59.103:8080";
We assume you are using Docker, so you need to set it with the IP
address of the RESTHeart container; it might be the localhost; if you
are using boot2docker, you can retrieve the IP with the following
command:
Get the IP address
$ boot2docker ip
To run the application, first of all you have to install Node.js. Download the installer for your system from https://nodejs.org.
The following commands will update npm, install the Grunt and Bower tools, download the required js libraries using bower and start a web server for previewing the application .
View the web app
$ npm update -g npm
$ npm install -g bower grunt-cli
$ bower install
 (If Bower asks you for the AngularJS version, choose 1.3.0)
$ grunt serve
 (after a while it should starts the default browser at http://localhost:9000/#/signin)
Understanding the Web client
The Web client is an AngularJS application, a javascript client that connects with RESTHeart API to manage data.
The application skeleton has been generated with Yeoman using the AngularJS generator with few libraries added via bower, notably:
- Restangular, an AngularJS service “to handle Rest API Restful Resources properly and easily”;
- angular-local-storage ”an AngularJS module that gives you access to the browsers local storage with cookie fallback”;
- ui-router, “the de-facto solution to flexible routing with nested views in AngularJS”.
In order to understand how it works, we need to look at the following files:
- app/scripts/app.js
- app/scripts/config.router.js
- app/scripts/controllers/main.js
- app/scripts/controllers/signin.js
- app/scripts/controllers/notes.js
Application initialization and configuration
These tasks are accomplished by:
- app.js that defines the AngularJS application and configure Restangular to properly interoperate with RESTHeart;
- config.router.js that defines the ui-router states with their html templates and controllers.
The following code snippet from config.router.js shows the three states of the application: signin, the abstract state app and app.notes.
application states
                     .state('signin', {
                            url: '/signin',
                            templateUrl: 'views/signin.html',
                            controller: 'SigninCtrl',
                            resolve: {
                                deps: ['$ocLazyLoad',
                                    function ($ocLazyLoad) {
                                        return $ocLazyLoad.load('scripts/controllers/signin.js');
                                    }
                                ]
                            }
                        })

                        .state('app', {
                            template: '<div ui-view></div>',
                            abstract: true,
                            controller: 'MainCtrl',
                            resolve: {
                                deps: ['$ocLazyLoad',
                                    function ($ocLazyLoad) {
                                        return $ocLazyLoad.load('scripts/controllers/main.js');
                                    }
                                ]
                            }
                        })

                        .state('app.notes', {
                            url: "/notes",
                            templateUrl: 'views/notes.html',
                            controller: 'NotesCtrl',
                            resolve: {
                                deps: ['$ocLazyLoad',
                                    function ($ocLazyLoad) {
                                        return $ocLazyLoad.load('scripts/controllers/notes.js');
                                    }
                                ]
                            }
                        });
Authentication
The signin state is where user authentication occurs. A form collects
the user id and the password and perform a GET request to RESTHeart at
the URI /_logic/roles/<userid>; this is a special endpoint intended to
simplify the credentials check process.
The possible responses to GET /_logic/roles/<userid> requests are:
- 401 Unauthorized, if no or wrong credentials were passed in the Authorization header
- 403 Forbidden, if the user id in the Authorization header is different than the <userid> in the URI
- 200 OK if credentials match; in this case the following document is sent; not that it includes the roles array:
Roles
{
    "_embedded": {},
    "_links": {
        "self": {
            "href": "/_logic/roles/admin"
        }
    },
    "authenticated": true,
    "roles": ["ADMIN"]
}
If any request gets successfully authenticated RESTHeart includes in the response the following headers:
Auth-Token: 6a81d622-5e24-4d9e-adc0-e3f7f2d93ac7Auth-Token-Location: /_authtokens/adminAuth-Token-Valid-Until: 2015-07-08T13:28:10.749Z
The Authentication Token is a very important feature when you are developing a Web application. RESTHeart uses stateless basic authentication, so every request needs to include the user credentials; you need to store them either in a cookie or (better) in the session storage. In order to avoid to store the actual password, the client can check the credentials and, if they are verified, it can rather store the auth token and use it on further requests.
In summary, The authentication token together with the
/_logic/roles/<userid> resource, allows you to implement a form based
authentication experience on top of the simple and effective basic
authentication mechanism; this is actually what the signin.js controller
does:
It GETs /_logic/roles/ and in case it gets back 200, it stores the authentication token in the session storage.
Restangular is then configured to:
- always add the basic authentication header to every further requests
- to delete the auth token from the session storage if it is expired leading to a 401 Unauthorized response
- to add the No-Auth-Challenge request header to avoid the browser to prompt you for credentials with the awful popup login window
Finally, the controller of the app abstract state (that is executed by all children states, including app.notes) checks if the authentication token has been stored in the session storage, eventually redirecting to the sign-in page.
Getting, Posting, and Deleting Notes
Most of the application logic is handled by the controller notes.js of the app.notes state.
reference sheet
Have a look at the RESTHeart documentation reference sheetto quickly understand the semantic of the HTTP verbs on the different resources (for instance, a POST to a collection URI creates a document in it).
Notes list
The interface shows the list of existing notes on the left column, also allowing to filter it based on a search query. This is done by the loadNotes function:
Load notes
$scope.loadNotes = function (selectFirst) {
    $scope.isLoading = true;
    var apiOptions = {
        pagesize: 50,
        page: 1,
        count: true,
        sort_by: "-date"
    };
    var filter = getFilter($scope.query);
    if (angular.isDefined(filter)) {
        apiOptions.filter = filter;
    }
    ApiRestangular.all('notes').getList(apiOptions).then(function (result) {
        $scope.notes = result;
        $scope.isLoading = false;
        if (angular.isDefined(selectFirst) && selectFirst) {
            $scope.selected = $scope.notes[0];
        }
    });
};
$scope.$watch('query', function (newValue, oldValue) {
    $scope.loadNotes();
}, true);

....

function getFilter(query, userid) {
    if (angular.isDefined(query)) {
        return {'$and': [{'user': userid}, {'content': {$regex: '.*' + query + '.*' }}]};
    } else {
        return {'user': userid};
    }
}
The Restangular getList() call performs the following request:
GET /rhnedb/notes?sort_by=-date&filter={'user':'<userid>'}&pagesize=50&page=1
And, in case a search query has been specified:
GET /rhnedb/notes?sort_by=-date&filter={'$and':[{'user':'<userid>'},{'content':{'$regex':'(?i).*THE_QUERY_STRING.*'}}]}&pagesize=50&page=1
These GET requests to the URI /rhnedb/notes return the properties of
the collection itself together with its documents in the _embedded
sub-document according to the HAL representation format used by
RESTHeart.
The query parameters influence the result set:
- sort_by requires the documents to be sorted: in this case, by the date property descending (- stands for descending);
- pagesize and page control the paging: in this case we are returning the first 50 documents;
- filter can be any MongoDB query: in this case, it filters the notes limiting to those created by the authenticated user; also, if a search query has been specified, the $regex operator performs a case-insensitive match for documents with content value containing it.
Creating a new note
The new button allows to create a new note. This is done by the
createNote() function:
Create a new note
$scope.createNote = function () {
    var note = {
        content: 'New note',
        color: $scope.colors[Math.floor(Math.random() * 3)],
        date: Date.now(),
        user: AuthService.getSavedUserid(),
    };
    ApiRestangular.all('notes')
        .post(note)
        .then(function () {
            $scope.loadNotes();
        });
};
The Restangular post() performs the following request:
POST /rhnedb/notes <data.json>
POSTing the collection creates a new document; as soon as the response is received, the notes list gets reloaded (now it includes the new note as first item due to the sorting on the date property).
Updating and Deleting a note
When a note is selected, it gets displayed in the textarea on the right. As soon as the user modifies it, the note gets marked as “dirty” and the Save button is displayed. Clicking it invokes the updateNote() function:
Update a note
$scope.updateNote = function () {
    if (angular.isUndefined($scope.selected)) {
        return;
    }
    $scope.selected.date = Date.now();
    $scope.selected
        .put(null, { 'If-Match': $scope.selected._etag.$oid })
        .then(function (res) {
            dirties[$scope.selected._id.$oid] = false;
            $scope.loadNotes(true);
        });
};
$scope.deleteNote = function () {
    ApiRestangular.one('notes', $scope.selected._id.$oid)
        .remove(null, { 'If-Match': $scope.selected._etag.$oid })
        .then(function () {
            $scope.loadNotes();
            $scope.selected = null;
        });
};
The Restangular put() performs the following request:
PUT /rhnedb/notes/<noteid> <data.json>
Note the argument {“If-Match”: $scope.selected._etag.$oid}
This adds the If-Match request header with the values of the note property _etag.$oid. RESTHeart implements the Entity Tag optimistic concurrency control protocol: existing resources can be modified only specifying the correct ETag in this header, otherwise 409 Conflict or 412 Precondition Failed return error codes are returned. This makes sure that clients do not modify a resource that has been already modified by another client, leading to the so called ghost writes. More information on ETag documentation section.
The “Delete” button allows to delete the selected note.
The Restangular remove() performs the following request:
DELETE /rhnedb/notes/<noteid>
Of course, the If-Match header needs to be added to DELETE requests as
well.
As soon as the Restangular promise gets fulfilled, the notes list is reloaded (see the argument of the function then()).
Stopping and restarting
You should always stop RESTHeart before MongoDB. If you are running Docker:
Stop Docker containers
$ docker stop restheart
$ docker stop mongodb
You should start MongoDB before RESTHeart. You can decide to delete and recreate the Docker containers. If you delete and re-create the MongoDB container then all data will be lost. If you want to prevent this, then you can start it again:
Start an existing Docker container
$ docker start mongodb
On the other hand, RESTHeart is fully stateless, so it’s recommended to always remove and re-create the RESTHeart container from scratch.
Remove and re-run a Docker container
$ docker rm restheart
$ docker run -d -p 8080:8080 --name restheart --link mongodb:mongodb softinstigate/restheart
Conclusions
We built a nice Web application, using some interesting technologies: Docker, Yeoman, AngularJS and Restangular to name few and MongoDB and RESTHeart of course.
We shown how to install a development environment and we described how the AngularJS Web application is organized looking at how the controllers interoperate with the server using the Restangular service.
We spent little time on MongoDB and RESTHeart and this poses us a question: why this application requires zero effort for server side development still providing a robust and scalable implementation?
The answer relies on the architecture that builds on top of the MongoDB schemaless, NoSQL database and its companion RESTHeart: in fact, from a development prospective, RESTHeart is not yet another way of implementing Web APIs, rather it connects to MongoDB and automatically exposes data model APIs (to create databases, collections, indexes, etc) and data API (to create, get, update and delete documents); thus there is no need for any server side development.
Of course, a real case enterprise application needs more than what we have shown in this post: fine grained access control, user base management, relationship management, the ability to inject server side business logic, resource representation transformations, and schema check and enforcement, to name few. Notably, RESTHeart provides all these features, leading to cut down development costs but still achieving enterprise grade quality in terms of robustness, scalability and maintainability.
At SoftInstigate, the company behind RESTHeart, we have developed complex Web applications based on RESTHeart, and after years of struggling with ever complicating application servers, we having proved on the ground that developing with the HATEOAS tools can make development funny again.
References
- RESTHeart: https://restheart.org
- RESTHeart documentation: https://restheart.org/docs/v3/
- MongoDB CRUD Introduction: https://docs.mongodb.org/manual/core/crud-introduction/
- Docker containers for RESTHeart and MongoDB: https://registry.hub.docker.com/u/softinstigate/restheart/
- REST - Representational state transfer: https://en.wikipedia.org/wiki/Representational_state_transfer
- HATEOAS - Hypermedia as the Engine of Application State: https://en.wikipedia.org/wiki/HATEOAS
- HAL Browser - API browser for the hal+json media type: https://github.com/mikekelly/hal-browser
- RESTful API Memo: PUT and POST Differences: https://maurizioturatti.com/blog/2012/11/13/restful-api-memo-put-and-post/
- Boot2Docker - lightweight Linux distribution made specifically to run Docker containers. https://github.com/boot2docker/boot2docker
- Linking Docker containers together. https://docs.docker.com/userguide/dockerlinks/